

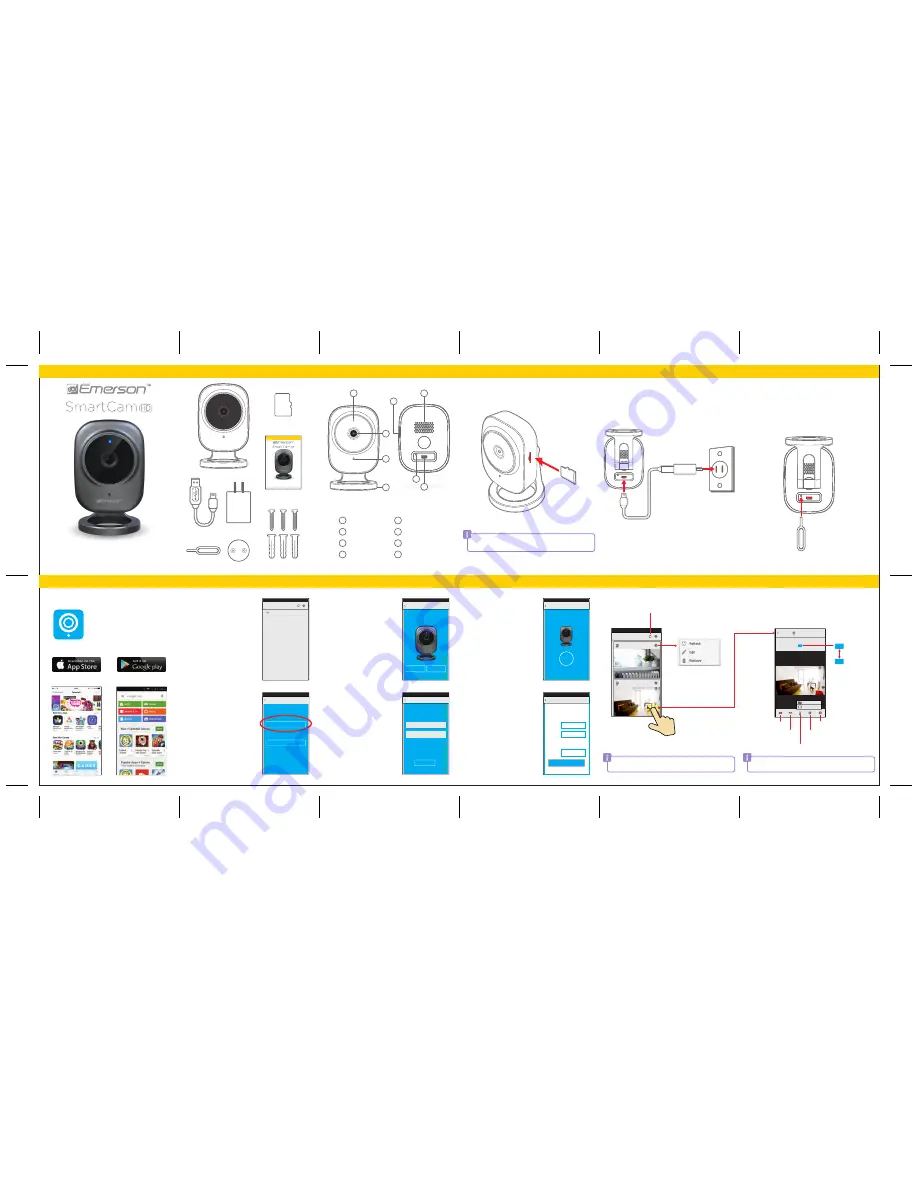
FRONT
Camera list
Camera 1
Camera 2
Location of controls
Setting up the camera
App features
USB Cable
Adaptor
Reset Pin
Anchors & screws
User Guide
FRONT
BACK
USB cable
Adaptor
SmartCam
Micro SD card
Power outlet
Reset pin
Micro SD card
SmartCam
Metal base
LED indicator
1
Micro SD card slot
5
Magnet base
4
Micro USB port
8
Microphone
3
Reset button
7
Camera
2
Speaker
6
Take snapshots
Access camera settings
View Recording history &
Local albums
Use camera microphone
Record videos
Live camera feed
Camera list
1
7
6
3
2
Keep your camera unplugged when inserting or ejecting a
Micro SD card.
If your camera is disconnected, reconnect the camera and wait
for the blue LED indicator to remain constant.
Rotate your device to view your camera in landscape mode.
User Guide
EVC510
Camera list
Add a camera
Next
Connect camera to Wi-Fi
Enter the Wi-Fi name and password that
your device is connected to.
Wi-Fi name
Wi-Fi password
No
Yes
Is the blue indicator light flashing rapidly?
Connecting
Connecting to Wi-Fi...
2%
Status: Online
Condition: Good
Display: 1280X720
Camera 1
Local album
Recording history
HD
Password must be at least 8 characters
and include an uppercase letter, a
lowercase letter, and a number.
Please name the camera and create a
password.
Finish
Camera name:
Camera 1
••••••••
Password:
Confirm
password:
User Guide
EVC510
8
4
In the box
Insert the included 8GB Micro SD card into your SmartCam’s Micro
SD card slot. (SmartCam supports up to 32GB of storage.)
4. The name of the Wi-Fi network will
automatically be filled in. Enter the
Wi-Fi password or leave it blank if
there is none, then tap “Next.”
2. Select “Set up camera.”
Before proceeding, make sure your
device is connected to a Wi-Fi
network.
1. After installing SmartCam Pro,
launch the app and tap “Add a
camera.”
3. Make sure the blue LED indicator is
blinking rapidly before connecting.
If it is not, reset your camera (see
“Reset camera”).
5. Wait for your camera to connect to
the Wi-Fi network. If your camera
fails to connect, reset the camera
and repeat all the steps.
6. After a successful connection, you
will be prompted to create a name
and password for your camera.
Your password must meet the
following requirements:
- At least 8 characters long
- Contain a number
- Contain an uppercase letter
- Contain a lowercase letter
Camera list
A preview of your SmartCam will appear on the home screen.
Live camera feed
View and hear your SmartCam’s live camera feed directly from your
device. The Live camera feed can be viewed from several connected
devices simultaneously.
Inserting Micro SD card
Installing camera
1. Plug the USB cable into the back of the camera.
2. Attach the other end of the cable into the included adaptor to
connect to a power outlet, or plug the USB cable directly into a
computer.
3. Wait 30 seconds for the camera to boot up.
4. Camera must be reset after it starts up for the first time (see “Reset
camera” on the right). If this is not the first time booting the camera,
skip this step.
Reset camera
Downloading SmartCam Pro app
1. Insert the reset pin into the reset button on the back of the camera
as shown below.
2. Press and hold the pin down for 5 seconds.
3. Wait for the camera to reboot and for the LED indicator to start
blinking rapidly.
Open the App Store or Google Play store on your device and search
for “SmartCam Pro”, then download and install the app.
The SmartCam Pro app is compatible with:
• iOS 6.0 and later
• Android 2.2 and later
Refresh all the camera previews at once
Refresh, edit, or remove a camera.
Tap the preview screen to view
the live camera feed.
HD
Reconnect your camera
Set up camera
Setup
Set up a new camera, or relocate an existing
camera to a new Wi-Fi network.
Connect or search for an existing camera.
Tap to change resolution
SD
640X360
1280X720
5
SmartCam Pro
8GB


