

User Guide
EM6130
Digital
Cordless
Phone
_
triple handset answering system
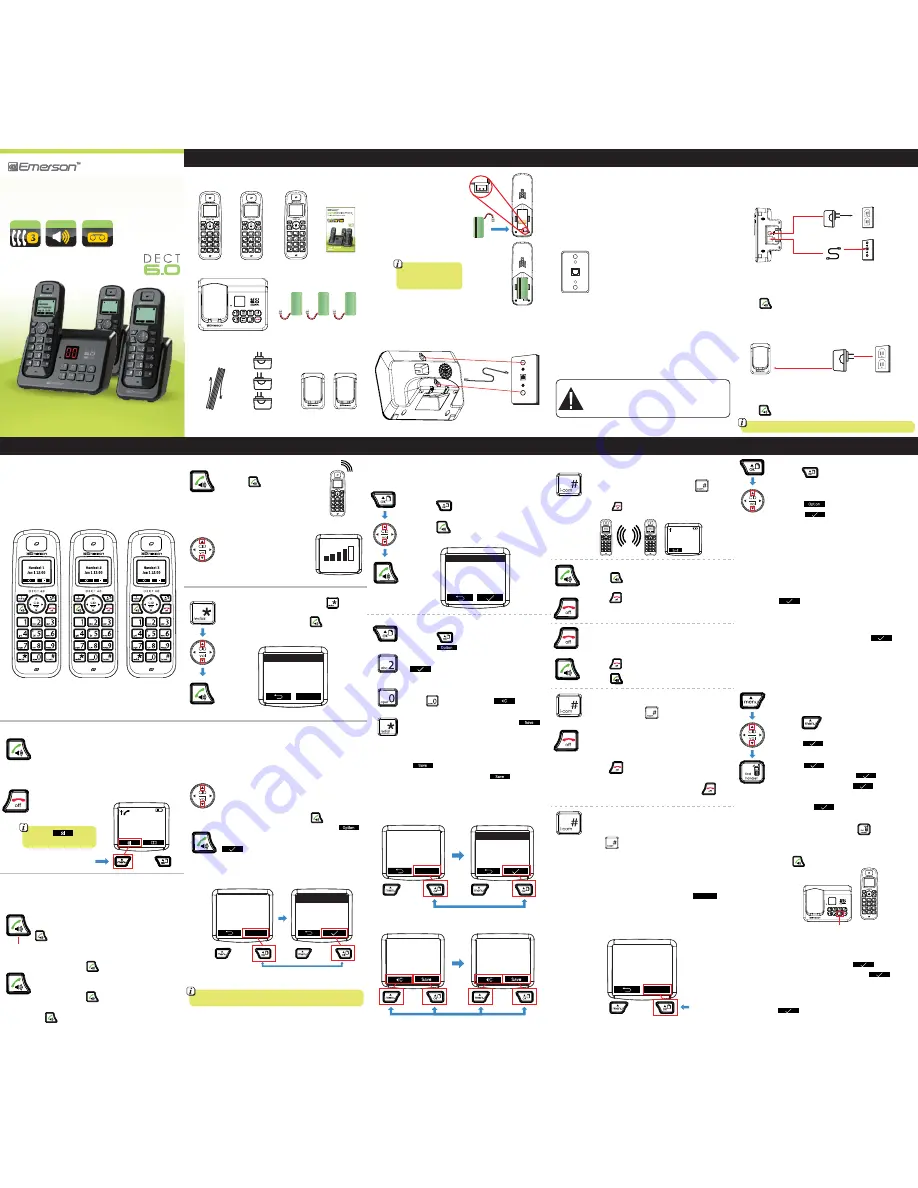
Installing the battery
1. Open the battery cover.
2. Plug the battery connector securely
into the socket inside the handset
battery compartment. Be sure to
match the colors as shown in figure 1.
3. Insert the battery as shown in figure 2.
4. Close the battery cover.
5. Place the handset on the base
to charge.
Wall Mounting
To mount your telephone on a wall plate (not included),
follow the instructions below:
1. Plug the line cord into a modular phone jack.
2. Align the holes on the base and / or cradles with the mounting studs on
the wall plate.
3. Pull the base down onto the studs until the telephone is secure.
Base
Line Cord
wall plate
Cradle 1
(3) Rechargeable
Batteries
(3) AC
Adaptors
Figure 1
Figure 2
Before using for the
first time, charge the
handset for 12-16 hours
Additional handsets
It is possible to register up to 5 handsets to the base (3 handsets are
included) additional handsets may be purchased separately. If you
would like to purchase additional handsets, please contact our customer
service department at: 1-877-768-8483 (Toll Free) or [email protected]
Adding numbers to the phonebook:
1.
Press the button to open the phonebook.
2.
Press the softkey, and select “New Entry”
from the phonebook options screen and press the
softkey.
3.
Use the handset keypad to enter a name for the entry
by multi-pressing a key until the desired letter is displayed.
4. Press to add a space and the softkey to
to make a correction.
5. When finished entering the name, press the
softkey.
6. Enter the number using the handset keypad.
7. When finished entering the number, press the
softkey.
8. Select a ring tone and press the softkey to
save the number in the phonebook.
9. It is possible to edit and delete numbers in the
phonebook from the phonebook options screen.
CONF
conference screen
Handset 1
Handset 2
Standby Screen
small letters /
capital letters
add space
multi-press
for a,b, or c
phonebook screen
John Smith
Mike Hayes
Paul Williams
Angela Dotson
Option
phonebook options screen
New Entry
Edit Entry
Show Details
Delete Entry
entry screen (name)
Name: abc
John Smith
Number:
entry screen (number)
Handset 1
Soft Keys
Soft Keys
Soft Key
Phonebook
The phone can store up to 50 names and numbers in its phonebook.
Caller information may be saved from the received calls in the Caller ID
memory (see "Reviewing Caller ID information"), or entered manually.
John Smith
Mike Hayes
Paul Williams
Angela Dotson
phonebook screen
Dialing a number from the phonebook:
1. Press the button to open the phonebook.
2. Use the
▲
and
▼
buttons to navigate up or down.
3. Press the button to dial the selected number.
Press the soft key
to mute or disable mute
• answer a call
• start a call
• dial a number from the phonebook or Caller ID history
• activate / deactivate speakerphone
Answer calls
• end a call
• in the menu, escape to
the standby screen
00:30
talk screen
Mute Soft Key
To answer an incoming call while having a conversation:
After you hear the Call Waiting tone, press and release the
button. The first call is placed on hold and the second
call is answered.
To return to the first call and put the second call on hold:
Press and release the button again to return to the
first call, the second call will be put on hold.
To activate Three Way Calling:
Press and release the button while on the first call,
you will hear a dial tone. Dial a second number, and press
the button again to connect the two calls.
Call Waiting / Flash
The Flash feature is used to activate calling services available through your local phone
company, such as Call Waiting, and Three Way Calling. To use the features below you
must subscribe to these services from your local telephone company.
press to
flash
volume screen
•
to use the speakerphone,
press the button,
this can be done before
or during a call
• during a call or while using
the speakerphone, use the
▲
and
▼
buttons to increase
or decrease the volume
Volume
You can delete a number, or all numbers from the Caller ID history in
the Caller ID options screen
Reviewing Caller ID information:
• In the standby mode, use the
▲
and
▼
buttons to
review the Caller ID history
• you can select a number and press to dial it
• to save a number to the phonebook, press the
softkey and then select “Save Number” and press the
softkey to confirm and save
Caller ID / Call Waiting Caller ID
IMPORTANT: In order to use this unit’s Caller ID features, you must subscribe to
either the standard Name/Number Caller ID Service or Call Waiting Caller ID Service
from your local telephone company.
This telephone automatically displays an incoming caller’s name and telephone
number, as well as the date and time of the call. It can record and store the
information of up to 30 calls into the phone’s Caller ID memory.
EMERSON
877-768-8483
Aug 20 12:30
New
Option
Save Number
Delete
Delete All
Caller ID screen
Caller ID options screen
Soft Keys
• to redial a number, press and
HOLD
the
button,
then use the
▲
and
▼
buttons to select from a list of
recently dialed numbers, and press to make the call
redial screen
Option
555-555-1111
555-555-2222
555-555-3333
555-555-4444
Redial
The handset / Using the phone
Speaker
End calls
Receiving an intercom (internal) call
1. Press to accept the internal call.
2. During the call, the handset number of the caller is displayed.
3. Press to hang up.
Intercom
1. To use the intercom, press and
HOLD
the button.
2. Dial the number of the handset you would like to call.
3. Press to end the intercom (internal) call.
Using multiple handsets
Internal_
intercom screen
Receiving an external call during an intercom
(internal) call
If you receive an external call during an internal call, a call
waiting tone (double beep) will be heard on both handsets.
1. Press to end the internal call.
2. Press to accept the external call.
Transferring a call to another handset
1. Press and
HOLD
the button.
2. Dial the number of the handset you would like to transfer
the call to.
3. If the handset dialed answers, you can have an internal
conversation.
4. Press to end the internal conversation and transfer
the call.
5. If the handset dialed does not answer, press to
speak to the external caller again.
Conference call (2 internal handsets and an
external caller)
1. While on the line with an external caller, press and
HOLD
the button (the external line is put on hold).
2. Dial the number of the handset you would like to include
in the call.
3. If the handset dialed answers, press the soft
key to merge the calls.
CONF
Connecting
Handset 1
1. Plug one end of the line cord into the jack on the bottom of the phone’s
base, and the other end into a modular phone jack.
2. Plug the pin of the AC adaptor into the DC6V jack on the bottom of the
base as shown above, and plug into a standard AC outlet.
3. The handset will display “Searching”, wait until “Handset 1” is displayed.
4. Press on the handset and confirm you hear the dial tone.
Handsets 2 & 3
1. Plug the pin of the AC adaptors into the DC6V jack on the bottom of the
cradles and plug into standard AC outlets.
2. The handset will display “Searching”, wait until “Handset 2” &
“Handset 3” is displayed.
3. Press on the handset and confirm you hear the dial tone.
modular phone jack
line cord
AC adapter
Handsets 2 & 3 cradles
AC Outlet
insert here
Handsets 2 & 3 do not require telephone jacks
Modular Telephone
Line Jack
CAUTION: Disconnect the phone cord from the
wall outlet before installing or replacing the
batteries. (Only for telephones which require
batteries)
Rechargeable battery warning
●
This equipment contains a rechargeable battery.
●
Rechargeable batteries are known to the State of California to cause cancer.
●
Do not short-circuit the battery.
●
The rechargeable batteries contained in this equipment may explode if
disposed of in a fire.
●
Do not charge the battery used in this equipment in any charger other
than the one designed to charge this battery as specified in the owner’s
manual. Using another charger may damage the battery or cause it to explode.
Telephone jack requirements
Important installation information
●
Never install telephone wiring during a lightning storm.
●
Never touch uninsulated telephone wires or terminals, unless the
telephone line has been disconnected at the network interface.
●
Use caution when installing or modifying telephone lines.
●
Never install telephone jacks in wet locations unless the jack is specifically
designed for wet locations.
●
Temporarily disconnect any equipment connected to the phone, such as
faxes,other phones, or modems.
To use this phone, you must have an RJ11C modular
telephone jack. If you do not have a modular jack,
please call your local telephone company to find out
how to get one installed.
Getting started
In the box
Adding a new handset
The two handsets that are included in this package are
already registered, use the steps below to register new
handsets only.
1.
Press the button to enter the menu.
2.
Use the
▲
and
▼
buttons and select “Handset” and
press the softkey.
3.
Use the
▲
and
▼
buttons and select “Registration” and
press the softkey.
4. Select “Register” and press the softkey.
5. Select “Base 1” and press the softkey.
6. When “System PIN:” appears on the display enter
0000
and press the softkey.
7. When “Press And Hold Page Key On Base” appears on
the display, press and
HOLD
the button on the
base (approximately 30 seconds) until “Handset 4, or 5”
appears on the display.
8. Press on the handset and confirm you hear the dial tone.
Removing a handset
Use to remove handsets that are damaged.
1. Follow steps 1-3 (above).
2. Select “De-register”and press the softkey.
3. Enter system pin
0000
and press the softkey.
4. When “Select HS” appears enter the handset number
of the handset you would like to remove (it must be a
handset other then the one you are using) and press the
softkey. “Not Registered” will appear on the
removed handset.
press and hold to register the handset
Copy a phonebook entry to another handset
1. Press the button to open the phonebook.
2. Search by entering the first letter of the desired name
or use the
▲
and
▼
buttons to navigate up or down.
3. Press the softkey and select “Copy Entry” and
press the softkey.
or
Select “Copy All” to copy all entries from one handset to
another (this will erase all the information on the destination
handset).
or
Select “Copy-Merge” to copy all entries from one handset
to another (the information on the destination handset is
not deleted).
4. The available handsets are displayed, use the
▲
and
▼
buttons to select the correct handset and press the
softkey to confirm.
5. “Copying to Handset” is displayed, and “Receive Phone
book Record?” appears on the display of the destination
handset.
6. On the destination handset, press the softkey
to confirm.
Handset 2
Handset 3
User Guide
AC adapter
AC Outlet
Handset 3
Speakerphone
Digital
THIS SIDE UP
THIS SIDE UP
THIS SIDE UP
Cradle 2
Handset 2
Aug 19 12:30
Handset 3
Aug 19 12:30
Includes
3 handsets
Handset 1


