
IMPORTANT:
Do not connect the telephone into the wall jack
while setting up the Caller ID menu because an incoming call
may invalidate the information not yet saved.
1. Press and hold the
[dial]
button until the display shows
“SET ◄ OR ►”.
2. Use the
[▲] or [▼]
buttons to scroll through the options below,
and press the
[dial]
button to select the desired option you wish
to set.
●
DATE/TIME
●
LOCAL AREA CODE
●
REGIONAL AC’S-1
●
SELECT LANGUAGE
●
T/P DIAL MODE
●
EXIT SETUP
NOTE: Press the [flash] button to exit the setup menu, or the
phone will exit automatically if there is no operation within
20 seconds and return to the “NO CALLS” screen.
DATE AND TIME
The date and time is programmed automatically when the first
Caller ID record is received. It is also possible to set the date and
time manually if desired.
1. Press and hold the
[dial]
button until the display shows
“SET ◄ OR ►”.
2. Use the
[▲] or [▼]
buttons and select
“DATE/TIME”
and
press the
[dial]
button to enter.
3. Use the
[▲] or [▼]
buttons to set the hour, minute, AM/PM,
month, and day.
4. Press the
[dial]
button to confirm your selections.
LOCAL AREA CODE
The telephone uses the programmed area code to determine the
number format to display when receiving Caller ID information.
It is also used for the dial back feature.
Modular wall phone jack
Base TEL LINE jack
Straight telephone cord
Coil cord jack (handset)
Coil cord jack (base)
DESK MOUNTING
1. Connect the coil cord to the handset and base as shown in the
diagram below.
2. Plug one end of the straight line cord into the jack at the bottom
of the phone’s base, and the other end into a modular wall
telephone jack.
3. Pick up the handset and confirm you hear the dial tone.
WALL MOUNTING
To mount your telephone on a wall plate (not included), follow the
instructions below:
1. Plug the straight line cord into a modular wall phone jack.
2. Align the holes on the base with the mounting studs on the wall
plate.
3. Pull the base down onto the studs until the telephone is secure.
● If you will not be using the phone for a long
period of time, remove the batteries to
prevent possible leakage and corrosion.
4. Replace the covers.
5. Re-connect the line cord to the modular
wall jack.
NOTE:
● D
o not mix old and new batteries.
“AA” size battery
+ AA 1.5V —
Battery compartment covers
+ AA 1.5V
—
+ AA 1.5V
—
+ AA 1.5V
—
+ AA 1.5V
—
This telephone requires 4 AA-size alkaline batteries to operate the
Caller ID and memory functions.
1. Make sure that the telephone is
disconnected from the wall jack.
2. Remove the battery compartment
covers located at the bottom of
the unit’s base.
3. Install 4 AA- size batteries
(not included) as shown on the
diagram.
Delete
Button
Dial
Button
Caller ID Display
Scroll Up Button [▲]
Memo Button
Scroll Down Button [▼]
Lighted Ring Indicator
Mute Button
Auto Button
Volume Control
Flash Button
Keypad
Hook Switch
Redial Button
Ringer On/Off
ON OFF
Normal High
OWNER’S MANUAL
COILED
HANDSET CORD
STRAIGHT TELEPHONE
LINE CORD
TELEPHONE BASE
HANDSET
CAUTION: Disconnect the phone cord from the
wall outlet before installing or replacing the
batteries. (Only for telephones which require
batteries)
● Ne
ver install telephone wiring during a lightning storm.
●
Never touch uninsulated telephone wires or terminals, unless
the telephone line has been disconnected at the network
interface.
●
Use caution when installing or modifying telephone lines.
●
Never install telephone jacks in wet locations unless the jack is
specifically designed for wet locations.
● Temporarily disconnect any equipment
connected to the phone,
such as faxes, other phones, or modems.
Modular Telephone
Line Jack
To use this phone, you must have an RJ11C
modular telephone jack. If you do not have
a modular jack, please call your local
telephone company to find out how to get
one installed.
SAVE THESE INSTRUCTIONS
For products that require batteries
Important battery precautions
● Use only the type of battery specified in this user manual
● Batteries may present a risk of fire, explosion, or chemical burn
if abused. Do not try to charge a battery that is not intended to
be recharged.
● Do not dispose of the battery(ies) in a fire. They may explode.
Check with local codes for disposal instructions.
● Non-rechargeable batteries,
such as alkaline batteries, may leak
if left in your product for a long period of time. Remove the
batteries from the product if you are not going to use it for a
month or more.
●
If your product uses more than one battery, do not mix types and
make sure they are inserted correctly. Mixing different types of
batteries or inserting them incorrectly, may cause them to leak.
● Discard any leaky or deformed battery
immediately. Leakage
from battery acid can cause skin burns or other personal injury.
●
Please help to protect the environment by recycling or disposing
of batteries according to federal, state, and local regulations.
NOTE: Some of the precautions below may not apply to your
product, e.g.: Battery and power cord precautions.
When using your telephone equipment, basic safety precautions
should always be followed to reduce the risk of fire, electric shock
and injury, including the following:
1. Read and understand all instructions.
2. Follow all warnings and instructions marked on the product.
3. Unplug this product from the wall outlet before cleaning. Do not
use liquid or aerosol cleaners. Use a damp cloth for cleaning.
4. Do not use this product near water (for example, near a bath
tub, kitchen sink or swimming pool).
5. Do not place this product on an unstable surface.
6. Slots and openings in the back or bottom of this product are
provided for ventilation. To protect them from overheating,
these openings must not be blocked by placing the product on
a soft surface such as a bed, sofa or rug. This product should
never be placed near or over a radiator or heat register. This
product should not be placed in any area where proper
ventilation is not provided.
7. Never push objects of any kind into the ventilation slots of this
product as they may touch dangerous voltage points or create
a short circuit that could result in a risk of fire or electric shock.
Never spill liquid of any kind on the product.
8. Use only the power cord and batteries indicated in this manual.
9. This product should be operated only from the type of power
source indicated on the marking label. If you are not sure of the
type of power supply in your home, consult your dealer or local
power company.
10. Plug the adaptor to the socket - outlet that is closest to the
equipment and which is easily accessible.
11. Do not allow anything to rest on the power cord. Do not install
this product where the cord may have anyone walking on it.
12. To reduce the risk of electric shock, do not disassemble this
product, but take it to an authorized service facility. Opening
or removing parts of the telephone base or handset other than
specified access doors may expose you to dangerous voltages
or other risks. Incorrect reassembling can cause electric shock
when the product is subsequently used.
13. Do not overload wall outlets and extension cords as this can
result in the risk of fire or electric shock.
14. The power adapter is intended to be correctly oriented in a
vertical or floor mount position. The prongs are not designed
to hold the plug in place if it is plugged into a ceiling or an
under-the-table/cabinet outlet.
15. Unplug this product from the wall outlet and refer servicing to
an authorized service facility under the following conditions:
A. When the power supply cord or plug is damaged or frayed.
B. If liquid has been spilled onto the product.
C. If the product has been exposed to rain or water.
D. If the product does not operate normally by following the
operating instructions. Adjust only those controls that are
covered by the operating instructions, as improper
adjustment of other controls may result in damage and often
requires extensive work by an authorized technician to
restore the product to normal operation.
E. If the product has been dropped and damaged.
F. If the product exhibits a distinct change in performance.
16. Avoid using a telephone (other than cordless) during an
electrical storm. There is a remote risk of electric shock from
lightning.
17. Do not use the telephone to report a gas leak in the vicinity of
the leak.
18. Do not dispose of batteries in a fire. They may explode.
Check with local codes for possible special disposal
instructions.
CAUTION:
When using telephone equipment,
there are basic safety instructions that should
always be followed. Refer to the
IMPORTANT
SAFETY INSTRUCTIONS
provided with this
product and save them for future reference.
Rating plate and caution marking are marked on the bottom
enclosure of the apparatus.
WARNING
:
TO
PREVENT
FIRE
OR
ELECTRICAL
SHOCK
HAZARD
,
DO
NOT
EXPOSE
THIS
PRODUCT
TO
RAIN
OR
MOISTURE
.
CAUTION
RISK
OF
ELECTRIC
SHOCK
DO
NOT
OPEN
WARNING
:
TO
REDUCE
THE
RISK
OF
ELECTRIC
SHOCK
,
DO
NOT
REMOVE
COVER
(
OR
BACK
).
NO
USER
SERVICEABLE
PARTS
INSIDE
.
REFER
SERVICING
TO
QUALIFIED
SERVICE
PERSONNEL
.
The lightning flash with
arrowhead symbol, within
an equilateral triangle, is
intended to alert the user
to the presence of uninsu-
lated “dangerous voltage”
within the product’s
enclosure that may be of
sufficient magnitude to
constitute a risk of electric
shock to persons.
The exclamation point
within the equilateral
triangle is intended to alert
the user to the presence of
important operating and
maintenance (servicing)
instructions in the literature
accompanying the product.
service. The telephone company is required to notify you before
interrupting service. If advance notice is not practical, you will be
notified as soon as possible. You will be given the opportunity to
correct the problem and the telephone company is required to
inform you of your right to file a complaint with the FCC. Your
telephone company may make changes in its facilities, equipment,
operation, or procedures that could affect the proper functioning
of this product. The telephone company is required to notify you if
such changes are planned.
This telephone system meets FCC Standards for
Hearing Aid Compatibility.
Your telephone equipment is approved for connection to the Public
Switched Telephone Network and is in compliance with parts 15
and 68, FCC Rules and Regulations and the Technical
Requirements for Telephone Terminal Equipment published by
ACTA.
FCC Part 15
This equipment has been tested and found to comply with the
requirements for a Class B digital device under Part 15 of the
Federal Communications Commission (FCC) rules. These
requirements are intended to provide reasonable protection
against harmful interference in a residential installation. This
equipment generates, uses and can radiate radio frequency
energy and, if not installed and used in accordance with the
instructions, may cause harmful interference to radio
communications. However, there is no guarantee that interference
will not occur in a particular installation. If this equipment does
cause harmful interference to radio or television reception, which
can be determined by turning the equipment off and on, the user
is encouraged to try to correct the interference by one or more of
the following measures:
● Re-orient or relocate the receiving antenna.
● Increase the separation between the equipment and receiver.
● Connect the equipment into an outlet on a circuit different from
that to which the receiver is connected.
● Consult the dealer or an experienced radio/TV technician for
help.
Do not attempt to repair or modify this equipment.
Warning:
Changes or modifications to this equipment not expressly
approved by the party responsible for compliance could void the
user’s authority to operate the equipment.
FCC Part 68 and ACTA
This equipment complies with Part 68 of the FCC rules and with
technical requirements adopted by the Administrative Council for
Terminal Attachments (ACTA). The label on the back or bottom of
this equipment contains, among other things, a product identifier
in the format US:AAAEQ##TXXXX. This identifier must be
provided to your local telephone company upon request.
The plug and jack used to connect this equipment to premises
wiring and the telephone network must comply with applicable
Part 68 rules and technical requirements adopted by ACTA.
A compliant telephone cord and modular plug is provided with this
product. It is designed to be connected to a compatible modular
jack that is also compliant. An RJ11 jack should normally be used
for connecting to a single line and an RJ14 jack for two lines.
The Ringer Equivalence Number (REN) is used to determine how
many devices you may connect to your telephone line and still
have them ring when you are called. The REN for this product is
encoded as the 6th and 7th characters following the US: in the
product identifier (e.g., if ## is 03, the REN is 0.3). In most, but not
all areas, the sum of all RENs should be five (5.0) or less. For
more information, please contact your local telephone company.
This equipment may not be used with Party Lines. If you have
specially wired alarm dialing equipment connected to your
telephone line, ensure the connection of this equipment does not
disable your alarm equipment. If you have questions about what
will disable alarm equipment, consult your telephone company or
a qualified installer.
If this equipment is malfunctioning, it must be unplugged from the
modular jack until the problem has been corrected. Repairs to this
telephone equipment can only be made by the manufacturer or it’s
authorized agents. For repair procedures, follow the instructions
outlined under the Limited Warranty.
If this equipment is causing harm to the telephone network, the
telephone company may temporarily discontinue your telephone
Model EM-2517
Slimline Caller ID Phone
FCC and telephone company information
OWNER’S MANUAL
Important safety instructions
Telephone jack requirements
Connecting
Setting up the Caller ID menu
Important installation information
In the box
Location of controls
Location of controls
1. Press and hold the
[dial]
button until the display shows
“SET ◄ OR ►”.
2. Use the
[▲] or [▼] buttons
and select
“LOCAL AREA CODE”
and press the
[dial]
button to enter.
3. Use the [▼] button to select the first digit and press the [▲]
button to confirm and skip to the next digit.
4. Use the
[delete]
button to edit, and press the
[dial]
button to
confirm.
5. Use the same method to set the rest of the digits.
NOTE: You can also use the keypad to set the area code.
REGIONAL AREA CODES
Similar to programming local area codes, programmed regional
area codes allow the phone to determine the number format to
display when receiving Caller ID information. Calls matching any
of the programmed regional area codes are displayed as 10 digits.
This is helpful for areas that have multiple or overlapping area
codes that require 10 digit dialing.
1. Press and hold the
[dial]
button until the display shows
“SET ◄ OR ►”.
2. Use the
[▲] or [▼] buttons
and select
“REGIONAL AC’S-1”
and press the
[dial
] button to enter.
3. Use the [▼] button to select the first digit and press the [▲]
button to confirm and skip to the next digit.
4. Use the
[delete]
button to edit, and press the
[dial]
button to
confirm.
5. Use the same method to set the rest of the digits. Up to 6
regional area codes may be programmed.
NOTE: You can also use the keypad to set the regional area
codes
.
SELECT LANGUAGE
This setting allows you to choose the language for the display
information.
1. Press and hold the
[dial]
button until the display shows
“SET ◄ OR ►”.
2. Use the
[▲] or [▼] buttons
and select
“SELECT LANGUAGE”
and press the
[dial]
button to enter.
3. Use the
[▲] or [▼] buttons to select the desired language.
4. Press the
[dial]
button to confirm.
TONE / PULSE DIAL MODE
Choose Tone or Pulse dialing.
1. Press and hold the
[dial]
button until the display shows
“SET ◄ OR ►”.
2. Use the
[▲] or [▼] buttons
and select
“T/P DIAL MODE”
and
press the
[dial]
button to enter.
3. Use the
[▲] or [▼] buttons to select the desired dial mode.
4. Press the
[dial]
button to confirm.
EXIT SETUP
When
“EXIT SETUP”
is displayed press the
[dial]
button exit.
SWITCHING THE RINGER ON OR OFF
Slide the ringer switch to the
“OFF”
position to turn the ringer
off. The ringer will not be activated by any incoming calls. Don’t
forget to turn the ringer
“ON”
when you are ready to receive calls,
otherwise you will not hear the ringing sound during incoming calls.
NOTE: When the ringer switch is in the “OFF” position, the lighted
ring indicator will still alert you to incoming calls.
ADJUSTING THE HANDSET VOLUME
To adjust the handset volume
use the switch located on the
right side of the handset.
REDIAL
To redial the last number called use the redial feature. This feature
is useful when the number you are calling is busy.
1. Pick up the handset.
2. Press the
[redial]
button.
3. The last number called is redialed.
FLASH
The Flash feature is used to activate calling services available
through your local phone company, such as Call Waiting, and
Three Way Calling. To use the features below you must subscribe
to these services from your local telephone company.
To answer an incoming call while having a conversation:
After you hear the Call Waiting tone, press and release the
[flash]
button. The first call is placed on hold and the second call is
answered.
To return to the first call and put the second call on hold:
Press and release the
[flash]
button again to return to the first
call, the second call will be put on hold.
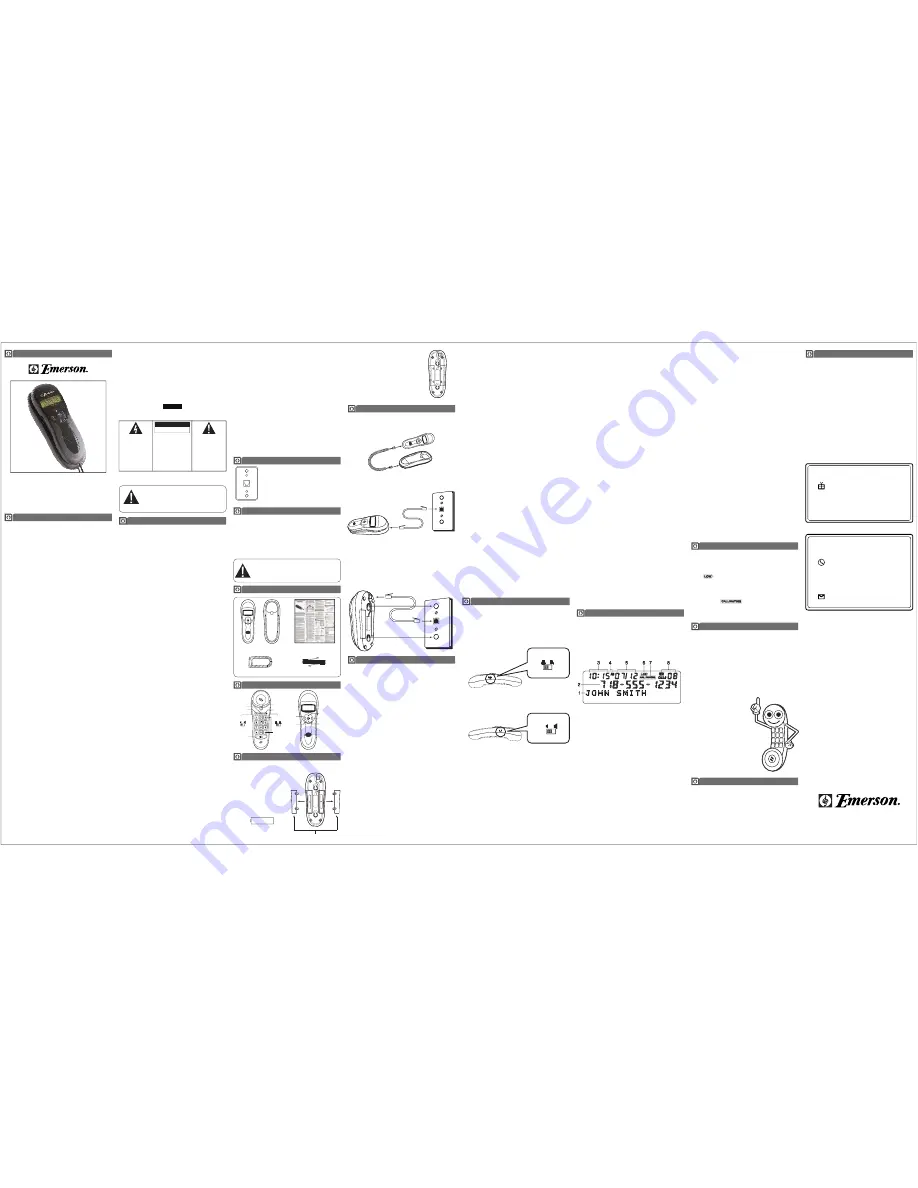
1. Name
2. Number
3. Time
4. AM / PM
5. Date
6. Low Battery Indicator
7. Call Waiting indicator
8. New Calls
Call Waiting Caller ID
Provided you subscribe to Call Waiting Caller ID service from
your phone company; if you receive an incoming call while on the
phone, a beep will indicate the presence of a Call Waiting call on
the line. The Call Waiting Caller ID information will be displayed
and stored in the Caller ID memory.
NOTE: When you hear the Call Waiting beep, press the [flash]
button to put the current call on hold and answer the
incoming call. Press the [flash] button again to return
to the original call.
Receiving Caller ID information
When you receive a call, the caller’s information is displayed,
allowing you to decide whether or not to answer the call. If you are
away from home or unable to answer the phone, the information
for up to 90 of the most recent calls will be stored into the
telephone’s Caller ID memory. When receiving the 91st call, the
oldest Caller ID record will be deleted.
Reviewing Caller ID information
To review the information of your received calls which are stored
in the phone’s Caller ID memory, use the [▲] or [▼] buttons.
IMPORTANT:
In order to use this unit’s Caller ID features,
you must subscribe to either the standard Name/Number
Caller ID Service or Call Waiting Caller ID Service from your
local telephone company.
This telephone automatically displays an incoming caller’s name
and telephone number, as well as the date and time of the call.
It can record and store the information of up to 90 calls into the
phone’s Caller ID memory.
1. Pick up the handset.
2. Press the
[memo]
button, the display shows “M0-M9”.
3. Push the desired memory location (0-9) on the handset keypad,
and press the
[memo]
button to confirm.
4. Use the keypad to enter the telephone number and press the
[memo]
button to confirm.
5. Use the keypad to enter the name and press the
[memo]
button
to confirm and exit.
NOTE: Use the [redial] button to insert a pause when a delay is
needed in an automatic dialing sequence.
Changing a stored number
Repeat the storage sequence above, the new number will replace
the previously stored number at that memory location.
Dialing a stored number
1. Pick up the handset.
2. Press the
[auto]
button on the handset keypad.
3. Press a memory location (0-9) and the stored number will be
dialed automatically.
OR
1. Pick up the handset
2. Press the
[memo]
button.
3. Use the
[▲] or [▼] buttons
to select a memory location from
the display.
4. Press the
[dial]
button, to dial that number.
Copying a number from the Caller ID memory
You can copy a number from the Caller ID memory by following
the steps below.
1. Pick up the handset.
2. Use the
[▲] or [▼] buttons
to select a number from the Caller
ID memory list.
3. Press the
[memo]
button, and select a memory location (0-9)
from the keypad.
4. Press the
[memo]
button to confirm the memory location, press
the
[memo]
button again to confirm the number, and press the
[memo]
button a third time to confirm the name and exit.
Dialing back a number from Caller ID memory
When reviewing Caller ID information, you may dial back the
phone number displayed by pressing the
[dial]
button.
If the phone is ON the base:
1. Use the
[▲] or [▼] buttons
and select the number you would
like dialed from the Caller ID memory.
2. Press the
[dial]
button, the display shows
“PICK UP OR
ADJ”
.
3. Pick up the handset and the displayed number will be dialed
automatically.
NOTE: Depending on how the incoming caller’s phone number is
formatted when it’s received, and whether or not you
previously pre-programmed your local area code into the
setup menu, you may need to adjust the format of the
incoming caller’s stored phone number before making the
call. Press the [dial] button to scroll through different dialing
options (7, 10, or 11 digits).
If the phone is OFF the base:
1. Use the
[▲] or [▼] buttons
to select the number you would like
dialed from the Caller ID memory.
2. Press the
[dial]
button.
3. The display shows
“ADJUST”.
4. A three second timer begins allowing you to adjust the number
format to either 7, 10, or 11 digits depending on your local area
code, and calling region.
5. Press the
[dial]
button to scroll through the different dialing
options (7, 10, or 11 digits).
6. When the three second timer runs out, the displayed number
is called automatically.
NO CALLS
- The Caller ID memory is empty.
UNAVAILABLE
- The incoming call does not have Caller ID
service.
If “UNKNOWN CALLER”
appears along with a calling
number, the name information for that number is not available.
LOW
- The battery power is low, and the batteries need to
be replaced as soon as possible. Please remember to use alkaline
batteries, and do not mix old and new batteries.
BLOCKED CALL
- The incoming call is registered as a private
number, and Caller ID information is withheld.
CALL WAITING
- If you subscribe to Call Waiting
Caller ID Service, this icon flashes when you receive a call while
you are on the phone.
NEW CALL
- Indicates call or calls that have not been reviewed.
Follow the guidelines below to properly maintain this product:
● Avoid putting it near heating appliances and devices that
generate electrical noise (for example: motors or fluorescent
lamps).
● DO NOT expose to direct sunlight or moisture.
● Avoid dropping the unit and/or other rough treatment.
● Clean with a soft cloth.
● Never use a strong cleaning agent or abrasive powder because
this will damage the finish.
● Retain the original packaging in case you need to ship it at a
later date.
To activate Three Way Calling:
Press and release the
[flash]
button while on the first call, you will
hear a dial tone. Dial a second number, and press the
[flash]
button again to connect the two calls.
MUTE
To temporarily prevent the person on the other end of the line from
hearing your conversation, press the
[mute]
button. To deactivate
mute, press the
[mute]
button again.
MEMORY
This telephone can store up to 10 of your most frequently dialed
phone numbers.
Storing frequently called numbers
Deleting Caller ID information
1. Use the
[▲] or [▼] buttons to select the caller information you
wish to delete.
2. Press the
[delete]
button.
NOTE: To delete all Caller ID information, press and hold the
[delete] button until the display shows “ERASE ALL?”,
then press the [delete] button again to confirm. All Caller
ID records will be erased.
To turn the ringer
“ON”
or
“OFF”
,
use the switch located on the
left side of the handset.
Volume Control
Ringer On/Off
ON OFF
Normal High
www.emersonphones.com
Manufactured by Southern Telecom Inc. Brooklyn NY. 11232
© 2009 Southern Telecom Inc.
All rights reserved.
Emerson and the G-Clef logo are registered trademarks of
Emerson Radio Corp. Parsippany, New Jersey USA.
No dial tone
● Check all cabling, and telephone jack connections.
Phone does not ring
● Make sure the ringer switch is set to the
ON
position.
No display
● Replace batteries.
● Make sure the batteries are properly installed.
No information is shown after the phone rings
● In order to receive Caller ID records, you must subscribe to the
standard name and number Caller ID service available through
your local telephone company.
● Be sure to wait until the second ring before answering.
Other party cannot hear you
● Check if the
[mute]
button has
been accidently pressed, if so
press the
[mute]
button again to
deactivate the mute function.
●
Make sure the handset coil cord is
properly plugged in.
●
Check that extension phones are
on the hook at the same time
you’re using the phone. It is normal
for the volume to drop when
additional extension phones are
used at the same time.
Warranty service not provided
This warranty does not cover damage resulting from accident,
misuse, abuse, improper installation or operation, lack of reasonable
care, and unauthorized modification. This warranty is voided in the
event any unauthorized person opens, alters or repairs this product.
All products being returned to the authorized service center for
repair must be suitably packaged.
Limitation of Warranty:
●
THE WARRANTY STATED ABOVE IS THE ONLY WARRANTY
APPLICABLE TO THIS PRODUCT. ALL OTHER WARRANTIES,
EXPRESS OR IMPLIED (INCLUDING ALL IMPLIED WARRANTIES
OF MERCHANTABILITY OR FITNESS FOR A PARTICULAR
PURPOSE) ARE HEREBY DISCLAIMED. NO VERBAL OR
WRITTEN INFORMATION GIVEN BY SOUTHERN TELECOM INC.
IT’S AGENTS, OR EMPLOYEES SHALL CREATE A GUARANTY
OR IN ANY WAY INCREASE THE SCOPE OF THIS WARRANTY.
● REPAIR OR REPLACEMENT AS PROVIDED UNDER THIS
WARRANTY IS THE EXCLUSIVE REMEDY OF THE CONSUMER.
SOUTHERN TELECOM INC. SHALL NOT BE LIABLE FOR
INCIDENTAL OR CONSEQUENTIAL DAMAGES RESULTING
FROM THE USE OF THIS PRODUCT OR ARISING OUT OF ANY
BREACH OF ANY EXPRESS OR IMPLIED WARRANTY ON
THIS PRODUCT. THIS DISCLAIMER OF WARRANTIES AND
LIMITED WARRANTY ARE GOVERNED BY THE LAWS OF THE
STATE OF NEW YORK. EXCEPT TO THE EXTENT PROHIBITED BY
APPLICABLE LAW, ANY IMPLIED WARRANTY OF MERCHANTABILITY
OR FITNESS FOR A PARTICULAR PURPOSE ON THIS PRODUCT
IS LIMITED TO THE APPLICABLE WARRANTY PERIOD SET FORTH
ABOVE.
Some states do not allow the exclusion nor limitation of incidental
or consequential damages, or limitations on how long an implied
warranty lasts so the above limitations or exclusions may not
apply to you. This warranty gives you specific legal rights, and
you also may have other rights that vary from state to state.
The shipping address of the authorized service center is:
Southern Telecom Inc.
ATTN: Returns Department
14-C 53rd Street
Brooklyn, NY 11232
Should you have any questions or problems concerning this
product, please contact our customer service department at:
1-877-768-8483 (Toll Free)
Monday - Thursday: 9AM - 5PM (EST)
Friday: 9AM - 3PM (EST)
or
via e-mail at
1 Year Limited Warranty
In the unlikely event that this product is defective, or does not perform
properly, you may within one (1) year from your original date of
purchase return it to the authorized service center for repair or
exchange.
TO OBTAIN WARRANTY SERVICE:
● Provide proof of the date of purchase within the package
(Dated bill of sale).
● Prepay all shipping costs to the authorized service center,
and remember to insure your return.
● Include a return shipping address (no P.O. Boxes),
a telephone contact number, and the defective unit within
the package.
●
Describe the defect or reason you are returning the product.
Your product will be repaired or replaced, at our option, for the same
or similar model of equal value if examination by the service center
determines this product is defective. Products received damaged
as a result of shipping will require you to file a claim with the carrier.
Telephone
Caller ID
Caller ID display messages
Product maintenance
Warranty information
Troubleshooting tips


