background image


FM4360G-AN

User manual

Gas wok

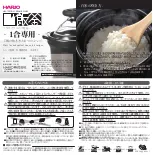
Summary of Contents for FM4360G-AN

Page 1: ...FM4360G AN User manual Gas wok ...

Page 2: ...s To ensure optimal and regular performance of your appliance please read this instruction manual carefully It will enable you to navigate all processes perfect ly and most efficiently To refer to this manual any time you need to we recommend you to keep it in a safe place And please pass it to any future owner of the appliance We wish you much joy with your new appliance The following symbols are...

Page 3: ...urface layout 7 Burner powers related to Hs 7 Ring switch settings 7 Ring burner 8 Operating the appliance 9 Switching the appliance on and off 10 Cleaning and Care 11 What to do if 13 Disposal 14 Installation Instructions 15 Safety instructions 15 Assembly 18 Installing more than one Frontline hob 21 Guarantee Customer Service 25 Service 27 ...

Page 4: ...sing for the first time the operating and installation instructions are to be followed The appliance must only be installed in accordance with the regulations in force and only in a well ventilated sufficiently large room If in doubt speak to your installer In the event of faults with the appliance or damage to the burner or the glass ceramic cracks scratches splits switch off the appliance shut o...

Page 5: ... electrical appliances to sockets near to this appliance Electrical leads must not be allowed to come near hot rings 1 Warning Risk of burns During operation the rings become hot Overheated fats and oils can ignite very quickly Warning Fire hazard Do not place or store flammable liquids highly inflammable materials or fusi ble objects e g plastic film plastic aluminium on or near the appliance Saf...

Page 6: ...Remove any stickers that are on the glass ceramic Put a few drops of glass ceramic cleaner on the glass ceramic and rub with a cloth or kitchen paper Wipe glass ceramic dry Clean pan holder burner crown and burner cover with warm water and wash ing up liquid Dry off Replace burner crown burner cover and pan stand ...

Page 7: ...ass 3 Cooking surface layout Burner powers related to Hs Ring switch settings Burner Type of gas Natural gas Town gas Liquid gas Wok burner 3 7 kW 3 4 kW 3 7 kW 269g h Symbol Description Off position max power ignition position minimum power Frontline strip Ring switch Wok burner ...

Page 8: ...ner 3 The appliance is equipped with a fully protected ring burner If the flames go out for whatever reason the gas supply is automatically closed off Burner crown Pan bracket Burner cover Burner body Spark plug Thermosensor Large flame jet ...

Page 9: ...rown and burner cover are lying straight on the burn er body If the burner crown and the burner cover are not on straight the gas flame will not burn evenly and this can cause damage to the burner 1 Important The apertures for the gas flames on the burner crown must not be blocked by foods that have boiled over or by cleaning products ...

Page 10: ...he flames should go out repeat the ignition process 3 Set the desired power The power can be set progressively from maximum power to minimum power 4 To end the cooking process turn back to the Off position 3 In the event of a power cut or also when the spark plug is wet because of food boiling over or cleaning the rings can also be ignited using a gas lighter or a match 1 Warning Only take cookwar...

Page 11: ...d 4 Rub the appliance dry using a clean cloth Scrapers and cleaners for glass ceramic and stainless steel can be purchased from specialist retailers Burner crown and burner cover Clean burner crown and burner cover in hot washing up water remove heavy deposits with a soft brush after soaking The flame apertures of the burner crown must always be clean and free of debris Pan brackets Wash the pan b...

Page 12: ...ine strip The aluminium Frontline strip fastens on by means of magnets It is easy to re move by hand and can be cleaned with detergent Please do not use any scour ing agents or sponges that scratch Do not clean the strip in the dishwasher ...

Page 13: ...dy Ring burners are not igniting The switch was not depressed firmly enough Depress switch firmly as far as it will go The spark plug is damp or dirty Dry or clean spark plug if necessary light with gas lighter or match Fault in the electrical supply The fuse in the house s electri cal wiring fuse box has been tripped Check the fuses If the fuse should trip several times a dvise Customer Care Depa...

Page 14: ...is product may not be treated as household waste Instead it shall be handed over to the applicable collection point for the recycling of electrical and electronic equip ment By ensuring this product is disposed of correctly you will help prevent po tential negative consequences for the environment and human health which could otherwise be caused by inappropriate waste handling of this product For ...

Page 15: ...s of the worktop are to be protected against moisture using a suitable sealant The sealant seals the appliance to the work top with no gap Ensure anti shock protection through correct installation by a qualified installer z Safety instructions when connecting to the electricity supply If this appliance s mains cable is damaged it must be replaced by a special cable type H05BB F Tmax 90 C or higher...

Page 16: ...tion pipe This appliance is not connected to an exhaust gas outlet It must be connected in accordance with the installation conditions that apply Special attention is to be paid to suitable ventilation Gas connection The 1 2 gas connection pipe is located on the left hand side of the back of the appliance Burner rail end piece with nut 1 gasket 2 and adjustable fitting 3 are to be as sembled as il...

Page 17: ...iance The two ends overlap and must be cut off flush 1 Warning After installation always check the tightness of the connections using a soap so lution Never use a flame to check the tightness Using the appliance for the first time Ignite each ring burner and test burning stability at maximum and minimum power ...

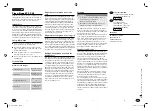
Page 18: ...Assembly 18 Assembly ...

Page 19: ...19 Assembly ...

Page 20: ...Assembly 20 ...

Page 21: ...hs of all appliances to be built in are added together minus 20 mm see also Overview of all appliance widths Example Installing more than one appliance 1 Work out the size of the cut out section and saw it out 2 Remove Frontline strip from the appliances by hand magnetic fastening 3 Lay the appliances one at a time on something soft for example a blanket with the underside facing upwards 4 Screw c...

Page 22: ...nnecting cross bar in the cut out and push up halfway against the appliance 6 Put silicon on the appliance corners that will touch one another Put silicon on the end of the cross bar 7 Loosely screw in fixing plates retaining grips from below on the worktop and on the connecting cross bar ...

Page 23: ...ng grip screws 10 Inject a line of silicon into the gap between the appliances 11 Dampen silicon line with a little soapy water 12 Press rubber block hard against the glass ceramic and draw it slowly along the gap 13 Leave silicon until the next day to harden 14 Carefully remove projecting silicon with a shaving blade 15 Clean glass ceramic thoroughly 16 Replace Frontline strips ...

Page 24: ...king zones Glass ceramic cooking surface with 2 induction cooking zones Gas hob with 2 burners Grill Grill Deep fat fryer Wok 580 mm Glass ceramic cooking surface with 4 radiation cooking zones Gas hob with 4 burners 720 mm Glass ceramic cooking surface with 4 radiation cooking zones Glass ceramic cooking surface with 4 induction cooking zones Gas hob with 4 burners ...

Page 25: ...me i e is not used for commercial purposes The appliance is installed in accordance with all relevant regulations in force within your new country of residence The provisions of this European Guarantee do not affect any of the rights granted to you by law p t b Albania 35 5 4 261 450 Rr Pjeter Bogdani Nr 7 Tirane Belgique België Belgien 32 2 363 04 44 Bergensesteenweg 719 1502 Lembeek Èeská republ...

Page 26: ...O Schweiz Suisse Svizzera 41 62 88 99 111 Industriestrasse 10 CH 5506 Mägenwil Slovenija 38 61 24 25 731 Electrolux Ljubljana d o o Gerbièeva 98 1000 Ljubljana Slovensko 421 2 43 33 43 22 Electrolux Slovakia s r o Electrolux Domáce spot rebièe SK Seberíniho 1 821 03 Bratislava Suomi www electrolux fi Sverige 46 0 771 76 76 76 Electrolux Service S t Göransgatan 143 S 105 45 Stockholm Türkiye 90 21 ...

Page 27: ... Department or one of our service partners In order to be able to assist you quickly we require the following information Model description Product number PNC Serial number S No for numbers see rating plate Type of fault Any error messages displayed by the ap pliance three digit letter number combination for glass ceramic So that you have the necessary reference numbers from your appliance at hand...

Page 28: ...www electrolux com 374 451 703 M 210807 03 Subject to change without notice ...

Reviews: