background image

user manual

EDC 66150W

Intuition –  

Advanced Drying System 

Condenser Dryer

Summary of Contents for EDC 66150W

Page 1: ...user manual EDC 66150W Intuition Advanced Drying System Condenser Dryer ...
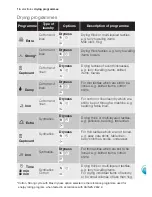
Page 2: ......

Page 3: ...ture The Electrolux ambition is to offer a wide variety of quality products that make your life more comfortable You find some examples on the cover in this manual Please take a few minutes to study this manual so that you can take advantage of the benefits of your new machine We promise that it will provide a superior User Experience delivering Ease of Mind Good luck AUS ...

Page 4: ...ion and tips Environmental information 4 electrolux contents electrolux Contents Safety information 5 Installation 7 8 Product description 9 Control panel 9 Use 10 Drying hints 14 15 Drying programme 16 17 Programme information 18 Care and cleaning 19 Something not working 22 24 Technical data 25 Environment concerns 26 Guarantee conditions 27 Customer service centres 28 ...

Page 5: ...shes and rubber coated tennis shoes etc should not be dried in a tumble drier Foam rubber materials can when heated produce fire by spontaneous combustion Always unplug the appliance after use cleaning and maintenance Under no circumstances should you attempt to repair the machine yourself Repairs carried out by inexperienced persons may cause injury or serious malfunctioning Contact your local Se...

Page 6: ...hose If the tumble dryer is placed on top of a washing machine it is compulsory to use the stacking kit optional accessory Use This appliance is designed for domestic use It must not be used for purposes other than those for which it was designed Only wash fabrics which are designed to be machine dried Follow the instructions on each garment label Do not dry unwashed items in the tumble dryer Fabr...

Page 7: ...a clean place where dirt does not build up Lint must not be allowed to accumulate around the tumble dryer Adequate ventilation has to be provided to avoid the back flow of gasses into the room from appliances burning other fuels including open fires Air must be able to circulate freely all round the appliance Do not obstruct the front ventilation grille or the air intake grilles at the back of the...

Page 8: ... the fuses required should be taken from the type plate The type plate is fitted near the loading aperture see Machine description section C CA AU UT TI IO ON N If the appliance is supplied from a cord extension set or electrical portable outlet device the cord extension set or electrical portable outlet device must be positioned so that it is not subject to splashing or ingress of moisture The ma...

Page 9: ...rol panel Fluff filters Rating Plate Condenser unit Water reservoir Adjustable feet 6 5 4 3 2 1 AUS Control panel Programme selector dial Delicate button Dryness button Buzzer button Indicator lights 5 4 3 2 1 1 1 2 6 3 4 5 7 Extra Extra Start Pause button Delay button 7 6 ...

Page 10: ...the door and filter Select the required programme Turn the programme selector dial to the required programme The light Start Pause starts to flash The selector dial is divided into following sections Cottons Synthetics Time Special Allows you to select electronically controlled or time controlled drying Turn the dial to the required programme or time E Elle ec ct tr ro on niic ca alllly y c co on ...

Page 11: ...ption can also be used for time controlled drying DELICATE is only suitable for use with loads of up to 3kg When the programme has finished the pilot lights End is on Select the Dryness Press the Dryness button repeatedly to select the desired option The relevant light will light up Laundry becomes dryer from MIN to MAX Press the Dryness button as many Dryness times as necessary until the small li...

Page 12: ...n both cases the light of the Start Pause button flashes to remind you that the start button needs to be pressed again Select the Delay Start This button allows you to delay the starting of the programme by 3 6 or 9 hours Press the button until the light relevant to the desired delay lights up This option must be selected a af ft te er r having selected the programme and b be ef fo or re e 6 9 3 p...

Page 13: ...t the end of the anti creasing phase Lights End Anticrease and remain lit and the buzzer sounds for 2 minutes Turn the programme selector dial to O O to switch the machine off Remove the laundry from the drum and carefully check that the drum is empty Leave the door open to prevent the formation of mildew and unpleasant smells Turn the programme selector dial to O O all the lights go out The appli...

Page 14: ...Avoid drying dark clothes with light coloured fluffy items such as towels as they could attract the fluff The laundry must be thoroughly spun before tumble drying E Ea as sy y c ca ar re e iit te em ms s too e g shirts should be briefly pre spun before drying depending on crease resist ance approx 30 seconds or using the special brief spin programme of your washing machine Knitted textiles knitted...

Page 15: ...hetics drum no more than half full Delicate fabrics and woollens drum no more than one third full Try to load to the maximum capacity of the machine as small loads are uneconomical Laundry weights The following weights are indicative 1200 g bathrobe 100 g napkin 700 g quilt cover 500 g sheet 200 g pillow case 250 g tablecloth 200 g towelling towel 100 g tea cloth 200 g night dress 100 g ladies bri...

Page 16: ...ered textiles e g pullovers bedding table linen For thin textiles which are not ironed e g easy care shirts table linen baby s clothes socks underwear For thin textiles which are still to be ironed e g knitted items cotton shirts For cotton or linen laundry which are still to be put through a machine e g bedding table linen Time 30 min 60 min Synthetics Cotton Dryness Synthetics Iron Drying thick ...

Page 17: ...e mechanism for easy care textiles such shirts and blouses for minimum ironing effort The result depends on the type and quality of textiles The loading volume corresponds to approx 4 to 5 shirts Recommendation Place textiles in the dryer straight after spinning Once dried immediately remove textiles and place on clothes hanger Special programme lasting around 10 minutes for refreshing or gently c...

Page 18: ...S and START Press the buttons down until the pilot lights above each ones begin to flash and one of the pilot lights indicating the drying phase lights and remains it A Ad djju us st tiin ng g t th he e lle ev ve ell o of f c co on nd du uc ct tiiv viit ty y Press the START PAUSE button sequentially the level of conductivity is indicated by the phase pilot lights which light in various combination...

Page 19: ...fluff which accumulates during drying and they must therefore be cleaned a at t t th he e e en nd d o of f e ea ac ch h p pr ro og gr ra am mm me e before removing the laundry with a damp cloth The light is on to remind you of this operation The filter in the inner door must be removed for cleaning Do not be alarmed by the amount of fluff It is not due to excessive wear caused by the dryer All fab...

Page 20: ...shower if necessary Also clean the outside removing all fluff Clean the rubber seal round the condenser cabinet and in the inner part of the small door with a damp cloth I Im mp po or rt ta an nt t Do not use pointed objects or utensils to clean the spaces between the plates as this could dam age the condenser Re fit the condenser turn the red stops upwards and close the door D Do o n no ot t u us...

Page 21: ...e g through a coffee filter Cleaning the air intake grille Using a vacuum cleaner remove the fluff from the air intake grille at the back of the appliance Cleaning the drum When your laundry does not reach the desired degree of dryness in other words when it turns out either too dry or too damp we advise you to clean the inside of the drum with a cloth soaked with vinegar This will eliminate any d...

Page 22: ... at mains socket Check fuse in fuse box domestic installation Close loading door Press the START PAUSE button again Drying results unsatisfactory Wrong programme selected Lint filter clogged Heat exchanger clogged with lint Incorrect volume of laundry Ventilation slots in base area covered up Residue on inside surface of drum or drum ribs Conductance of water at installation site differs from stan...

Page 23: ...s Washing protection After the start of the program me the option can no longer be set Turn the programme knob to OFF Set the programme again Programme inactive W Wa at te er r r re es se er rv vo oiir r f fu ullll light illuminated Condensate tank is full Empty condensate tank then start programme with START PAUSE button Drying cycle ends shortly after programme starts END light illuminated Not e...

Page 24: ... or solve the problem contact our service centre Before telephoning make a note of the model serial number and purchase date of your machine the Service Centre will require this information 1206 24 electrolux something not working ...

Page 25: ...ion Voltage Overall power Fuse Information on the electrical connection is given on the rating plate on the inner edge of the appliance door This appliance conforms with the following EU Directives 2006 95 EC Low Voltage Directive 89 336 EEC dated 03 05 1989 EMC Directive inclusive of Amending Directive 92 31 EEC 93 68 EEC dated 22 07 1993 CE Marking Directive AUS Use Domestic 5 C 35 C ...

Page 26: ...on about recycling of this product please contact your local city office your household waste disposal service or the shop where you purchased the product Ecological hints To save energy and to help protect the environment we recommend that you follow these hints Try to load the maximum capacity of the machineas small loads are uneconomical Always load well spun laundry The higher the spinspeed th...

Page 27: ...rself please contact the Customer Care Department or one of our service partners In order to be able to assist you quickly we require the following information Model description Product number PNC Serial number S No for numbers see rating plate Type of fault Any error messages displayed by the appliance So that you have the necessary reference numbers from your appliance at hand we recommend that ...

Page 28: ...erly maintain or service iii normal wear and tear iv power surges electrical storm damage or incorrect power supply v incomplete or improper installation vi incorrect improper or inappropriate operation vii insect or vermin infestation b The Appliance is modified without authority from Electrolux in writing c The Appliance s serial number or warranty seal has been removed or defaced d The Applianc...

Page 29: ......

Page 30: ...136904161 02 12022008 ...

Reviews: