background image

INSTRUCTION SHEET

©2021 Electrolux Home Products, Inc.        Instruction Sheet A00343905     7.23.21

NOTE:

 All Hardware Pack components  

mentioned throughout this instruction sheet 
will have an “H” after the item number.  

Single-Door All Refrigerator and All Freezer Trim Kit Installation 

Product Line: All Refrigerator and All Freezer Models 

Serial Number Range: All Serial Number Ranges

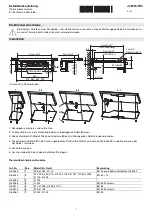
Single Trim Kit Components (79˝ & 84˝ Tall Cabinet Cutouts)

Brand

Kit #

Single Trim Kit #

Frigidaire Professional

TRMKTEZ1FL79

A16405201

Item #

Part Number

Description

Qty

1A

A18684901

Side Trim, RH

1

2A

A18684902

Side Trim, LH

1

3A

A16766503

Top Trim, Flat RH

1

4A

A16766505

Top Trim, Flat LH

1

5

A18684505

Toe Kick, RH

1

6

A18684507

Toe Kick, LH

1

7

A17111301

Leveler Assembly 

2

8

A20841303

Hardware Pack U19, Single

1

Brand

Kit #

Single Trim Kit #

Electrolux

TRMKTSS1LV84

A19895901

Item #

Part Number

Description

Qty

1B

A19036503

Side Trim, RH

1

2B

A19036504

Side Trim, LH

1

3B

A19036402

Top Trim, Louver RH

1

4B

A19036403

Top Trim, Louver LH

1

5

A18684506

Toe Kick, RH

1

6

A18684508

Toe Kick, LH

1

7

A17111301

Leveler Assembly

2

8

A20841304

Hardware Pack U19, Single

1

9

A19036701

Side Trim Attachment

2

7

1A

2A

3A

4A

5

6

1B

2B

9

3B

4B

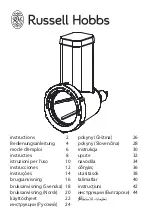
Hardware Pack A20841303

ITEM

PART NUMBER

DESCRIPTION

QTY

1H

A18695801

Tie-Bar, Top

1

2H

297142600

Screw, Flathead, #8-32

2

3H

050149

Screw, Round, #8-18

4

4H

A16955502

Bolt, M5 x 16

6

5H

A21188301

Bolt, ¼-20

2

6H

7H

A20706101

Trim Base Screw

1

Hardware Pack A20841304

ITEM

PART NUMBER

DESCRIPTION

QTY

1H

A18695801

Tie-Bar, Top

1

2H

297142600

Screw, Flathead, #8-32

2

3H

050149

Screw, Round, #8-18

12

4H

A16955502

Bolt, M5 x 16

6

5H

A21188301

Bolt, ¼-20

2

6H

7H

1H

2H

3H

4H

5H

2.12

"

 Ref

5

"

 Ref

Summary of Contents for A16404901

Page 1: ...ssembly 2 8 A20841303 Hardware Pack U19 Single 1 Brand Kit Single Trim Kit Electrolux TRMKTSS1LV84 A19895901 Item Part Number Description Qty 1B A19036503 Side Trim RH 1 2B A19036504 Side Trim LH 1 3B A19036402 Top Trim Louver RH 1 4B A19036403 Top Trim Louver LH 1 5 A18684506 Toe Kick RH 1 6 A18684508 Toe Kick LH 1 7 A17111301 Leveler Assembly 2 8 A20841304 Hardware Pack U19 Single 1 9 A19036701 ...

Page 2: ...Trim LH 1 3B A18804301 Top Trim Louver 1 4 A18685101 Center Trim 1 5 A18684501 Toe Kick 1 6 A17111301 Leveler Assembly 4 7 A20841301 Hardware Pack U19 Single 1 Brand Kit Dual Trim Kit Frigidaire TRMKTEZ2FL79 A16404901 Item Part Number Description Qty 1A A18684901 Side Trim RH 1 2A A18684902 Side Trim LH 1 3C A16766501 Top Trim Flat 1 4 A18685101 Center Trim 1 5 A18684501 Toe Kick 1 6 A17111301 Lev...

Page 3: ... 1 5 A18684502 Toe Kick 1 6 A17111301 Leveler Assembly 4 7 A20841302 Hardware Pack U19 Double 1 8 A19036701 Side Trim Attachment 2 5 1A 2A 3A 4 6 8 2H 3H 4H 5H 8H 9H 6H 7H 1H 10H 2 12 Ref 5 Ref 12 21 Ref 0 87 Ref Hardware Pack A20841301 ITEM PART NUMBER DESCRIPTION QTY 1H A18695801 Tie Bar Top 1 2H 297142600 Screw Flathead 8 32 2 3H 050149 Screw Round 8 18 4 4H A16955502 Bolt M5 x 16 6 5H A2118830...

Page 4: ...f 5 Ref 12 21 Ref 0 87 Ref Hardware Pack A20841301 ITEM PART NUMBER DESCRIPTION QTY 1H A18695801 Tie Bar Top 1 2H 297142600 Screw Flathead 8 32 2 3H 050149 Screw Round 8 18 12 4H A16955502 Bolt M5 x 16 14 5H A21188301 Bolt 20 4 8H A20632701 Screw 10 24 x 8 9H A16770801 Tie Bar Bottom 2 10H A18685301 Center Trim Support 1 ...

Page 5: ...ax 80 18 Min 36 88 Max 37 67 Min 83 88 Max 84 85 TRMKTEZ1FL79 Frigidaire TRMKTSS1LV84 Electrolux 33 0 032 79 0 06 25 25 minimum 1 021 minimum 25 9 mm 35 5 0 032 83 75 0 06 24 minimum 0 706 minimum 17 9 mm IMPORTANT Make sure there are two separate dedicated grounding type duplex wall outlets for the freezer and the refrigerator as specified in the Use Care Manual ...

Page 6: ...6 17 Min 68 01 Max 68 57 Min 79 22 Max 80 18 TRMKTEZ2FL75 Frigidaire TRMKTEZ2FL79 Frigidaire TRMKTSS2FL79 Electrolux TRMKTEZ2LV79 Frigidaire 66 25 0 032 25 25 minimum 75 0 06 0 896 minimum 22 8 mm 66 25 0 032 25 25 minimum 79 0 06 0 896 minimum 22 8 mm NOTE To install a dual trim kit or a pairing kit a partition cannot exist between the Freezer and the Refrigerator ...

Page 7: ...ecessed water shutoff valve for a 24 minimum opening For new construction use a 25 25 cabinet depth dimension Tools Needed PhillipsTM Screwdriver 3 8 5 16 Socket Wrench Step Ladder Flathead Screwdriver Power Drill and 5 16 Nut Driver Bit Tape Measure Safety Glasses 3 8 Nut Driver Gloves Level Before You Begin Be careful when unpacking components Do not use sharp objects when removing packaging mat...

Page 8: ... sure to place a drop cloth over the floor to prevent scratching the trim kit and or floor Fig 2 Fig 5 Fig 6 3 a Fit the first Leveler Assembly onto a refrigerator freezer Fig 3 Fig 4 b Using a 5H bolt and a power drill fasten the bottom of the Leveler Assembly with a 3 8 hex drill bit in whichever hole overlaps the screw hole Fig 4 Note The rear of the bracket is contoured to slip over the metal ...

Page 9: ... 5 0 5 0 5 A B NOTE Make sure you adhere the heater completely with no air pockets Fig 9A 8 Peel off the paper backing from the second heater 9 Adhere the second heater to the upper left side of the right side unit 0 5 from the top and 0 5 from the back wall so the harnesses come out at the bottom NOTE Make sure you adhere the heater completely with no air pockets Fig 9B For better adhesion remove...

Page 10: ...t the door height Fig 18 NOTE Some cabinet substrates may require pre drilling holes using a 1 8 3 mm diameter drill bit Electrolux TRMKTSS2LV84 Side Trim Attachment Setup some models 19 Using eight 3H screws and a power drill attach the two Side Trim Attachment brackets to the front left and right cabinet cut out edges with the brackets touching the floor Fig 19 Ensure the rectangular slots exten...

Page 11: ...n two 3H screws on the right side of the Top Trim one screw per side for Collared top trim with a Phillips screwdriver to the cabinets Fig 22 c Repeat for the left side Fig 21 Fig 22 TRMKTEZ2FL75 Frigidaire TRMKTEZ2LV79 Frigidaire TRMKTEZ2FL79 Frigidaire TRMKTSS2FL79 Electrolux Side Trim Installation For 24 a Place side trims in position by dropping them over the placement screw as seen in Fig 21 ...

Page 12: ...r using a 5 16 nut driver Fig 5 If more fastening space is required rotate the bolt labeled F clockwise Fig 6 using a flathead screwdriver or a 3 8 socket wrench Fig 6 d Attach the remaining Leveler Assembly as described in the previous 3 steps With the unit still on its back adjust all leveling wheels to approximately the orientation in Fig 7 Fig 4 Fig 7 Leveling the Unit 4 a Tilt the unit uprigh...

Page 13: ...way in ensuring the product is centered in the cabinet cutout c Choose the top trim according to which side the door hinge is on Fig 11 You do not need the other Top Trim for the installation d Install the Top Trim by fastening two 4H screws along the base of the trim with a 5 16 socket wrench Fig 12 Screw through the 1H bracket in step 8a to properly level the Top Trim Fig 10 Fig 11 Fig 12 9 a Sl...

Page 14: ...ther Toe Kick b Carefully place the Tow Kick over the 2 Leveler Assembly Slots The first Leveler Assembly slot is circled in Fig 18 and the second Leveler Assembly slot is circled in Fig 19 c Adjust the Toe Kick until the magnets are engaged to the Leveler Assembly bolts and the Toe Kick is resting vertically in place Fig 17 Fig 18 Fig 19 Note Refer to the Use Care Manual to adjust the door height...

Reviews: