D
E
WALT Industrial Tool Co. Inc., 701 E. Joppa Road, Towson, MD 21286 (MAY12) Part # N188212 Copyright © 2012
The following are trademarks for one or more D
E
WALT power tools: the yellow and black color scheme; the “D” shaped air intake grill; the array of pyramids on the
handgrip; the kit box configuration; and the array of lozenge-shaped humps on the surface of the tool.
DWE575DC 7-1/4" (184 mm)
Circular Saw Dust Collection Kit
FOR USE WITH DWE575 AND DWE575SB CIRCULAR SAWS
PLEASE READ BEFORE OPERATING
CIRCULAR SAWS
If you should have difficulty understanding the following
instruc tions contact a D
E
WALT service center or an authorized
D
E
WALT service person, or call 1-800-4-D
E
WALT.
Important Safety Instructions
WARNING: To reduce the risk of serious personal injury, turn
tool off and disconnect tool from power source before making
any adjustments or removing/installing attachments or
accessories.
WARNING:
For your own safety, read the tool instruction manual
before using any accessory. Failure to heed these warnings may result
in serious personal injury and damage to the vacuum and accessory.
When servicing this tool, use only identical replacement parts.
WARNING:
To reduce the risk of serious personal injury, always
wear ANSI compliant eye protection.
This kit contains:
1 Dust port
1 Dust port–back half
2 Dust port screws
1 Lower guard lever (new)
1 Lever screw (new)
If any parts are missing please contact D
E
WALT at 1-800-4-D
E
WALT
(1-800-433-9258)
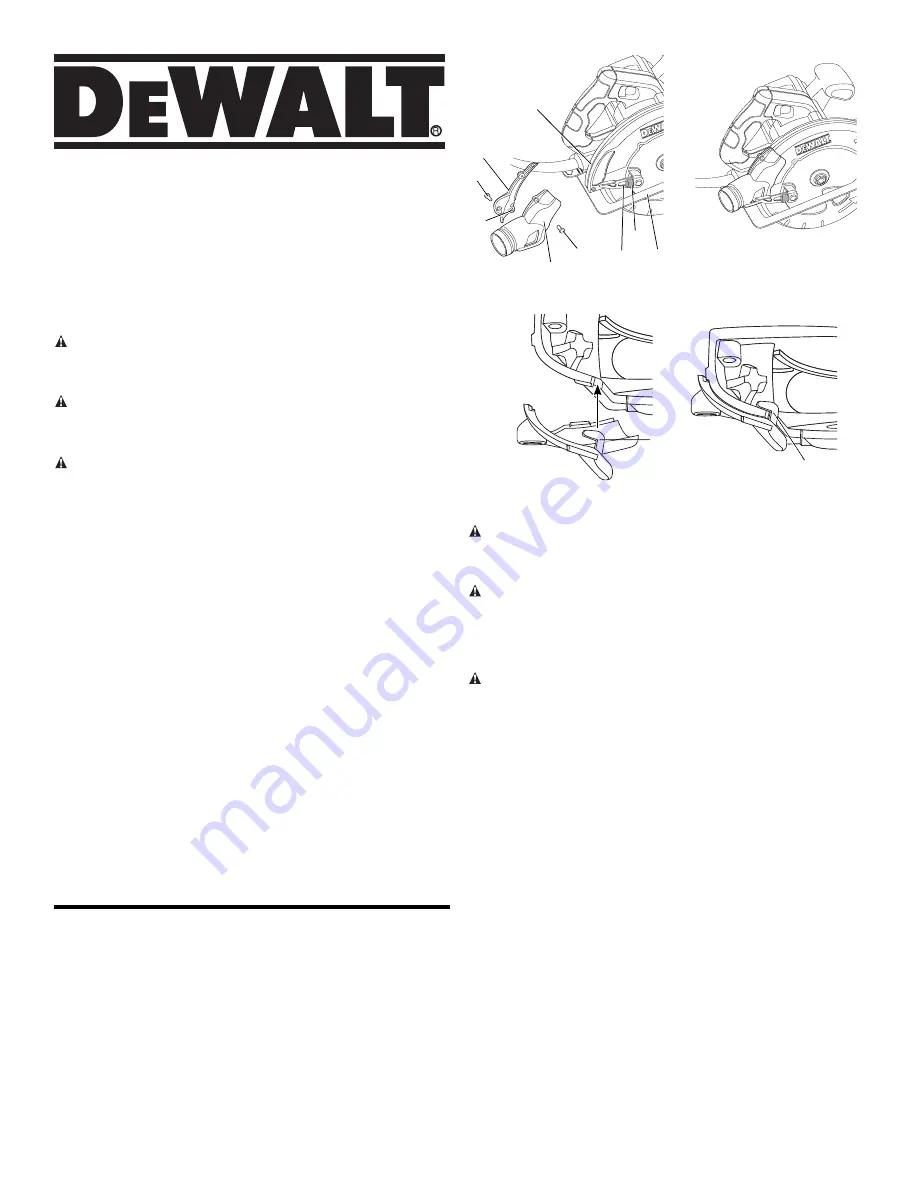
Mounting the Dust Port
1. Fully loosen depth adjustment lever.
2. Place base plate (A) in the minimal depth of cut position so that the
tab (G) will clear depth strap.
3. Remove the lower guard lever (B) and guard lever spacer (C) from
the saw by unscrewing the lever screw.
4. Using the existing guard lever spacer, install the new lower guard
lever and screw supplied in kit.
5. Align the dust port–back half (D) over upper blade guard (E) as
shown. Be sure to insert the tab (G) into the casting notch on the
tool as shown in Figure 2. When installed correctly, it will snap fully
over the original depth of cut pointer.
6. Align the dust port (F) with the dust port–back half (D).
7. Insert two dust port screws (H) as shown and tighten securely.
If you have any questions, please contact D
E
WALT Industrial Tool Co.,
701 East Joppa Road, Baltimore, MD 21286, call 1-800-4-D
E
WALT
(1-800-433-9258) or visit our website www.dewalt.com.
F
D
B
A
E
H
H
FIG. 2
G
G
G
C
FIG. 1
Kit de dépoussiérage DWE575DC,
184 mm (7-1/4 po), pour scie circulaire
À UTILISER AVEC LES SCIES CIRCULAIRES DWE575 ET
DWE575SB.
LIRE CE QUI SUIT AVANT TOUTE
UTILISATION DE
SCIE
S
CIRCULAIRE
S
Si vous éprouvez des difficultés à comprendre les instructions
suivantes, veuillez contacter un centre de réparation D
E
WALT
ou un réparateur agréé D
E
WALT ou appeler le 1-800-4-D
E
WALT.
Consignes de sécurité importantes
AVERTISSEMENT : pour réduire tout risque de dommages
corporels graves, arrêter et débrancher l’outil du secteur avant
tout réglage ou avant de retirer ou installer toute pièce ou tout
accessoire.
AVERTISSEMENT :
pour votre sécurité, lire le manuel de l’utilisateur
respectif à l’outil avant l’utilisation de tout accessoire. Tout manquement
à ces avertissements pose des risques de dommages corporels et de
dommages sérieux à l’aspirateur et à ses accessoires. Lors de la
maintenance de cet outil, n’utiliser que des pièces de rechange
identiques.
AVERTISSEMENT :
pour réduire tout risque de dommages
corporels graves, porter systématiquement une protection oculaire
homologuée ANSI.
Ce kit comprend :
1 Buse de dépoussiérage
1 Partie arrière de la buse de dépoussiérage
2 Vis de la buse de dépoussiérage
1 Levier du carter inférieur de lame (nouveau)
1 Vis du levier (nouveau)
Pour toute pièce manquante, veuillez contacter D
E
WALT au
1-800-4-D
E
WALT (1-800-433-9258).
Installation de la buse de dépoussiérage
1. Desserrez complètement le levier de réglage de profondeur.
2. Placez la plaque de la base (A) sur la position de profondeur de
coupe minimale de façon à ce que la languette (G) aille au-delà de
la courroie de profondeur.
3. Retirez le levier du carter inférieur (B) et sa bague entretoise (C) de
la scie en dévissant la vis du levier.
4. En utilisant la bague entretoise existante du levier du carter,
installez le nouveau levier du carter inférieur et la vis fournis avec
ce kit.
5. Alignez la partie arrière de la buse de dépoussiérage (D) sur le
carter supérieur de lame (E), comme illustré. Assurez-vous de
bien insérer la languette (G) dans l’encoche intégrée sur l’outil
comme illustré en figure 2. Si installée correctement, elle devrait
s’enclencher à fond sur l’index de profondeur de coupe originel.