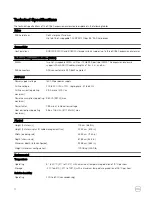
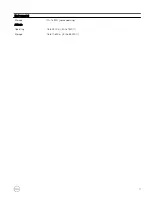
background image

Dell SC460 Expansion Enclosure
Getting Started Guide

Regulatory Model: CYAE

Summary of Contents for SC460

Page 1: ...Dell SC460 Expansion Enclosure Getting Started Guide Regulatory Model CYAE ...

Page 2: ... to hardware or loss of data and tells you how to avoid the problem WARNING A WARNING indicates a potential for property damage personal injury or death Copyright 2017 Dell Inc or its subsidiaries All rights reserved Dell EMC and other trademarks are trademarks of Dell Inc or its subsidiaries Other trademarks may be trademarks of their respective owners 2017 08 Rev A01 ...

Page 3: ...is guide is used in a manner not specified by Dell the protection provided by the equipment could be impaired For your safety and protection observe the rules described in the following sections NOTE See the safety and regulatory information that shipped with each Storage Center component Warranty information is included as a separate document Installation Safety Precautions Follow these safety pr...

Page 4: ...e 1 SC460 Expansion Enclosure Components 1 Expansion enclosure 2 Rack rails 2 3 SAS cables 4 4 Power cables 4 5 Front bezel Optional 6 Documentation Determine the Mounting Location Determine where to mount the SC460 expansion enclosure in the rack 1 Identify a location in the rack with 4U of space for the expansion enclosure WARNING If you plan to install the expansion enclosure above the lower 20...

Page 5: ...our 8 32 x 0 75 in knurled head Phillips screws 036 034 012 Left 1U cable management tray rail 042 034 012 Right 1U cable management tray rail 042 034 008 1U cable management tray 042 033 060 Steps 1 Adjust the length of the 1U cable management tray rails 042 034 012 and 042 034 008 to fit the rack 2 Align the rails so that the UP arrow is pointed in the correct direction and the side of the rail ...

Page 6: ...nto place Mount the Expansion Enclosure Install the rails in the rack and mount the SC460 expansion enclosure on the rails Prerequisite Required materials Screwdriver 034 000 193 Six clip nuts 106 569 307 Two M5 x 10 mm Phillips pan head screws 106 002 452 Two M5 x 16 mm Phillips pan head screws 106 002 453 Left and right expansion enclosure rack rails 100 569 001 Steps 1 Adjust the length of the ...

Page 7: ...gure 6 Attach Rail to the Front of the Rack 4 Secure the rail by installing an M5 x 10 mm screw 106 002 452 in the larger of the two holes at the front of the rail 5 Secure the rail by installing an M5 x 16 mm screw 106 002 453 in the larger of the two holes at the back of the rail 6 Repeat steps 2 through 5 to install the left rail 7 Mount the expansion enclosure chassis on the rails a If a mecha...

Page 8: ...from the expansion enclosure chassis reinstall these components in the chassis 9 Secure the expansion enclosure chassis and top cover a Install the six clip nuts 106 569 307 into the rack holes that align with the shoulder screws on the front of the expansion enclosure chassis b Use the orange enclosure latch handles to push the expansion enclosure chassis completely into the rack Make sure that t...

Page 9: ...pansion enclosure 2 Press the two latches on front of bezel Figure 9 Install the Bezel 3 Push the bezel into place until it attaches to the expansion enclosure 4 Release the latches on the front on the bezel 5 If the bezel has key lock lock the bezel with the key NOM Information Mexico Only The following information is provided on the device described in this document in compliance with the requir...

Page 10: ... power supply AC line voltage 200 to 240 VAC 10 single phase 47 to 63 Hz AC line current operating maximum 4 9 A max at 200 Vac Power consumption operating maximum 980 VA 931 W max Power factor 0 95 min at full load low voltage Heat dissipation operating maximum 3 36 x 106 J hr 3177 Btu hr max Physical Height 4U chassis 17 5 cm 6 89 in Height 4U chassis plus 1U cable management tray 22 23 cm 8 75 ...

Page 11: ...Environmental Storage 10 to 90 noncondensing Altitude Operating 16 to 2300 m 50 to 7500 ft Storage 16 to 10 600 m 50 to 35 000 ft 11 ...

Reviews: