background image

Dell Precision 3240 Compact

Servicehandleiding

Regelgevingsmodel: D16S
Regelgevingstype: D16S001
August 2020
Ver. A00

Summary of Contents for D16S

Page 1: ...Dell Precision 3240 Compact Servicehandleiding Regelgevingsmodel D16S Regelgevingstype D16S001 August 2020 Ver A00 ...

Page 2: ...otentieel gegevensverlies aan en vertellen u hoe het probleem kan worden vermeden GEVAAR LET OP duidt het risico van schade aan eigendommen lichamelijk letsel of overlijden aan 2020 Dell Inc of zijn dochtermaatschappijen Alle rechten voorbehouden Dell EMC en andere handelsmerken zijn handelsmerken van Dell Inc of zijn dochterondernemingen Andere handelsmerken zijn mogelijk handelsmerken van hun re...

Page 3: ...ijke componenten van uw systeem 17 Hoofdstuk 4 Demonteren en hermonteren 20 Benodigd gereedschap 20 Screw List 20 Zijpaneel 21 Removing the top cover side bezel 21 Installing the top cover side bezel 23 Top Cover side bezel 24 Removing the side cover 24 Installing the side cover 26 SMA antenne 27 De SMA antenne verwijderen 27 De SMA antenne installeren 28 Montagekader 30 Removing the front bezel 3...

Page 4: ...raphics card 53 Installing the graphics card 54 Koelplaat 56 Removing the heat sink 56 Installing the heat sink 57 Interposer module 60 Removing the interposer module 60 Installing the interposer module 60 Processor 61 Removing the processor 61 Installing the processor 62 Moederbord 64 De systeemkaart verwijderen 64 De systeemkaart plaatsen 66 Lay out van de systeemkaart 69 Interne antenne 69 De i...

Page 5: ...Hoofdstuk 6 Hulp verkrijgen en contact opnemen met Dell 78 Inhoudsopgave 5 ...

Page 6: ...s gevolg van onderhoudswerkzaamheden die niet door Dell zijn goedgekeurd valt niet onder de garantie Zie de veiligheidsinstructies die bij het product worden geleverd of kijk op www dell com regulatory_compliance WAARSCHUWING Raak een component pas aan nadat u zich hebt geaard door een ongeverfd metalen oppervlak van het chassis aan te raken zoals het metaal rondom de openingen voor de kaarten aan...

Page 7: ...eeft andere geavanceerde functies voor energiebeheer Door ontkoppeling en het ingedrukt houden van de aan uitknop gedurende 15 seconden zou de reststroom in de systeemkaart moeten ontladen Binding Binding is een methode voor het verbinden van twee of meer aardingsgeleiders met dezelfde elektrische potentiaal Dit wordt gedaan door het gebruik van een ESD buitendienstkit Zorg er bij het aansluiten v...

Page 8: ...olsband en het aardingssnoer tussen uw huid de ESD mat en de hardware staat bekend als hechting Gebruik alleen onderhoudskits met een polsband mat en aardingssnoer Gebruik nooit draadloze polsbanden Houd er altijd rekening mee dat de interne draden van een polsband gevoelig zijn voor schade door slijtage en dat die dus regelmatig gecontroleerd moeten worden met een polsbandtester om mogelijke ESD ...

Page 9: ...erdelen apart houden van alle isolatoronderdelen wanneer service wordt verleend en dat ze antistatische tassen gebruiken voor het transport van gevoelige onderdelen Nadat u aan de computer heeft gewerkt Over deze taak WAARSCHUWING Uw computer kan beschadigd raken als u er losse schroeven in achterlaat Stappen 1 Breng alle schroeven opnieuw aan en zorg ervoor dat er geen losse schroeven in uw compu...

Page 10: ...n geheugen moet worden vernieuwd De diepe slaapmodus zal waarschijnlijk het energieverbruik in stand by met 40 50 verminderen DDR4 informatie De subtiele verschillen tussen de DDR3 en DDR4 geheugenmodules staan hieronder weergegeven Verschil in toetsuitsparing De toetsuitsparing op een DDR4 module zit op een andere locatie dan die op een DDR3 module Beide uitsparingen bevinden zich op de insteekka...

Page 11: ...Specificaties Bustype Geïntegreerd Geheugentype DDR4 Geheugeninterface N v t Unified Memory Architecture UMA Grafisch niveau 10e generatie Intel Comet Lake Xeon W Series GT2 UHD P630 Geschat maximaal energieverbruik TDP 45 W inbegrepen in de CPU voeding Maximale kleurdiepte 24 niet HDR 30 bit HDR per pixel Maximale verticale vernieuwingsfrequentie Maximaal 60 Hz afhankelijk van de resolutie Intel ...

Page 12: ... 7 inch 144 78 mm enkele slot laag profiel Beeldschermconnectoren 3x mDP 1 4 Maximumaantal gelijktijdige beeldschermen 3 beeldschermen Beeldschermresolutie 3x 4096x2160 bij 120 Hz 1x 5120x2880 bij 60 Hz API s voor grafische kaart Shader Model 5 1 OpenGL 4 5 DirectX 12 0 Vulkan 1 0 API s voor rekencapaciteit CUDA DirectCompute OpenCL NVIDIA Quadro P620 Tabel 4 NVIDIA Quadro P620 specificaties Omsch...

Page 13: ...Hz at 1920 x 1080 Up to 118 Hz at 3840 x 2160 Operating Systems Graphics Video API Support DirectX 12 OpenGL 4 5 Supported Resolutions and Max Refresh Rates Hz Max Digital Single DisplayPort 1 4 7680 x 4320 8k 30 Hz mDP Type C to DP Max Digital Dual DisplayPort 1 4 7680 x 4320 8k 60 Hz mDP Type C to DP Numbers of display supported Up to four displays Functies voor systeembeheer Zakelijke systemen ...

Page 14: ...hoden kunnen kiezen die voldoen aan hun persoonlijke voorkeuren of werkplanning waarbij systeembeheerders nog steeds de mogelijkheid hebben om deze instellingen met Groepsbeleid te beheren Dell Command Update eindgebruiker tool wordt vooraf geïnstalleerd en stelt beheerders in staat om Dell updates voor de BIOS stuurprogramma s en software individueel te beheren en automatisch te presenteren en in...

Page 15: ...ldoen aan de vraag van apparaten die veel stroom verbruiken Nieuwe energiebeheerfuncties Full duplex dataoverdracht en support voor nieuwe overdrachtstypen Achterwaartse compatibiliteit met USB 2 0 Nieuwe connectoren en kabel In de onderstaande onderwerpen behandelen we enkele van de meest gestelde vragen over USB 3 2 Gen 1 Snelheid Momenteel zijn er 3 snelheidsmodi gedefinieerd door de nieuwste U...

Page 16: ...link DVI vereist bijna 2 Gbps doorvoer Terwijl 480 Mbps een beperking vormde biedt 5 Gbps veelbelovende resultaten Met een snelheid van 4 8 Gbps is deze standaard nu gebruikelijk voor apparaten die voorheen buiten het USB territorium vielen zoals externe RAID storagesystemen Hieronder staan enkele beschikbare SuperSpeed USB 3 2 Gen 1 producten Externe USB harde schijven voor desktops Draagbare USB...

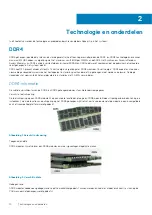
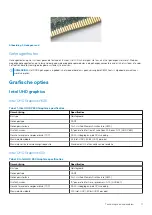
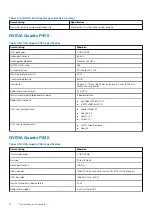
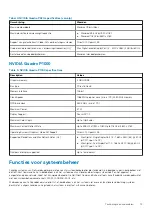
Page 17: ...3 Belangrijke componenten van uw systeem 17 ...

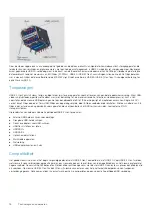
Page 18: ...Belangrijke componenten van uw systeem 18 Belangrijke componenten van uw systeem ...

Page 19: ...enmodules 12 Interposer module 13 SSD 14 Harde schijfeenheid OPMERKING Dell geeft een lijst met componenten en hun onderdeelnummers voor de originele gekochte systeemconfiguratie Deze onderdelen zijn beschikbaar volgens garantiedekkingen die door de klant zijn aangeschaft Neem contact op met uw Dell verkoopvertegenwoordiger voor aankoopopties Belangrijke componenten van uw systeem 19 ...

Page 20: ...lips Kleine sleufkopschroevendraaier Screw List The following table shows the screw list and the image of the screws Table 7 Screw list Component Screw type Quantity Image Top cover 6x32 Thumbscrew 1 M 2 2230 2280 Solid state drive M2x3 5 1 1 optional second solid state drive WLAN card M2x3 5 1 I O module optional M3x3 2 4 20 Demonteren en hermonteren ...

Page 21: ...requisites 1 Follow the procedure in before working inside your computer NOTE Turn the optional SMA antenna downwards or remove it for convenient sliding of the top cover side bezel About this task The following image indicates the location of the top cover side bezel and provides a visual representation of the removal procedure Demonteren en hermonteren 21 ...

Page 22: ...Steps 1 Slide the top cover side bezel towards the back of the system unit 2 Lift the top cover side bezel away from the system unit 22 Demonteren en hermonteren ...

Page 23: ...gt dient u het bestaande component te verwijderen alvorens de installatieprocedure uit te voeren About this task The following images indicate the location of the top cover side bezel and provide a visual representation of the installation procedure Demonteren en hermonteren 23 ...

Page 24: ... cover side bezel on the chassis 1 Follow the procedure in after working inside your computer Top Cover side bezel Removing the side cover Prerequisites 1 Follow the procedure in before working inside your computer NOTE Ensure that you remove the security cable from the security cable slot if applicable About this task The following images indicate the location of the side cover and provide a visu...

Page 25: ...Steps 1 Loosen the thumbscrew 6x32 that secures the side cover to the system Demonteren en hermonteren 25 ...

Page 26: ...de cover Prerequisites Als u een component vervangt dient u het bestaande component te verwijderen alvorens de installatieprocedure uit te voeren About this task The following image indicates the location of the side cover and provides a visual representation of the installation procedure 26 Demonteren en hermonteren ...

Page 27: ... side cover to the system Next steps 1 Follow the procedure in after working inside your computer SMA antenne De SMA antenne verwijderen Vereisten 1 Volg de procedure in Voordat u in de computer gaat werken Over deze taak De volgende afbeelding geeft de locatie van de SMA antenne aan en biedt een visuele weergave van de verwijderingsprocedure Demonteren en hermonteren 27 ...

Page 28: ...van de SMA antenne los om de SMA antenne te scheiden van de systeemeenheid 3 Verwijder de SMA antenne van de systeemeenheid De SMA antenne installeren Vereisten Als u een component vervangt dient u het bestaande component te verwijderen alvorens de installatieprocedure uit te voeren 28 Demonteren en hermonteren ...

Page 29: ...tenne uit en plaats deze op de SMA connector van de systeemeenheid 2 Draai de moer aan de onderkant van de SMA antenne aan om de antenne aan de systeemeenheid te bevestigen 3 Draai de antenne om in een handige hoek volgens de implementatie infrastructuur Vervolgstappen 1 Volg de procedure in Nadat u in de computer hebt gewerkt Demonteren en hermonteren 29 ...

Page 30: ...ndicates the location of the front bezel and provides a visual representation of the removal procedure Steps 1 Pry the retention tabs to release the front bezel from the system 2 Remove the front bezel from the system Installing the front bezel Prerequisites Als u een component vervangt dient u het bestaande component te verwijderen alvorens de installatieprocedure uit te voeren 30 Demonteren en h...

Page 31: ...ess the bezel until the release tabs click into place Next steps 1 Install the side cover 2 Install the top cover side bezel 3 Follow the procedure in after working inside your computer Harde schijfeenheid Removing the hard drive assembly Prerequisites 1 Follow the procedure in before working inside your computer 2 Remove the side cover 3 Remove the top cover side bezel 4 Remove the front bezel De...

Page 32: ...tem to disconnect it from the connector on the system board 2 Lift the hard drive assembly from the system NOTE Note the orientation of the hard drive so that you can replace it correctly Removing the hard drive bracket Prerequisites 1 Follow the procedure in before working inside your computer 2 Remove the side cover 3 Remove the top cover side bezel 4 Remove the front bezel 5 Remove the 2 5 in h...

Page 33: ...acket from the slots on the drive 2 Lift the hard drive out of the bracket Installing the hard drive bracket Prerequisites Als u een component vervangt dient u het bestaande component te verwijderen alvorens de installatieprocedure uit te voeren About this task The following image indicates the location of the hard drive bracket and provides a visual representation of the installation procedure De...

Page 34: ... 3 Install the top cover side bezel 4 Install the side cover 5 Follow the procedure in after working inside your computer Installing the 2 5 in hard drive assembly Prerequisites Als u een component vervangt dient u het bestaande component te verwijderen alvorens de installatieprocedure uit te voeren About this task The following image indicates the location of the hard drive assembly and provides ...

Page 35: ... tabs clicks into place Next steps 1 Install the front bezel 2 Install the top cover side bezel 3 Install the side cover 4 Follow the procedure in after working inside your computer SSD Removing the M 2 2280 PCIe solid state drive Prerequisites 1 Follow the procedure in before working inside your computer 2 Remove the side cover Demonteren en hermonteren 35 ...

Page 36: ...ion of the removal procedure Steps 1 Remove the screw M2x3 5 that secures the solid state drive to the system board 2 Slide and lift the solid state drive off the system board Installing the M 2 2280 PCIe solid state drive Prerequisites Als u een component vervangt dient u het bestaande component te verwijderen alvorens de installatieprocedure uit te voeren About this task The following image indi...

Page 37: ...step is valid for system configuration that is shipped with 80 W CPU 4 Install the front bezel 5 Install the top cover side bezel 6 Install the side cover 7 Follow the procedure in after working inside your computer WLAN kaart Removing the WLAN card Prerequisites 1 Follow the procedure in before working inside your computer 2 Remove the side cover 3 Remove the top cover side bezel 4 Remove the fro...

Page 38: ...lide and remove the WLAN card from the connector on the system board Installing the WLAN card Prerequisites Als u een component vervangt dient u het bestaande component te verwijderen alvorens de installatieprocedure uit te voeren About this task The following image indicates the location of the wireless card and provides a visual representation of the installation procedure 38 Demonteren en hermo...

Page 39: ...White MAIN white triangle Auxiliary Black AUX black triangle 2 Place the WLAN card bracket to secure the antenna cables 3 Align the notch on the WLAN card with the tab on the WLAN card slot Insert the WLAN card into the connector on the system board 4 Replace the M2x3 5 screw to secure the WLAN card bracket to the WLAN card Next steps 1 Install the hard drive assembly 2 Install the front bezel 3 I...

Page 40: ...speaker and provide a visual representation of the removal procedure Steps 1 Disconnect the speaker cable from the system board 2 Press the release tab and lift the speaker along with the cable from the system board Installing the speaker Prerequisites Als u een component vervangt dient u het bestaande component te verwijderen alvorens de installatieprocedure uit te voeren About this task The foll...

Page 41: ...ver 4 Follow the procedure in after working inside your computer Ventilatoreenheid Removing the fan assembly Prerequisites 1 Follow the procedure in before working inside your computer 2 Remove the side cover 3 Remove the top cover side bezel 4 Remove the front bezel About this task The following images indicate the location of the fan assembly and provide a visual representation of the removal pr...

Page 42: ...n cable from the connector on the system board Lift the fan assembly out of the system Installing the fan assembly Prerequisites Als u een component vervangt dient u het bestaande component te verwijderen alvorens de installatieprocedure uit te voeren About this task The following images indicate the location of the fan assembly and provide a visual representation of the removal procedure 42 Demon...

Page 43: ...e it on the system up side down until it clicks into place NOTE Route the speaker cable through the routing guides on the fan assembly Next steps 1 Install the front bezel 2 Install the top cover side bezel 3 Install the side cover 4 Follow the procedure in after working inside your computer Demonteren en hermonteren 43 ...

Page 44: ...Over deze taak De volgende afbeeldingen geven de locatie van de knoopcelbatterij aan en bieden een visuele weergave van de verwijderingsprocedure Stappen 1 Wrik met een plastic pennetje de knoopcelbatterij uit de batterijsocket op de systeemkaart 2 Verwijder de knoopcelbatterij uit het systeem De knoopcelbatterij plaatsen Vereisten Als u een component vervangt dient u het bestaande component te ve...

Page 45: ...omputer hebt gewerkt Geheugenmodules Removing the memory modules Prerequisites 1 Follow the procedure in before working inside your computer 2 Remove the side cover 3 Remove the top cover side bezel 4 Remove the front bezel 5 Remove the fan assembly About this task The following images indicate the location of the memory modules and provide a visual representation of the removal procedure CAUTION ...

Page 46: ...slot Installing the memory modules Prerequisites Als u een component vervangt dient u het bestaande component te verwijderen alvorens de installatieprocedure uit te voeren About this task The following image indicates the location of the memory modules and provides a visual representation of the installation procedure 46 Demonteren en hermonteren ...

Page 47: ...er side bezel 4 Install the side cover 5 Follow the procedure in after working inside your computer Riser kaart Removing the riser card Prerequisites 1 Follow the procedure in before working inside your computer 2 Remove the side cover 3 Remove the top cover side bezel 4 Remove the front bezel 5 Remove the fan assembly NOTE This step is valid for system configuration that is shipped with 80 W CPU ...

Page 48: ...talling the riser card Prerequisites Als u een component vervangt dient u het bestaande component te verwijderen alvorens de installatieprocedure uit te voeren About this task The following image indicates the location of the riser card and provides a visual representation of the installation procedure 48 Demonteren en hermonteren ...

Page 49: ...he riser card to the system chassis Next steps 1 Install the fan assembly NOTE This step is valid for system configuration that is shipped with 80 W CPU 2 Install the front bezel 3 Install the top cover side bezel 4 Install the side cover 5 Follow the procedure in after working inside your computer Demonteren en hermonteren 49 ...

Page 50: ...Remove the top cover side bezel 4 Remove the front bezel 5 Remove the fan assembly NOTE This step is valid for system configuration that is shipped with 80 W CPU 6 Remove the riser card About this task The following images indicate the location of the Dell Ultra Speed Drive and provide a visual representation of the removal procedure 50 Demonteren en hermonteren ...

Page 51: ... Dell Ultra Speed Drive 5 Remove the standoff nut from the SSD 6 Slide the SSD out of the M 2 slot on the Dell Ultra Speed Drive Installing the Dell Ultra Speed Drive Prerequisites Als u een component vervangt dient u het bestaande component te verwijderen alvorens de installatieprocedure uit te voeren About this task The following image indicates the location of the Dell Ultra Speed Drive and pro...

Page 52: ...52 Demonteren en hermonteren ...

Page 53: ...n assembly NOTE This step is valid for system configuration that is shipped with 80 W CPU 3 Install the front bezel 4 Install the top cover side bezel 5 Install the side cover 6 Follow the procedure in after working inside your computer Grafische kaart Removing the graphics card Prerequisites 1 Follow the procedure in before working inside your computer 2 Remove the side cover 3 Remove the top cov...

Page 54: ...r card Installing the graphics card Prerequisites Als u een component vervangt dient u het bestaande component te verwijderen alvorens de installatieprocedure uit te voeren About this task The following image indicates the location of the graphics card and provides a visual representation of the installation procedure 54 Demonteren en hermonteren ...

Page 55: ...til it clicks into place Next steps 1 Install the riser card 2 Install the fan assembly NOTE This step is valid for system configuration that is shipped with 80 W CPU 3 Install the front bezel 4 Install the top cover side bezel 5 Install the side cover 6 Follow the procedure in after working inside your computer Demonteren en hermonteren 55 ...

Page 56: ...over 3 Remove the top cover side bezel 4 Remove the front bezel 5 Remove the fan assembly About this task The following images indicate the location of the heat sink and provide a visual representation of the removal procedure Figure 4 Heat sink shipped with system configuration shipped with 65 W CPU 56 Demonteren en hermonteren ...

Page 57: ...1 as printed on the heat sink 2 Lift the heat sink from the system board Installing the heat sink Prerequisites Als u een component vervangt dient u het bestaande component te verwijderen alvorens de installatieprocedure uit te voeren About this task The following image indicates the location of the heat sink and provides a visual representation of the installation procedure Demonteren en hermonte...

Page 58: ...Figure 6 Heat sink shipped with system configuration shipped with 65 W CPU 58 Demonteren en hermonteren ...

Page 59: ...the processor 2 Tighten the captive screws that secure the heat sink to the system board NOTE Tighten the screws in a sequential order 1 2 3 as printed on the heat sink Next steps 1 Install the fan assembly 2 Install the front bezel 3 Install the top cover side bezel 4 Install the side cover 5 Follow the procedure in after working inside your computer Demonteren en hermonteren 59 ...

Page 60: ...terposer module and provide a visual representation of the removal procedure Steps 1 Flip open the actuator and disconnect the SATA FPC cable from the system board 2 Loosen and remove the single screw M3x5 securing the interposer module to the system board Installing the interposer module Prerequisites Als u een component vervangt dient u het bestaande component te verwijderen alvorens de installa...

Page 61: ...he front bezel 4 Install the top cover side bezel 5 Install the side cover 6 Follow the procedure in after working inside your computer Processor Removing the processor Prerequisites 1 Follow the procedure in before working inside your computer 2 Remove the side cover 3 Remove the top cover side bezel 4 Remove the front bezel 5 Remove the fan assembly 6 Remove the heat sink About this task The fol...

Page 62: ... socket or allow any objects to fall on the pins in the socket 3 Gently lift the processor from the processor socket Installing the processor Prerequisites If you are replacing a component remove the existing component before performing the installation procedure About this task The following image indicates the location of the processor and provides a visual representation of the installation pro...

Page 63: ...ers are aligned at the same height If one or more corners of the processor are higher than the others the processor is not seated properly 2 When the processor is fully seated in the socket close the processor cover 3 Press down and push the release lever under the securing tab to lock it Next steps 1 Install the heat sink 2 Install the fan assembly 3 Install the front bezel 4 Install the top cove...

Page 64: ... de harde schijfeenheid 7 Verwijder de SSD 8 Verwijder de WLAN kaart 9 Verwijder de luidspreker 10 Verwijder de ventilatoreenheid 11 Verwijder de geheugenmodules 12 Verwijder de riser kaart 13 Verwijder de koelplaat 14 Verwijder de interposer module Over deze taak De volgende afbeeldingen geven de locatie van de systeemkaart aan en bieden een visuele weergave van de verwijderingsprocedure 64 Demon...

Page 65: ...Demonteren en hermonteren 65 ...

Page 66: ... schroeven 6 32 waarmee de systeemkaart aan het chassis wordt bevestigd 4 Til de systeemkaart weg van het chassis De systeemkaart plaatsen Vereisten Als u een onderdeel vervangt dient u het bestaande onderdeel te verwijderen alvorens de installatieprocedure uit te voeren Over deze taak De volgende afbeelding geeft de locatie van de systeemkaart aan en biedt een visuele weergave van de installatiep...

Page 67: ...Demonteren en hermonteren 67 ...

Page 68: ...m de caddy support van de harde schijf aan de systeemkaart te bevestigen 4 Plaats de drie schroeven M3x4 en drie schroeven 6 32 terug waarmee de systeemkaart aan het chassis wordt bevestigd Vervolgstappen 1 Installeer de interposer kaart 2 Installeer de koelplaat 3 Installeer de riser kaart 4 Plaats de geheugenmodules 5 Plaats de luidspreker 6 Installeer de ventilatoreenheid 7 Plaats de WLAN kaart...

Page 69: ... poort DisplayPort 1 4 poort HDMI 2 0b poort USB 3 2 Gen 2 Type C poort met alternatieve modus 9 Processorsocket 10 Connector van de CPU ventilator 11 Connector voor de interne luidspreker 12 Twee SODIMM DDR4 geheugenslots 13 M 2 2230 2280 SSD PCIe x4 connector Interne antenne De interne antenne verwijderen Vereisten 1 Volg de procedure in Voordat u in de computer gaat werken 2 Verwijder de zijpla...

Page 70: ...beeldingen geven de locatie van de interne antenne aan en bieden een visuele weergave van de verwijderingsprocedure Stappen 1 Wrik de metalen routeringsgeleiders los en verwijder de antennekabels van het chassis 2 Maak de enkele schroef M3x3 los waarmee de interne antenne aan het chassis wordt bevestigd en verwijder de schroef De interne antenne installeren Vereisten Als u een component vervangt d...

Page 71: ...r de metalen geleiders op het chassis Vervolgstappen 1 Installeer de systeemkaart 2 Installeer de interposer kaart 3 Installeer de koelplaat 4 Installeer de riser kaart 5 Plaats de geheugenmodules 6 Plaats de luidspreker 7 Installeer de ventilatoreenheid 8 Plaats de WLAN kaart 9 Plaats de SSD 10 Installeer de harde schijfeenheid 11 Plaats het montagekader 12 Installeer de SMA antenne 13 Plaats de ...

Page 72: ...derde jumper geactiveerde RTC reset is op deze modellen stopgezet Start de RTC reset met het systeem uitgeschakeld en aangesloten op netstroom Houd de aan uit knop dertig 30 seconden ingedrukt De RTC van het systeem wordt opnieuw ingesteld zodra u de aan uit knop loslaat Dell SupportAssist Pre Boot System prestatiecontrole uitvoeren Over deze taak De SupportAssist diagnose ook bekend als systeemdi...

Page 73: ...LED gedrag Tabel 9 Diagnostisch LED gedrag Knipperend patroon Omschrijving van het probleem Mogelijke oplossing Amber Wit 1 2 Onherstelbare SPI Flash fout 2 1 CPU fout Voer de diagnostische hulpprogramma s van Intel CPU uit Vervang de systeemkaart als het probleem aanhoudt 2 2 Systeemkaartfout inclusief BIOS beschadiging of ROM fout Flash nieuwste BIOS versie Vervang de systeemkaart als het proble...

Page 74: ...voedingskabel Diagnostische foutmeldingen Tabel 10 Diagnostische foutmeldingen Foutmeldingen Beschrijving AUXILIARY DEVICE FAILURE Er kan een fout zitten in de touchpad of de externe muis Controleer bij een externe muis de kabelaansluiting Schakel de optie Pointing Device aanwijsapparaat in het System Setup programma in BAD COMMAND OR FILE NAME Controleer of u de opdracht correct hebt gespeld spat...

Page 75: ...iet meer op opdrachten van de computer Schakel de computer uit verwijder de vaste schijf en start de computer op vanaf een cd Schakel daarna de computer weer uit plaats de vaste schijf terug en start de computer opnieuw op Als het probleem aanhoudt probeert u een ander station Voer de vaste schijftests in Dell Diagnostics Dell diagnostiek uit zie HARD DISK DRIVE FAILURE De vaste schijf reageert ni...

Page 76: ...geheugenmodule die defect is of niet goed vastzit Plaats de geheugenmodules opnieuw en vervang ze indien nodig MEMORY ODD EVEN LOGIC FAILURE AT ADDRESS READ VALUE EXPECTING VALUE Mogelijk is er een geheugenmodule die defect is of niet goed vastzit Plaats de geheugenmodules opnieuw en vervang ze indien nodig MEMORY WRITE READ FAILURE AT ADDRESS READ VALUE EXPECTING VALUE Mogelijk is er een geheugen...

Page 77: ...TIME OF DAY NOT SET PLEASE RUN THE SYSTEM SETUP PROGRAM De in het System Setup programma ingestelde tijd of datum komt niet overeen met die van de systeemklok Corrigeer de instellingen voor de opties Datum en Tijd TIMER CHIP COUNTER 2 FAILED Mogelijk werkt een chip op de systeemkaart niet goed Voer de System Set tests in Dell Diagnostics Dell diagnostiek uit zie UNEXPECTED INTERRUPT IN PROTECTED M...

Page 78: ...mproblemen 1 Ga naar https www dell com support home app knowledgebase 2 Typ het onderwerp of trefwoord in het vak Search 3 Klik op Search om verwante artikelen op te halen Leer en krijg meer informatie over uw product Productspecificaties Besturingssysteem Uw product installeren en gebruiken Databack up Problemen oplossen en diagnostiek Fabrieks en systeemherstel BIOS gegevens Dell biedt diverse ...

Page 79: ...ondersteuning a Voer de Servicetag van uw systeem in in het veld Voer de Servicetag in b Klik op verzenden De supportpagina met de verschillende ondersteuningscategorieën wordt weergegeven 4 Voor algemene ondersteuning a Selecteer uw productcategorie b Selecteer uw productsegment c Selecteer uw product De supportpagina met de verschillende ondersteuningscategorieën wordt weergegeven 5 Raadpleeg ht...

Reviews: