


Inf
orm
ation
in th
is document is subje
ct t
o change
with
out notice
.
©200
9D
ellI
nc.
All
righ
tsr
ese
rve
d.
Reproduc
tion of the
se material
s in
any manner whatsoever
without the written permission of
Dell Inc. is
strictly forbidde
n.
Trade
mar
ks used in this text:
Dell
, and
the
DEL
L
logo, a
re t
rademarks of De
ll Inc.
Other tradema
rks
and trade names may
be us
ed i
n th
is document to refer to eith
er the
entities claiming the
marks
and nam
es or
th
eir prod
ucts
. Dell Inc. disclaims a
ny propr
ietary interest in trademarks a
nd tr
ade names
other tha
n it
s own.
Mode
l G
761N, G789N, G791N, G795N, H55
3N
, H575N, H579N, H
588N, J541N, J542N, J544N, J559N, K558N, K559N, K
562N, K579N
06/2
009 Par
t Num
ber
990-
3550A
www.d
ell.com | support.dell.com
Printed in India
*990-3550*
15 A
20 A
30 A
32 A
60 A
48 A
Basic Rack Power
Distribution Unit (PDU)
Installation
Preliminary Information
Features
This sheet provides information on installing Dell Rack PDUs.
Receiving Inspection
Inspect the package and contents for shipping damage, and make sure that all parts were sent. Report any
damage immediately to the shipping agent, and report missing contents, damage, or other problems
immediately to Dell or your Dell reseller.
Please recycle
The shipping materials are recyclable. Please save them for later use, or dispose of them appropriately.
Install the Rack PDU
Attach the cord retention trays (optional for vertical Rack PDUs
only)
Caution:
Use only the supplied screws.
Attach the cord retention trays to the Rack PDU, using four flat-head screws (provided) per tray.
Attach cords to the tray (optional for vertical Rack PDUs only)
To attach a cord to the tray, loop the cord and then secure it to the tray with a wire tie (provided).
Note:
Each cord must be secured to the tray so that you can unplug it from the Rack PDU
without removing the wire tie.
Note:
When installing the Rack PDU, ensure that the power cord plug is accessible, and that
the Rack PDU is connected to a grounded outlet.
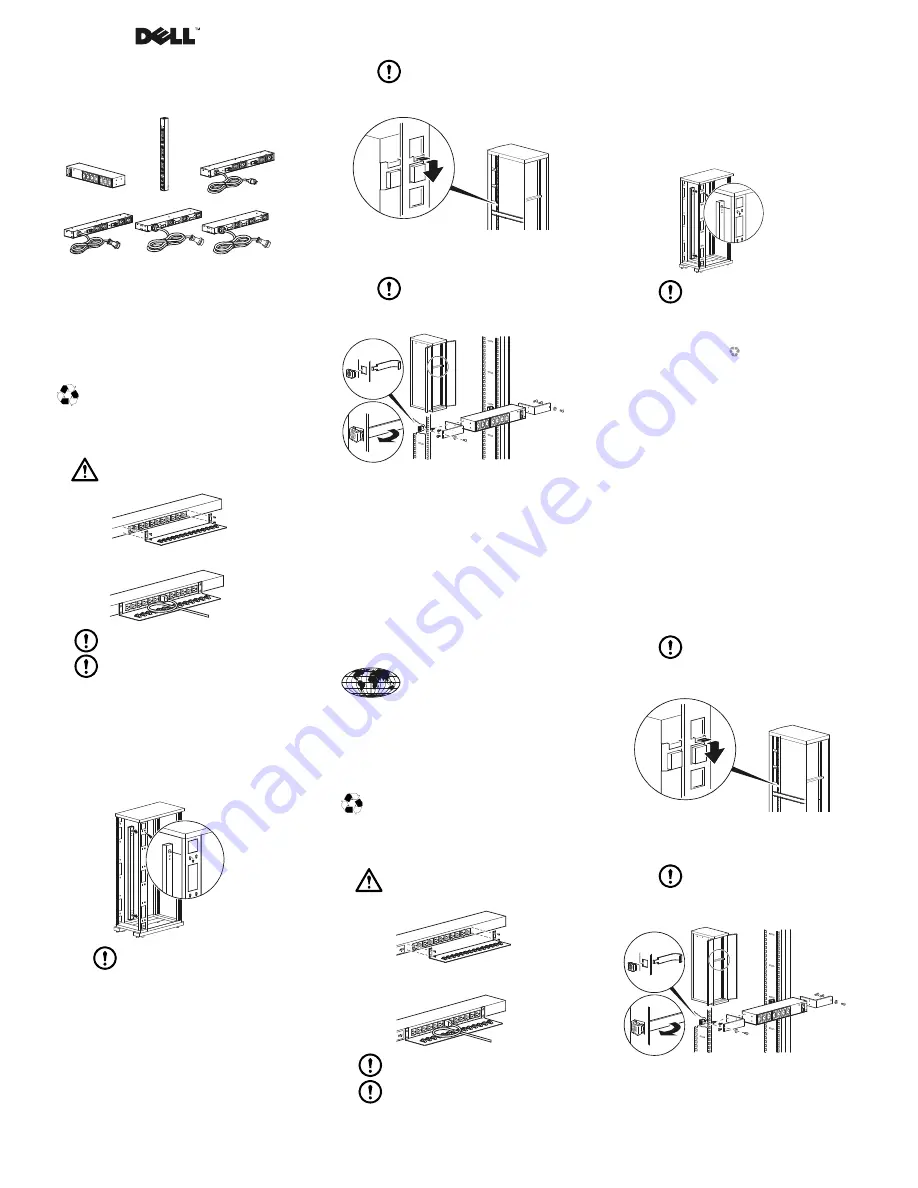
Mounting options
You can install the Rack PDU in one of two ways: using toolless mounting pegs (provided) or mounting
brackets (provided).
Vertical mounting.
• To install the Rack PDU using the toolless mounting method, install it in the rear of an enclosure, in the
cable channel directly behind the rear vertical mounting rails.
• To install the Rack PDU using the mounting brackets, install it on a vertical mounting rail on your rack
or enclosure.
Horizontal mounting.
To install the Rack PDU using the horizontal mounting brackets, install the
brackets on the Rack PDU and then attach the Rack PDU to the rack using cage nuts (provided with your
enclosure).
Toolless mounting (Vertical Rack PDUs only).
1.
Slide both mounting pegs into the holes located in the channel in the rear panel of the enclosure.
2.
Snap the Rack PDU into place by pushing it downward until it locks into position.
Note:
You can mount two Rack PDUs on one side of the enclosure by using the
toolless mounting method or mount one Rack PDU on each side of the enclosure
using the 90 degree mounting option with the deep toolless mounting pegs
(provided).
pd
u0
49
4
a
pdu
04
95
a
pd
u04
44
a
Bracket mounting
Vertical mounting.
To mount the Rack PDU vertically in any standard EIA-310 rack or enclosure:
1.
Identify the location for the Rack PDU in either the vertical or horizontal rail position that is closest
to the systems to which it will supply power.
Note:
Ensure that all power cords that you intend to connect to the Rack PDU can
reach the position you have selected.
2.
Position the Rack PDU so that the mounting hooks enter the square holes on the vertical rail.
3.
Push down the Rack PDU until the mounting hooks seat in the square holes and the release button
pops out and clicks.
Horizontal mounting.
You can mount the Rack PDU in a EIA-310-D standard 19-inch rack:
1.
Choose a mounting position for the Rack PDU with either the front or rear facing out of the
enclosure.
2.
Attach the mounting brackets to the Rack PDU, using the
flat-head screws (provided).
3.
Choose a location for the unit:
Note:
The unit occupies one U-space. A number on the enclosure’s vertical rail
indicates the middle of a U-space.
a. Insert cage nuts (provided with the enclosure) above and below the middle hole on each
vertical mounting rail in your chosen location.
b. Align the mounting holes of the brackets with the installed cage nuts. Insert and tighten
screws.
Limited Hardware Warranties and
Return Policy
DELL’S LIMITED HARDWARE WARRANTY PROVIDES IMPORTANT INFORMATION REGARDING
DISCLAIMERS AND LIMITATIONS OF LIABILITY BY DELL, WHICH CAN MATERIALLY IMPACT YOUR
RIGHTS. YOUR USE OF THE PRODUCT IS DEEMED TO BE YOUR ACCEPTANCE OF THE TERMS AND
CONDITIONS SET FORTH IN DELL’S LIMITED HARDWARE WARRANTY AND RETURN POLICY. TO
DETERMINE WHICH WARRANTY CAME WITH YOUR HARDWARE PRODUCTS, SEE YOUR PACKAGING
SLIP OR CONSULT YOUR PURCHASE AGREEMENT.
You can view and print Dell’s Limited Hardware Warranty and Return Policy:
U.S. Customers
Limited Hardware Warranty:
www.dell.com/warranty
Return Policy:
www.dell.com/returnpolicy
Canadian Customers
Limited Warranty:
http://support.dell.com/support/topics/topic.aspx/ca/shared/support/en/
warranty_information?~ck=ln&c=ca&l=en&lnki=0&s=gen
Total Satisfaction Return Policy:
http://www1.ca.dell.com/content/topics/reftopic.aspx/gen/en/
policy?c=ca&l=en&s=gen&~section=018
If you do not have access to the Website, you can call to request a hard copy of the Limited Hardware Warranty and
Return Policy as follows.
U.S. Customers: 1-800-8228965
Canadian customers: 1-800-387-5757
Einleitende Informationen
Funktionen
In dieser Broschüre finden Sie Informationen zur Installation von Dell Rack-PDU (Einfache Verteilerleiste).
Überprüfung beim Empfang
Überprüfen Sie die Verpackung und den Inhalt auf Transportschäden und vergewissern Sie sich, dass alle Teile
geliefert wurden. Teilen Sie Schäden unverzüglich dem Transportunternehmen mit und wenden Sie sich bei
fehlenden Teilen, Schäden und anderen Beanstandungen unverzüglich an Dell oder an Ihren Dell-Händler.
Recycling
Die Verpackung besteht aus wiederverwertbarem Material. Bitte bewahren Sie sie für die spätere
Verwendung auf oder entsorgen Sie sie ordnungsgemäß.
Montage der Rack-PDU
Befestigen der Kabelhalterungseinsätze (diese Option gilt nur
für Rackmount-PDUs)
Vorsicht:
Verwenden Sie ausschließlich die mitgelieferten Schrauben.
Befestigen Sie die Kabelhalterungseinsätze mit jeweils vier Flachkopfschrauben (beiliegend) pro Einsatz an
der Rack-PDU.
Befestigen der Kabel am Einsatz (diese Option gilt nur für
Rackmount-PDUs)
Legen Sie das Kabel in eine Schlinge und befestigen Sie es mit einem Kabelbinder (beiliegend) am Einsatz.
Hinweis:
Jedes Kabel muss so am Einsatz befestigt werden, dass es von der Rack-PDU
abgezogen werden kann, ohne dass der Kabelbinder entfernt werden muss.
Hinweis:
Bei der Installation der Rack-PDU sicherstellen, dass der Netzstecker zugänglich
ist und die Verteilerleiste nur an eine geerdete Stromquelle angeschlossen wird.
pd
u0
44
5a
pd
u0
123b
pdu
01
27
b
Montage-Optionen
Sie können die Rack-PDU auf zwei Arten montieren: mit Montagestiften (kein Werkzeug erforderlich, beiliegend) oder
mit Montagewinkeln (beiliegend).
Vertikale Montage.
• Die Rack-PDU zur Installation ohne Werkzeug an der Rückseite eines Gehäuses im Kabelkanal direkt
hinter den vertikalen Befestigungsschienen anbringen.
• Wenn Sie die Rack-PDU mit den Montagewinkeln montieren möchten, setzen Sie diese in eine vertikale
Montageschiene am Rack oder Gehäuse ein.
Horizontale Montage.
Bringen Sie zur Installation der Rack-PDU Verteilerleiste mit den
horizontalen Montagewinkeln die Winkel an der Rack-PDU Verteilerleiste an und montieren Sie diese dann
mit Käfigmuttern (im Lieferumfang des Gehäuses enthalten) am Rack.
Montage ohne Werkzeug (gilt nur für vertikal einbaubare
Rackmount-PDUs)
1.
Führen Sie die beiden Montagestifte in die entsprechenden Bohrungen im Kanal an der Rückseite des
Gehäuses ein.
2.
Drücken Sie die Rack-PDU Verteilerleiste nach unten, bis sie in ihrer Position einrastet.
Hinweis:
Bei werkzeugloser Montage können Sie zwei Rack-PDUs auf einer
Gehäuseseite befestigen; oder Sie können unter Verwendung der 90°-Montageoption
mit den mitgelieferten Montagestiften für werkzeuglosen Einbau auf beiden
Gehäuseseiten je eine Rack-PDU befestigen.
Montage mit Befestigungswinkeln
Vertikale Montage.
So montieren Sie die Rack-PDU vertikal in jedem standardmäßigen EIA-310-
Rack oder -Gehäuse:
1.
Bestimmen Sie den Einbauort für die Rack-PDU. Die PDU kann entweder auf der vertikalen oder
horizontalen Schiene, die sich am nächsten an der Stromversorgung befindet, eingebaut werden.
Hinweis:
Stellen Sie sicher, dass alle Stromkabel, die an die Rack-PDU angeschlossen
werden sollen, auch bis zu der von Ihnen gewählten Einbauposition reichen.
2.
Positionieren Sie die Rack-PDU so, dass die Montagehaken in die quadratischen Öffnungen auf der
vertikalen Schiene eingeführt werden.
3.
Drücken Sie die Rack-PDU herunter, bis die Montagehaken fest in den quadratischen Öffnungen sitzen
und die Entriegelungstaste herausgedrückt wird und einrastet.
Horizontale Montage.
Die Rack-PDU kann in einem EIA-310-D 19-Zoll-Standard-Rack installiert
werden:
1.
Wählen Sie eine Montageposition für die Verteilerleiste, bei der entweder die Vorderseite oder die
Rückseite der Verteilerleiste aus dem Gehäuse heraus zeigt.
2.
Befestigen Sie die Montagewinkel mit jeweils vier Flachkopf-schrauben (im Lieferumfang enthalten)
an der Rack-PDU.
3.
Wählen Sie einen Einbauort für die Einheit aus:
Hinweis:
Die Einheit benötigt eine Höheneinheit. Eine Zahl an den vertikalen
Rahmenschienen des Gehäuses kennzeichnet die Mitte einer
Höheneinheit.
a. Setzen Sie am gewünschten Einbauort an beiden vertikalen Rahmenschienen unterhalb und
unterhalb des mittleren Lochs je zwei Käfigmuttern (im Lieferumfang des Gehäuses enthalten)
über und unter der Einkerbung ein.
b. Richten Sie die Montagebohrungen der Winkel auf die installierten Käfigmuttern aus.
Setzen Sie die Schrauben ein und ziehen Sie sie fest.
Eingeschränkte Hardware-
Garantien und Richtlinien für die
Rücksendung
DIE EINGESCHRÄNKTE HARDWARE-GARANTIE ENTHÄLT WICHTIGE INFORMATIONEN ZUM
HAFTUNGSAUSCHLUSS BZW. HAFTUNGSEINSCHRÄNKUNGEN VON DELL, DIE IHRE RECHTE
EINSCHRÄNKEN. MIT DER VERWENDUNG DIESES PRODUKTS STIMMEN SIE DEN BESTIMMUNGEN ZU,
DIE VON DELL IN DER EINGESCHRÄNKTEN HARDWARE-GARANTIE UND DEN RICHTLINIEN FÜR DIE
RÜCKSENDUNG FESTGELEGT WURDEN. SIE KÖNNEN DIE FÜR SIE GÜLTIGE GARANTIE FÜR IHR
HARDWARE-PRODUKT AUS DEM INFORMATIONSDOKUMENT IN DER VERPACKUNG ODER DEM
KAUFVERTRAG ERSEHEN.
Sie können die eingeschränkte Hardware-Garantie und die Richtlinien für die Rücksendung aufrufen und ausdrucken:
U.S.-Kunden
Eingeschränkte Hardware-Garantie:
www.dell.com/warranty
p
du
0
44
4a
pd
u0
44
5a


