background image

About Your Printer  


Identifying Your Printer


Understanding the Operator Panel


Using the Operator Panel Menus


Identifying Your Printer 


The printer is available in two base models. The following table indicates some of the differences between the models. 


Configured Models 


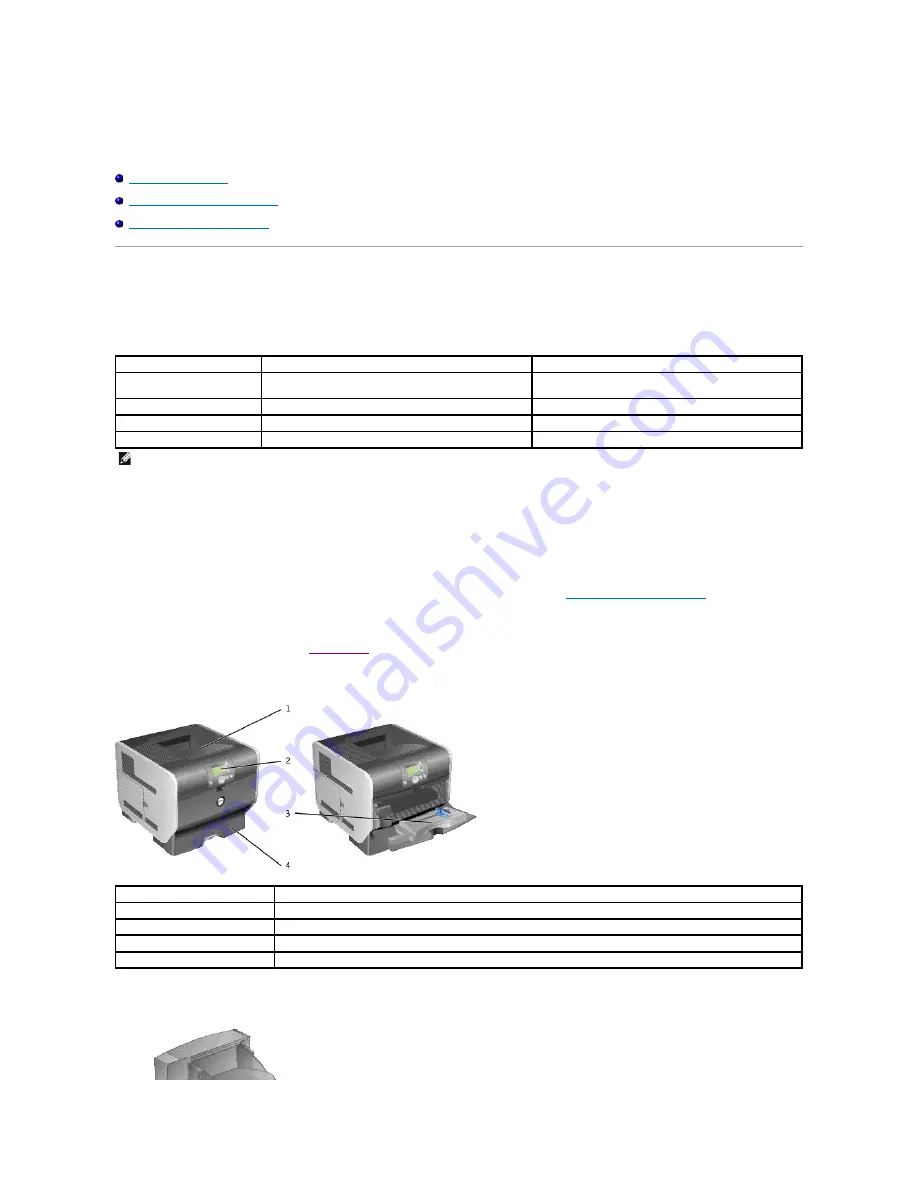
The following illustrations show a standard network and fully configured printer. If you attach print media handling options to the printer, it may look more like 
the fully configured model. 


Items denoted with an asterisk (*) are options. For more information about installing input options, see 

Installing and Removing Options


or the instructions 

that came with the option. 


To purchase any of the options below, go to 

www.dell.com

 or contact your Dell Sales Representative. 

Standard Network 


Fully Configured 


5210n 

5310n 

Input capacity 

600 sheets 
(500-sheet tray + 100-sheet multipurpose feeder) 

600 sheets 
(500-sheet tray + 100-sheet multipurpose feeder) 

Output capacity 

250 sheets 

250 sheets 

Standard memory 

64MB 

128MB 

Maximum memory capacity 

576MB 

640MB 

NOTE: 

The printer model number is shown on the operator panel.

Number: 

Part: 

Standard output bin (250 sheets) 

Operator panel 

Multipurpose feeder (100 sheets) 

Standard tray (500 sheets) 

Summary of Contents for 5210n Mono Laser Printer

Page 1: ...tions For more information about installing input options see Installing and Removing Options or the instructions that came with the option To purchase any of the options below go to www dell com or contact your Dell Sales Representative Standard Network Fully Configured 5210n 5310n Input capacity 600 sheets 500 sheet tray 100 sheet multipurpose feeder 600 sheets 500 sheet tray 100 sheet multipurp...

Page 2: ...he printer is on busy idle processing a job or requires operator intervention l Off Power is off l Solid green Printer is on but idle l Blinking green Printer is warming up processing data or printing a job l Solid amber Operator intervention is required 2 Menu button Open the menu index NOTE The printer must be in the Ready state to access the menu index A message indicating the menus are unavail...

Page 3: ...pping appears When the printer has stopped the status line in the operator panel shows Stopped and a list of options appears 7 Display View messages and graphics describing the current state of the printer and indicating possible printer problems you must resolve The operator panel display is a 4 line back lit grayscale display that can show both graphics and text Menu Menu Item Paper Menu l Defau...

Page 4: ...lus Contacting Dell You can access Dell Support at support dell com Select your region on the WELCOME TO DELL SUPPORT page and fill in the requested details to access help tools and information You can contact Dell electronically using the following addresses l World Wide Web www dell com www dell com ap for Asian Pacific countries only www euro dell com for Europe only www dell com la for Latin A...

Page 5: ...he author may not be used to endorse or promote products derived from this software without specific prior written permission THIS SOFTWARE IS PROVIDED BY THE AUTHOR AS IS AND ANY EXPRESS OR IMPLIED WARRANTIES INCLUDING BUT NOT LIMITED TO THE IMPLIED WARRANTIES OF MERCHANTABILITY AND FITNESS FOR A PARTICULAR PURPOSE ARE DISCLAIMED IN NO EVENT SHALL THE AUTHOR BE LIABLE FOR ANY DIRECT INDIRECT INCI...

Page 6: ...printer l Latest drivers for my printer l Answers to technical service and support questions l Documentation for my printer Dell Support Website support dell com The Dell Support website provides several online tools including l Solutions Troubleshooting hints and tips articles from technicians and online courses l Upgrades Upgrade information for components such as memory l Customer Care Contact ...

Page 7: ...h two steps 1 copyright the software and 2 offer you this license which gives you legal permission to copy distribute and or modify the software Also for each author s protection and ours we want to make certain that everyone understands that there is no warranty for this free software If the software is modified by someone else and passed on we want its recipients to know that what they have is n...

Page 8: ... source or binary form with the major components compiler kernel and so on of the operating system on which the executable runs unless that component itself accompanies the executable If distribution of executable or object code is made by offering access to copy from a designated place then offering equivalent access to copy the source code from the same place counts as distribution of the source...

Page 9: ...CURATE OR LOSSES SUSTAINED BY YOU OR THIRD PARTIES OR A FAILURE OF THE PROGRAM TO OPERATE WITH ANY OTHER PROGRAMS EVEN IF SUCH HOLDER OR OTHER PARTY HAS BEEN ADVISED OF THE POSSIBILITY OF SUCH DAMAGES END OF TERMS AND CONDITIONS How to Apply These Terms to Your New Programs If you develop a new program and you want it to be of the greatest possible use to the public the best way to achieve this is...

Page 10: ...General Public License applies to certain designated libraries and is quite different from the ordinary General Public License We use this license for certain libraries in order to permit linking those libraries into non free programs When a program is linked with a library whether statically or using a shared library the combination of the two is legally speaking a combined work a derivative of t...

Page 11: ... on the terms of this License whose permissions for other licensees extend to the entire whole and thus to each and every part regardless of who wrote it Thus it is not the intent of this section to claim rights or contest your rights to work written entirely by you rather the intent is to exercise the right to control the distribution of derivative or collective works based on the Library In addi...

Page 12: ...you do not accept this License Therefore by modifying or distributing the Library or any work based on the Library you indicate your acceptance of this License to do so and all its terms and conditions for copying distributing or modifying the Library or works based on it 10 Each time you redistribute the Library or any work based on the Library the recipient automatically receives a license from ...

Page 13: ...HOLDER OR OTHER PARTY HAS BEEN ADVISED OF THE POSSIBILITY OF SUCH DAMAGES END OF TERMS AND CONDITIONS How to Apply These Terms to Your New Libraries If you develop a new library and you want it to be of the greatest possible use to the public we recommend making it free software that everyone can redistribute and change You can do so by permitting redistribution under these terms or alternatively ...

Page 14: ...t notice 2005 Dell Inc All rights reserved Reproduction in any manner whatsoever without the written permission of Dell Inc is strictly forbidden Trademarks used in this text Dell and the DELL logo are trademarks of Dell Inc Microsoft and Windows are registered trademarks of Microsoft Corporation Other trademarks and trade names may be used in this document to refer to either the entities claiming...

Page 15: ...e jam occurred However it is best to clear the entire paper path to ensure you have cleared all possible jams Clearing Printer Jams Number Message What to do 1 27x Paper Jam Check Bin x Open the output bin rear doors and then remove the jam 2 202 Paper Jam Open Rear Door Open the rear door on the printer and then remove the jam 3 201 Paper Jam Remove Cartridge Open the top front cover remove the p...

Page 16: ...idge 1 Pull on the notch on the front of the printer to lower the multipurpose feeder 2 Push the release latch to the right to open the top front cover 3 Lift and pull the print cartridge out of the printer 4 Place the print cartridge aside NOTE The following clearing jam instructions may seem out of numerical sequence However they have been grouped to help you quickly clear the print path To go t...

Page 17: ...OTE The print media may be covered with unfused toner which can stain garments and skin NOTICE If the print media does not move immediately when you pull stop pulling You need to access the print media from the printer rear door CAUTION Do not use any pointed objects to remove the paper This could cause personal injury or damage to the printer ...

Page 18: ...wise continue with step 2 2 Open the printer rear door 3 Remove the jammed media 4 Close the rear door 5 Press the Select button CAUTION The inside of the printer may be hot Allow the printer to cool before touching any internal components CAUTION Do not use any pointed objects to remove the paper This could cause personal injury or damage to the printer ...

Page 19: ...ation pull the media either up or down 3 Close the duplex rear door Make sure it snaps into place 4 Press the Select button 23x and 24x Jams Paper jams in these areas can occur on the incline surface of a tray or across more than one tray To clear these areas 1 Open the printer paper tray and remove any jammed media ...

Page 20: ...n any optional trays beginning at the top and remove any jammed media Pull the print media either up or down If it does not pull easily one way try the other way 4 Press the Select button 250 Paper Jam Check MP Feeder 1 Remove the paper from the multipurpose feeder ...

Page 21: ...oward the inside of the tray until it lightly rests against the edge of the media 5 Press the Select button 260 Paper Jam Check Env Feeder The envelope feeder feeds envelopes from the bottom of the stack the bottom envelope will be the one that is jammed 1 Lift the envelope weight ...

Page 22: ... the printer and then set it aside b Remove the envelope from the printer c Reinstall the envelope feeder Make sure it snaps into place 3 Flex and stack the envelopes 4 Load the envelope feeder 5 Adjust the guide NOTE If you cannot remove the envelope the print cartridge will have to be removed See 200 and 201 Paper Jam Remove Cartridge for more information ...

Page 23: ...t expander 1 If the paper is exiting into the bin pull the media straight out and press the Select button Otherwise continue with step 2 2 Push the output bin rear door latches in toward the center The rear doors will open and drop down NOTE If you only have one output option you may only have one rear door ...

Page 24: ...3 Remove the jammed media 4 Close the output bin rear doors and make sure all doors are secure 5 Press the Select button ...

Page 25: ... These licenses do not provide you any rights to the Dell or third party copyrighted software in this printer Since the GNU licensed software that the Dell modifications are based upon is supplied explicitly without warranty use of the Dell modified version is similarly provided without warranty See the warranty disclaimers in the referenced licenses for additional details To obtain source code fi...

Page 26: ...nded and then click Install When all of the files are installed on your computer the Congratulations screen appears and prompts you to connect your printer 5 Click Finish and then connect the printer to the computer using a USB or parallel cable and turn the printer on Microsoft s Plug N Play finishes installing the printer and prompts you when setup is complete Installing Additional Printer Drive...

Page 27: ...omputer h Click Close when installation is complete 2 Open Finder click Applications and then click Utilities 3 Double click Print Center or Printer Setup Utility 4 Do one of the following l If the USB attached printer appears in the Printer list quit Print Center or Printer Setup Utility A queue has been created for the printer l If the USB attached printer does not appear in the Printer list mak...

Page 28: ...vers and Utilities CD All the printer driver packages support local printing using a parallel connection The driver package for Sun Solaris supports USB connections to Sun Ray appliances and Sun workstations Before Installing Do the following before you install printer drivers 1 Make sure you are logged on with root user authority 2 Make sure you have enough disk space available for a complete ins...

Page 29: ...ssing Enter ps ef grep vold If you get a response the vold process is running and therefore the Volume Manager is running The CD automatically mounts Start the package installation program by typing pkgadd d cdrom cdrom0 unix packages print drivers solaris2 sparc pkg If there is not a response Volume Manager is not running Make sure that the cdrom directory exists Mount the CD For example if the p...

Page 30: ...e names you want to remove on the command line See your operating system documentation for more information Removing remaining directories Package removal utilities usually do not remove directories shared by more than one package After removing all of the printer drivers packages some directories may need to be removed manually To see if any directories remain after removing all the packages chec...

Page 31: ...the power switch l Disconnect all cords and cables from the printer before attempting to move the printer l Failure to repackage the printer properly for shipment can result in damage to the printer not covered by the printer warranty l Damage to the printer caused by improper moving is not covered by the printer warranty Moving the Printer Within the Office The printer can be safely moved from on...

Page 32: ...lers and fuser NOTE Replacement of the fuser must be performed by an authorized service technician l When 80 Scheduled maintenance advised appears on the operator panel display l When toner fog or background shading appears on printed pages l After printing approximately 300 000 pages Replacing Maintenance Kit Items Charge rolls When toner fog or background shading appears on printed pages or afte...

Page 33: ...e to side and front to back several times to redistribute the toner reinsert it and continue printing Repeat this procedure multiple times until the print remains faded When the print remains faded replace the toner cartridge To replace the toner cartridge 1 Pull on the notch on the front of the printer to lower the multipurpose feeder 2 Push the release latch to the right to open the top front co...

Page 34: ...tic strap and tape 5 Thoroughly shake the cartridge side to side and front to back several times to distribute toner evenly 6 Insert the print cartridge into the printer CAUTION When replacing a toner cartridge do not leave the new cartridge exposed to direct light for an extended period of time Extended light exposure can cause print quality problems ...

Page 35: ...intenance Kit Items Replacing the Charge Rolls Order a new charge roll kit when toner fog or background shading appears on printed pages 1 Turn the printer off and unplug the printer power cord 2 Pull on the notch on the front of the printer to lower the multipurpose feeder ...

Page 36: ...rd cover retainer to the hook on the printer 6 Insert the hook on the bottom of the cardboard cover retainer into the slot on the printer You will need to lower the top front cover to do this 7 Locate the used charge roll above the area for the print cartridge 8 Pull the charge roll to the left until charge roll drops out of the right side ...

Page 37: ... blue tab on the left side of the charge roll with its hole in the arm marked with the corresponding blue arrow and insert it Pull the charge roll to the left 11 Lift the right side of the charge roll and insert it into its hole 12 Remove the packaging from the charge roll ...

Page 38: ...13 Remove the cardboard cover retainer 14 Reinstall the print cartridge into the printer 15 Close the top front cover 16 Close the multipurpose feeder ...

Page 39: ...printer off and unplug the printer power cord 2 Pull on the notch on the front of the printer to lower the multipurpose feeder 3 Push the release latch to the right to open the top front cover 4 Pull the print cartridge up and out of the printer 5 Locate the used transfer roller on the bottom of the inside of printer 6 Pry the left side of the transfer roller up from its slot to loosen it Use any ...

Page 40: ...er roller 9 Locate the small hole on the right side of the printer and insert the metal tab on the right side of the transfer roller into the hole 10 Lower the transfer roller gently until the left metal tab fits into the slot You may have to push it down for a secure fit 11 Reinstall the print cartridge into the printer ...

Page 41: ...13 Close the multipurpose feeder 14 Plug the printer power cord into a properly grounded electrical outlet Replacing the Pick Rollers 1 Remove the standard tray 2 Look underneath the printer for the pick roller arm and pull it down ...

Page 42: ...7 Discard the used pick rollers 8 Remove the two pick rollers from the packaging 9 Pull the pick roller arm down 10 Locate the recessed area on the pick roller and align it with the tab on the arm 11 Push the pick roller onto the arm with the tab aligned NOTE There are two arrows on each pick roller Make sure the bottom arrow faces you as you align the recessed area with the tab ...

Page 43: ...12 Repeat step 10 and step 11 to install the other pick roller 13 Gently release the pick roller arm 14 Insert the standard tray ...

Page 44: ...int Media Weights NOTE If you use a print media size not listed select the next larger size Input or Output Tray or Bin Paper Card Stock Transparencies Label Vinyl Paper Polyester Dual web or Integrated Standard 500 sheet tray Standard output bin Optional 250 sheet drawer Optional 500 sheet drawer Optional output expander Multipurpose feeder Optional duplex unit Optional envelope feeder Input or O...

Page 45: ... to 8 5 x 14 in 70 x 127 mm to 216 x 356 mm 2 75 x 5 in to 9 01 x 14 in 70 x 127 mm to 229 x 356 mm 5 83 x 7 17 in to 8 5 x 14 in 148 x 182 mm to 216 x 356 mm 7 Envelope 3 875 x 7 5 in 98 x 191 mm 9 Envelope 3 875 x 7 5 in 98 x 225 mm 10 Envelope 4 12 x 9 5 in 105 x 241 mm DL Envelope 4 33 x 8 66 in 110 x 220 mm B5 Envelope 6 93 x 9 84 in 176 x 250 mm C5 Envelope 6 38 x 9 01 in 162 x 229 mm Other ...

Page 46: ...6 mm 2 75 x 5 in to 9 01 x 14 in 70 x 127 mm to 229 x 356 mm 5 83 x 7 17 in to 8 5 x 14 in 148 x 182 mm to 216 x 356 mm 7 Envelope 3 875 x 7 5 in 98 x 191 mm 9 Envelope 3 875 x 7 5 in 98 x 225 mm 10 Envelope 4 12 x 9 5 in 105 x 241 mm DL Envelope 4 33 x 8 66 in 110 x 220 mm B5 Envelope 6 93 x 9 84 in 176 x 250 mm C5 Envelope 6 38 x 9 01 in 162 x 229 mm Other Envelope1 3 87 x 6 38 in to 6 93 x 9 84...

Page 47: ...to 135 g m2 16 to 36 lb bond grain long in the multipurpose feeder and optional 250 sheet trays Paper lighter than 60 g m2 16 lb might not be stiff enough to feed properly causing jams For best performance use 75 g m2 20 lb bond grain long paper When using paper narrower than 182 x 257 mm 7 2 x 10 1 in make sure the weight is greater than or equal to 90 g m2 24 lb bond Unacceptable paper 37 to 39 ...

Page 48: ... l Recycled paper having a weight less than 60 g m2 16 lb l Multiple part forms or documents Letterhead For the best print quality use 75 g m2 20 lb xerographic grain long paper Try a sample of any paper you are considering using with the printer before buying large quantities When loading letterhead note the recommended print side on the paper package and load paper accordingly Paper Characterist...

Page 49: ...rinting on transparencies l Be sure to set the Paper Type to Transparency from the printer driver to avoid damaging the printer l In Macintosh be sure to set the Paper Type to Transparency in the Print dialog on the Imaging choice in the Copies Pages pop up menu l Use transparencies designed specifically for laser printers Transparencies must be able to withstand temperatures of 230 C 446 F withou...

Page 50: ...s If you have any doubts about the envelopes you are considering using check with the envelope supplier l Load only one size of envelope at a time in the envelope feeder l A combination of high humidity over 60 and the high printing temperatures may seal the envelopes Labels The printer can print on many labels designed for use with laser printers These labels are supplied in letter size A4 size a...

Page 51: ... grain direction of print media Try a sample of any card stock you are considering using with the printer before purchasing a large quantity After printing approximately 10 000 pages of card stock or each time you replace the print cartridge complete the following steps to maintain printer feeding reliability 1 Print five sheets of paper 2 Wait approximately five seconds 3 Print five more sheets o...

Page 52: ...ore you load it If jams do occur with print media try feeding one sheet at a time through the multipurpose feeder l Do not use print media that you have cut or trimmed yourself l Do not mix print media sizes weights or types in the same print media source l Make sure the recommended print side is loaded in the source according to your simplex or duplex needs l Keep print media stored in an accepta...

Page 53: ...Paper Type menu items are correctly set the trays are automatically linked When one paper source is empty paper automatically feeds from the next linked source NOTE Only installed paper sources are displayed Menu selection Purpose Values Tray x Size Type Identifies the default paper size for each paper source NOTE For trays with automatic size sensing only the value detected by the hardware appear...

Page 54: ... name only appears once in the Paper Type value list Plain Paper Card Stock Transparency Labels Vinyl Labels Bond Envelope Letterhead Preprinted Colored Paper Custom Type x The multipurpose feeder is only displayed on the operator panel when Configure MP is set to Cassette Envelope Feeder Size Type Identifies the envelope size being loaded 7 3 4 Envelope 9 Envelope 10 Envelope US DL Envelope non U...

Page 55: ...y Texture Labels Texture Vinyl Labels Texture Envelope Texture Letterhead Texture Preprinted Texture Colored Texture Bond Texture Smooth Normal Rough Card Stock Texture Identifies the texture of the card stock loaded in a specific input source Smooth Normal Rough Shown if Card Stock is supported in the specified input source Custom x Texture Identifies the texture of the custom media loaded in a s...

Page 56: ...ault Portrait Width Sets the portrait width of the universal media NOTE If the value set exceeds the maximum width the printer will use the maximum value allowed in inches or millimeters 3 inches to 14 17 inches in 0 01 inch increments 76 mm to 360 mm in 1 mm increments Shows either inches or millimeters from Units of Measure setting 8 5 inches is the US default and 216 mm is the international def...

Page 57: ...in Custom x Bin x represents 1 through 3 Overflow Bin Sends print jobs to a specific output bin based on the requested paper type Standard Bin Bin 1 Bin 2 Bin 3 NOTE Only installed output bins will be displayed If multiple output bins are assigned the same name the name only appears once in the Output Bin value list Menu selection Purpose Values Menu Settings Page Prints information relating to th...

Page 58: ...l ready to receive print jobs Select 1 to put the printer in Power Saver mode one minute after it finishes a print job This uses much less energy but requires more warm up time for the printer Select 1 if your printer shares an electrical circuit with room lighting and you notice lights flickering Select a high value if your printer is in constant use Under most circumstances this keeps the printe...

Page 59: ...Setting a printer language as the default does not prevent a software application from sending print jobs that use the other language PCL Emulation Uses a PCL interpreter for incoming host communications PS Emulation Uses a PS interpreter for incoming host communications Print Area Modifies the logical and physical printable area Normal Fit to Page Whole Page NOTE The Whole Page setting only affec...

Page 60: ...and so on If Collation is On a blank page is inserted between each collated copy of the job Between Jobs Inserts a blank sheet between jobs Between Pages Inserts a blank sheet between each page of a job This is useful if you are printing transparencies or want to insert blank pages in a document for notes Separator Source Specifies the paper source that holds separator sheets Tray x Tray 1 Selects...

Page 61: ...l sets in printer memory RAM are deleted Remove Held Jobs Removes confidential and held jobs from the printer hard disk Confidential Held Not Restored All Selecting a menu value only affects jobs that are resident in the printer Bookmarks and other types of held jobs are not affected Job Acct Stat Prints a listing of all job statistics stored on the hard disk or clears all statistics on the disk P...

Page 62: ... Lines per Page 1 255 60 US 64 non US The printer sets the amount of space between each line vertical line spacing based on the Lines per Page Paper Size and Orientation menu items Select the correct Paper Size and Orientation before changing Lines per Page Sets the width of the logical page for A4 size paper A4 Width 198 mm 203 mm NOTE The 203 mm setting makes the logical page wide enough to prin...

Page 63: ...the network interface and selects PCL emulation if the data indicates that is the required printer language Off Printer does not examine the incoming data The printer uses PostScript emulation to process the job if PS SmartSwitch is On or uses the default printer language specified in the Setup Menu if PS SmartSwitch is Off PS SmartSwitch Configures the printer so it automatically switches to Post...

Page 64: ...ed for bidirectional communication following the conventions defined in the Network Printing Alliance NPA Protocol NOTE Changing this menu item automatically resets the printer Off Printer performs NPA processing If data is not in NPA format it is rejected as bad data On Printer does not perform NPA processing Auto Printer examines the data to determine the format and then processes it appropriate...

Page 65: ...es compatibility with most existing parallel interface implementations recommended setting Honor Init Determines whether the printer honors hardware initialization requests from the computer The computer requests initialization by activating the INIT signal on the parallel interface Many personal computers activate the INIT signal each time the computer is turned on and off Off Printer does not ho...

Page 66: ...d AppleTalk address Selecting View Address displays the AppleTalk address on the operator panel Activate Activates or deactivates the AppleTalk feature On Activates the AppleTalk feature Off Deactivates the AppleTalk feature Set Zone Provides a list of zones from network Default will be default zone for the network If no default zone exists on the network the will be the default ...

Page 67: ...t memory to support Resource Save feature l Press the Select button to disable Resource Save and continue printing l To enable Resource Save after you get this message Make sure the link buffers are set to Auto then exit the menus to activate the link buffer changes When Ready is displayed enable Resource Save l Install additional memory For more information see Installing Printer Memory 37 Insuff...

Page 68: ...abled 56 Standard parallel port disabled 56 USB port x disabled l Press the Select button to clear the message The printer discards any data received through the USB port l Make sure the USB Buffer menu item is not set to Disabled 56 Standard USB port disabled l Press the Select button to clear the message The printer discards any data received through the USB port l Make sure the USB Buffer menu ...

Page 69: ... clearing the paper path press the Select button to resume printing 238 yy Paper jam 1 Clear the paper path 2 After clearing the paper path press the Select button to resume printing 239 yy Paper jam 1 Clear the paper path 2 After clearing the paper path press the Select button to resume printing 24x yy Paper jam 1 Clear the paper path 2 After clearing the paper path press the Select button to res...

Page 70: ...ified job l Press Stop to cancel the operation Delete all l Press the Select button to delete all confidential jobs l Press Stop to cancel the operation Delete all confidential jobs l Press the Select button to delete all held jobs l Press Stop to cancel the operation Deleting Wait for the message to clear Disabling DLEs Wait for the message to clear Disabling Menus Wait for the message to clear N...

Page 71: ... held job Contact your system support person Network A network interface is the active communication link Network x Network x y A network interface is the active communication link where x represents the active communication link and y represents the channel No held jobs Wait for the message to clear No jobs found NOTE The four digit personal identification number PIN you entered is not associated...

Page 72: ... the Printer Wait for the message to clear Restoring Factory Defaults Wait for the message to clear NOTE When factory default settings are restored l All downloaded resources fonts macros symbol sets in the printer memory are deleted l All menu settings return to the factory default setting except The Display Language setting in the Setup Menu All settings in the Parallel Menu Network Menu Infrare...

Page 73: ...cting the network cable to the printer The default IP address should be 169 254 x x 1 Look for the address under the TCP IP heading on the network setup page printed in Printing a Network Setup Page 2 Go to Verifying the IP Settings and begin with step 2 If the network is not using DHCP then manually assign an IP address to the printer One of the easiest ways is to use the operator panel 1 Press t...

Page 74: ...he Drivers and Utilities CD Supported Network Printer Ports l Microsoft Standard TCP IP port Windows XP Professional x64 Windows XP Windows Server 2003 and Windows 2000 l LPR Windows NT 4 0 l Printer network ports Windows XP Professional x64 Windows XP Windows Server 2003 Windows 2000 and Windows 98 SE Me For basic printer functionality install a printer driver and use a system network printer por...

Page 75: ...ll printer on one or more remote computers and then click Next 5 Enter your Administrator user name and password and then click Add 6 Select the clients or servers and then click Next 7 Select the network printer you would like to install and then click Next If you do not see your printer listed click Update to refresh the list or click Add Printer to add a printer to the network 8 Select your pri...

Page 76: ... when setup is complete Installing Additional Printer Drivers If you wish to install additional printer drivers on your computer follow these steps 1 Turn on your computer and insert the Drivers and Utilities CD If the Drivers and Utilities CD appears click Cancel 2 In Windows XP click Start Control Panel Printers and Other Hardware Printers and Faxes In all others click Start Settings Printers 3 ...

Page 77: ...nd is shown underneath the printer icon l Browse My Network Places or Network Neighborhood Find the host name of the server and look for the shared name you assigned to the printer Now that the printer is shared you can install the printer on network clients using the point and print method or the peer to peer method Install the Shared Printer on Client Computers Point and Print This method is the...

Page 78: ...Settings Printers b Select the printer you just created c Click File Properties d From the General tab click Print Test Page When a test page prints successfully printer installation is complete Macintosh To print to a network printer each Macintosh user must install a custom PostScript Printer Description PPD file and either create a desktop printer on the computer Mac OS 9 x or create a print qu...

Page 79: ... from the pop up menu 5 Enter the IP address or the printer DNS name in the Printer Address box 6 Choose the printer manufacturer from the Printer Model pop up menu 7 Select the new printer from the list and click Add 8 Verify printer installation a Open Finder click Applications and click Text Edit b Choose Print from the File menu c Choose Summary from the Copies Pages pop up menu d Do one of th...

Page 80: ...re Installing Do the following before you install printer drivers 1 Make sure you are logged on with root user authority 2 Make sure you have enough disk space available for a complete installation 3 Set up an administrative user group During the installation of printer drivers you will be asked if you want to change the administrative user group for printer drivers The default administrative grou...

Page 81: ...ages print drivers solaris2 sparc pkg If there is not a response Volume Manager is not running Make sure that the cdrom directory exists Mount the CD For example if the path to the CD ROM drive is dev dsk c0t6d0s2 the command is mount F hsfs o ro dev dsk c0t6d0s2 cdrom Start the package installation program by typing pkgadd d cdrom unix packages print drivers solaris2 sparc pkg b Continue with the...

Page 82: ... packages some directories may need to be removed manually To see if any directories remain after removing all the packages check the directory where you installed printer drivers By default printer drivers installs in the following location usr local dell unix_prt_drivers NetWare NDPS iPrint The printer supports Novell Distributed Print Services NDPS iPrint For the latest information about instal...

Page 83: ...UT NOT LIMITED TO PROCUREMENT OF SUBSTITUTE GOODS OR SERVICES LOSS OF USE DATA OR PROFITS OR BUSINESS INTERRUPTION HOWEVER CAUSED AND ON ANY THEORY OF LIABILITY WHETHER IN CONTRACT STRICT LIABILITY OR TORT INCLUDING NEGLIGENCE OR OTHERWISE ARISING IN ANY WAY OUT OF THE USE OF THIS SOFTWARE EVEN IF ADVISED OF THE POSSIBILITY OF SUCH DAMAGE This software consists of voluntary contributions made by m...

Page 84: ...tware to make sure the software is free for all its users This license the Library General Public License applies to some specially designated Free Software Foundation software and to any other libraries whose authors decide to use it You can use it for your libraries too When we speak of free software we are referring to freedom not price Our General Public Licenses are designed to make sure that...

Page 85: ...ich use some of those functions and data to form executables The Library below refers to any such software library or work which has been distributed under these terms A work based on the Library means either the Library or any derivative work under copyright law that is to say a work containing the Library or a portion of it either verbatim or with modifications and or translated straightforwardl...

Page 86: ...e or link a work that uses the Library with the Library to produce a work containing portions of the Library and distribute that work under terms of your choice provided that the terms permit modification of the work for the customer s own use and reverse engineering for debugging such modifications You must give prominent notice with each copy of the work that the Library is used in it and that t...

Page 87: ...4 If you wish to incorporate parts of the Library into other free programs whose distribution conditions are incompatible with these write to the author to ask for permission For software which is copyrighted by the Free Software Foundation write to the Free Software Foundation we sometimes make exceptions for this Our decision will be guided by the two goals of preserving the free status of all d...

Page 88: ...sions of works based on the Library 3 If you copy code from files distributed under the terms of the GNU General Public Licence or the GNU Library General Public Licence into a copy of this library as this licence permits the exception does not apply to the code that you add in this way To avoid misleading anyone as to the status of such modified files you must delete this exception notice from su...

Page 89: ...der the printer and optional duplex unit A drawer consists of a tray and a support unit The 250 sheet drawer and the 500 sheet drawer are installed the same way 1 Remove the tray from the support unit Remove all packing material and tape from both the support unit and the tray NOTE Furniture options may not be available in all regions Contact your Dell Sales Representative to determine furniture a...

Page 90: ...ows XP click Start Control Panel Printers and Other Hardware Printers and Faxes In all others click Start Settings Printers 5 Right click the printer icon and select Properties 6 On the Installed Options tab select 250 sheet tray or 550 sheet tray in the Available Options list 7 Click Add 8 Click OK and then close the Printers folder If you install multiple paper trays they will be automatically l...

Page 91: ...ttach the printer 3 In Windows XP click Start Control Panel Printers and Other Hardware Printers and Faxes In all others click Start Settings Printers 4 Right click the printer icon and select Properties 5 On the Installed Options tab select Duplex option in the Available Options list 6 Click Add 7 Click OK and then close the Printers folder Installing an Output Expander Each output expander consi...

Page 92: ...inter or print media handling option Make sure the output expander is positioned securely 4 If you are mounting the output expander on the printer or another output expander attach the wire bail Place the tips of the wire bail into the ends of the plastic bracket so that the bail curves downward The wire bail rests in the output bin of the output expander below it or in the standard output bin Num...

Page 93: ...velope Feeder The envelope feeder attaches to the front of your printer behind the multipurpose feeder It can be removed when you are not using it making the printer more compact 1 Pull on the notch on the front of the printer to lower the multipurpose feeder 2 Lift open the envelope feeder connector door 3 Align the tabs on the envelope feeder with the slots on both sides of the printer and then ...

Page 94: ...he connector 5 Push the memory card firmly into the connector until the latches on either end of the connector snap into place It may require some force to fully seat the card CAUTION If you are installing printer memory sometime after setting up the printer turn the printer off and unplug the power cord before continuing NOTE Printer memory cards designed for other printers may not work with the ...

Page 95: ...pen the side door 2 Push the latches away from the card on both ends of the printer memory card connector The memory card moves out of the connector as the latches open NOTICE Printer memory memory cards are easily damaged by static electricity Touch something metal such as the printer frame before you touch a memory card ...

Page 96: ... the original packaging wrap the card in paper and store it in a box 5 Close both latches 6 Close the side door Installing Font ROMs Installing Font ROMs 1 Open the side door NOTE Font ROMs may not be available in all regions Contact your Dell Sales Representative to determine Font ROM availability NOTE Font ROMs designed for other printers may not work with the printer ...

Page 97: ...of the connector on the Font ROM must touch the system board and be locked into the connector Be careful not to damage the connectors 5 Close the side door Removing Font ROMs NOTE If an option card has been installed you may need to remove the option card before installing the Font ROM NOTICE Font ROMs are easily damaged by static electricity Touch something metal such as the printer frame before ...

Page 98: ...al packaging wrap the Font ROM in paper and store it in a box 5 If you removed an option card to access the Font ROM reinstall the option card 6 Close the side door NOTE If an option card has been installed you may need to remove the option card before removing the Font ROM NOTICE Font ROMs are easily damaged by static electricity Touch something metal such as the printer frame before you touch a ...

Page 99: ......

Page 100: ...software application a window representing the printer driver opens You can then select the appropriate settings for the specific job you are sending to the printer Print settings selected from the driver override the default settings selected from the printer operator panel You may need to click Properties or Setup from the initial Print dialog to see all of the available printer settings you can...

Page 101: ... the Desktop 1 Minimize all programs to reveal the desktop 2 Double click the My Computer icon 3 Double click the Printers icon A list of available printers appears 4 Double click the printer you selected when you sent the job A list of print jobs appears in the printer window 5 Select the job you want to cancel 6 Press the Delete key on the keyboard Canceling a Job From a Macintosh Computer Cance...

Page 102: ...r options are installed correctly 1 Make sure the printer is on 2 Press the Menu button on the operator panel 3 Press the Down arrow button until appears next to Reports and then press the Select button 4 Press the Down arrow button until appears next to Network Setup Page or Network x Setup Page and then press the Select button The printer returns to Ready Printing a Font Sample List To print sam...

Page 103: ...operties If there is no Properties button click Setup and then click Properties 3 Depending on the operating system you may have to click the Other Options tab and then click Print and Hold 4 Enter a User Name and PIN 5 Send your job to the printer Go to the printer when you are ready to retrieve your confidential print job and follow the At the printer steps Macintosh 1 From a word processor spre...

Page 104: ...your job to the printer Go to the printer when you are ready to retrieve your confidential print job and follow the At the Printer steps Macintosh 1 From a word processor spreadsheet browser or other application select File Print 2 In the Copies Pages or General pop up menu select Job Routing a When using Mac OS 9 if Job Routing is not a choice on the pop up menu select Plug in Preferences Print T...

Page 105: ...Size list box 7 Click OK and then send the print job as usual Mac OS 9 1 Select File Page Setup 2 Select the size of the specialty media from the Paper pop up menu and then click OK 3 Select File Print 4 With General selected on the top pop up menu go to the Paper Source pop up menu and select the tray containing the specialty media or the name of the media 5 Click Print Mac OS X 1 Select File Pag...

Page 106: ...x the sheets back and forth to loosen them then fan them Do not fold or crease the print media Straighten the edges on a level surface 5 Place the print media in the tray NOTE Do not remove a tray when a job is printing or when the operator panel indicator light is blinking Doing so may cause a jam Print side face down for simplex single sided printing Print side face up for duplex printing ...

Page 107: ...n arrow button until appears next to Paper Menu and then press the Select button 4 Press the Down arrow button until appears next to Paper Size Type and then press the Select button 5 Press the Down arrow button until appears next to the input source you want to use and then press the Select button 6 Press the Down arrow button until appears next to the paper size you want to use and then press th...

Page 108: ...15 9 mm l Length 5 14 in 127 355 6 mm The icons on the multipurpose feeder show you how to load the multipurpose feeder with paper how to turn an envelope for printing and how to load letterhead paper for simplex and duplex printing To load print media 1 Pull on the notch on the front of the printer to lower the multipurpose feeder 2 Pull the tray extension out NOTE If you install an optional enve...

Page 109: ...e the stack height label as a guide for stack height when loading print media NOTE Hold transparencies by the edges and avoid touching the print side Fan the stack of transparencies to prevent jams Be careful not to scratch or leave fingerprints on the transparencies Paper Transparencies Envelopes NOTE Load only one size and type of print media at a time in the multipurpose feeder Do not mix sizes...

Page 110: ...ge of the media 7 Set the Paper Size and Paper Type for the multipurpose feeder MP Feeder Size and MP Feeder Type to the correct value for the print media you loaded a Press the Menu button on the operator panel b Press the Down arrow button until appears next to Paper Menu and then press the Select button c Press the Down arrow button until appears next to Paper Size Type and then press the Selec...

Page 111: ...e feeder must be adjusted correctly to ensure trouble free printing To load the envelope feeder 1 Adjust the envelope support for the length of envelope you are loading l Fully closed pushed in toward the printer for short envelopes l Extended to the middle position for medium length envelopes l Fully open extended to its full length for long envelopes NOTICE Do not place objects on the envelope f...

Page 112: ...the flap on the left The end of the envelopes with the stamp area enters the envelope feeder first Let the envelopes at the bottom of the stack slide into the envelope feeder slightly more than the ones at the top of the stack NOTICE Never use envelopes with stamps clasps snaps windows coated linings or self stick adhesives These envelopes may severely damage the printer NOTE When you load envelop...

Page 113: ...lect button d Press the Down arrow button until appears next to Envelope Feeder Size Type and then press the Select button e Press the Down arrow button until appears next to the envelope size you loaded and then press the Select button f Press the Down arrow button until appears next to Envelope Feeder Size Type and then press the Select button g Press the Down arrow button until appears next to ...

Page 114: ...he Down arrow button until appears next to the paper type you loaded and then press the Select button The printer returns to Ready To disable tray linking set the Paper Type to a unique value in each one of the trays If all the trays do not have the same type of print media when they are linked you could mistakenly print a job on the wrong paper type Identifying and Linking Output Bins There is on...

Page 115: ...bins 1 Press the Menu button on the operator panel 2 Press the Down arrow button until appears next to Paper Menu and then press the Select button 3 Press the Down arrow button until appears next to Bin Setup and then press the Select button 4 Press the Down arrow button until appears next to Configure Bins and then press the Select button 5 Press the Down arrow button until appears next to Link a...

Page 116: ...re encouraged to try to correct the interference by one or more of the following measures l Reorient the receiving antenna l Relocate the device with respect to the receiver l Move the device away from the receiver l Plug the device into a different outlet so that the device and the receiver are on different branch circuits If necessary consult a Dell Technical Support representative or an experie...

Page 117: ...e at your own expense Class B This equipment has been tested and found to comply with the limits for a Class B digital device pursuant to Part 15 of the FCC Rules These limits are designed to provide reasonable protection against harmful interference in a residential installation This equipment generates uses and can radiate radio frequency energy and if not installed and used in accordance with t...

Page 118: ...f Laser Products NOTE EN 55022 emissions requirements provide for two classifications l Class A is for typical commercial areas l Class B is for typical domestic areas To determine which classification applies to your device examine the FCC or ICES information on the regulatory label located on the back side or bottom panel of the device If the FCC or ICES information on the label indicates a Clas...

Page 119: ...nters input output I O devices monitors and so on integrated into or connected to the device should match the electromagnetic environment classification Class A or B of the device To determine which classification applies to your device examine the regulatory labels markings located on the bottom side or back panel of your device Once you have determined your device s VCCI classification read the ...

Page 120: ...ter for Testing and Certification Notice The equipment should draw power from a socket with an attached protection circuit a 3 prong socket All equipment that works together computer monitor printer and so on should have the same power supply source The phasing conductor of the room s electrical installation should have a reserve short circuit protection device in the form of a fuse with a nominal...

Page 121: ... screen is certified to comply with Environmental Protection Agency EPA ENERGY STAR requirements as configured when shipped by Dell ENERGY STAR Emblem Exporter Dell Inc One Dell Way Round Rock TX 78682 Importer Dell Computer de México S A de C V Paseo de la Reforma 2620 11 Piso Col Lomas Altas 11950 México D F Ship to Dell Computer de México S A de C V al Cuidado de Kuehne Nagel de México S de R L...

Page 122: ...n spolu s běžným komunálním odpadem Je třeba jej odnést do příslušného zařízení aby bylo možné jej renovovat a recyklovat Informace o zodpovědném způsobu recyklace tohoto produktu ve své zemi naleznete na adrese www euro dell com recycling WEEE direktiv Waste from Electrical and Electronic Equipment I EU angiver denne etiket at dette produk ikke må kasseres med det normale affald Det skal deponere...

Page 123: ...ectronic Equipment Elektronikschrottverordnung In der EU wird mit diesem Etikett angegeben dass dieses Gerät nicht zusammen mit dem Haushaltabfall zu entsorgen ist Das Gerät sollte in einer entsprechenden Recycling Einrichtung entsorgt werden Informationen zum Recyceln dieses Geräts in Ihrem Land finden Sie unter www euro dell com recycling Direttiva WEEE Waste from Electrical and Electronic Equip...

Page 124: ...éctrico e electrónico WEEE Waste Electrical and Electronic Equipment Na União Europeia esta etiqueta indica que este produto não deve ser eliminado juntamente com o lixo doméstico Este produto deve ser depositado numa instalação adequada para ser recuperado e reciclado Para obter informações sobre como reciclar este produto no seu país visite www euro dell com recycling Инструкция по обращению с о...

Page 125: ... cómo reciclar este producto de forma responsable en su país visite www euro dell com recycling WEEE direktivet Waste from Electrical and Electronic Equipment Inom EU indikerar den här etiketten att produkten får inte slängas med hushållsavfall Den ska lämnas in på en återvinningsstation Mer information om hur du kan återvinna den här produkten på ett ansvarsfullt sätt i ditt land hittar du på www...

Page 126: ... so you can l Monitor the toner level for your printer l Click Order Toner to order replacement toner cartridges See Dell Printer Supplies Reorder Application for more information Dell Printer Supplies Reorder Application The Order Supplies dialog box can be launched from the Printing Status window the Programs window or the desktop icon You can order toner by phone or from the Web 1 Click Start P...

Page 127: ...ll Programs Dell Printers Dell Laser Printer 5210n 5310n a Select Dell Printer Software Uninstall b Select the components to uninstall and then click Next c Click Uninstall Now d Click OK when the uninstall is complete Driver Profiler Use the Driver Profiler to create driver profiles that contain custom driver settings A driver profile can contain a group of saved printer driver settings and other...

Page 128: ...ress To print a network setup page 1 Press the Menu button on the operator panel 2 Press the Down arrow button until appears next to Reports and then press the Select button 3 Press the Down arrow button until appears next to Network Setup Page and then press the Select button To assign an IP address see Set IP Address Utility Use the Dell Printer Configuration Web Tool for Printer Status Get imme...

Page 129: ...inter needs supplies or intervention Type your name or the key operator s name in the email list box to be notified Set Password Lock the operator panel with a password so that other users don t inadvertently change the printer settings you selected Online Help Click Help to visit the Dell website for printer troubleshooting NOTE You must be a network administrator to use this feature ...

Page 130: ...printer and a properly grounded electrical outlet l The electrical outlet is not turned off by any switch or breaker l The printer is not plugged into any surge protectors uninterrupted power supplies or extension cords l Other electrical equipment plugged into the outlet is working l The printer is turned on l The printer cable is securely attached to the printer and the host computer print serve...

Page 131: ...For more information see Understanding the Operator Panel Menus Job prints from the wrong tray or on the wrong paper or specialty media The operator panel menu settings do not match the media loaded in the tray Make sure the Paper Size and Paper Type specified in the printer driver match the paper size and type in the tray Incorrect characters print l You are using an incompatible parallel cable I...

Page 132: ... Menu and in the software application l Make sure the envelopes are loaded correctly See Loading the Envelope Feeder for more details Flash memory Make sure flash memory is securely connected to the printer system board Internal print server l Make sure the internal print server also called an internal network adapter or INA is securely connected to the printer system board l Make sure you are usi...

Page 133: ... Understanding Paper and Specialty Media Guidelines for more details If the problem continues turn the printer off and contact the place where you bought the printer Toner appears on the back of the printed page Toner is on the transfer roll To help prevent this do not load print media that is smaller than the page size of the job to be printed Open and close the printer top front cover to run the...

Page 134: ...rect l Replace the photoconductor kit Gray background prints l The Toner Darkness setting may be too dark Change the Toner Darkness setting in the Quality menu l Adjust the Brightness setting darker l Adjust the Contrast setting lighter l The print cartridge may be defective Replace the print cartridge Some of the print is cut off on the sides top or bottom of the media Move the guides in the tray...

Page 135: ...ettings may be needed to configure the wireless print server that has been installed in the printer Here are some of the settings that may be needed l Network Name also known as SSID Service Set ID l BSS Basic Service Set Type the type of wireless network you use Ad Hoc or Infrastructure l Wireless Channel Number l Network authentication and encryption type l Security Key s l Signed Certificate or...

Page 136: ...lign the connection points on the card with the connector on the system board and push the card firmly into the system board connector 6 Insert the screws saved from the cover plate or the extra screw shipped with the card 7 Tighten the screw to secure the card NOTICE Option cards are easily damaged by static electricity Touch something metal such as the printer frame before you touch an option ca...

Page 137: ...ighten the connector until the antenna is attached securely as a loose connection can result in a poor wireless signal 9 Rotate the antenna until the joint allows it to be pointed up 10 Close the side door 11 Connect the power cord and turn on the printer ...

Page 138: ...ly configuring the internal wireless print server see Manual configuration Before configuring the wireless print server make sure your printer has been set up correctly l The internal wireless print server option card has been installed correctly in the printer l All access panels and printer doors have been replaced or closed l The toner or print cartridges are installed correctly l Paper has bee...

Page 139: ...kip to step 3 2 From the Wireless Networks Available in Your Area screen select I want to enter a different network name and then click Next 3 Select the wireless mode for your network Infrastructure or Ad Hoc mode 4 Enter the Network Name SSID of the network that you want to use 5 Select the appropriate channel for the network if applicable 6 Click Next 7 Select the type of security that your net...

Page 140: ...g options are selected continue to step 7 If 802 1x RADIUS was selected as the authentication type click Configure Authentication and follow the Configuring the Authentication Mechanism instructions If WPA Personal was selected as the encryption type click Configure Encryption and follow the Configuring WPA Personal Encryption instructions If WEP or WEP static keys was selected as the encryption t...

Page 141: ...structions Configuring WEP Encryption 1 Enter the appropriate WEP key s WEP encryption requires at least one WEP key but can include up to four 2 Select the default WEP transmit key 3 Click OK to return to the Advanced Mode home screen and proceed to step 7 of the advanced mode instructions Configuring WPA Personal Encryption 1 Enter the appropriate Pre Shared key 2 Click OK to return to the Advan...

Page 142: ...ork will need to be accessed As a result extensive knowledge of wireless network and computer settings will be needed to complete the configuration process Before configuring the wireless print server make sure your printer has been set up correctly l The internal wireless print server option card has been installed correctly in the printer l The toner or print cartridges are installed correctly l...

Page 143: ...ificates for use with 802 1x RADIUS 1 From the print server embedded Web page click Configuration on the left side of the page 2 Click Certificate Management 3 Complete the appropriate management option s 4 Return to the embedded Web page home screen and go to step 7 of the Configuring the Print Server in Ad Hoc Mode instructions To install a new CA Certificate 1 Under Certificate Configuration cl...

Page 144: ...t use either Infrastructure mode in which the network structure is based on a series of wireless routers or base stations or Ad Hoc mode in which wireless devices communicate with each other directly without using a wireless router Before configuring the wireless print server make sure your printer has been set up correctly l The internal wireless print server option card has been installed correc...

Page 145: ...ge home screen and go to step 6 of the Configuring Your Wireless Print Server instructions To install a new CA Certificate 1 Under Certificate Configuration click Install A New Certificate Authority Certificate 2 Browse to the correct certificate location and click Submit To request and install a new Signed Certificate 1 Under Certificate Configuration click Update The Certificate Signing Request ...

Page 146: ...he printer The wireless print server does not need to be reconfigured for each successive installation Changing the Wireless Print Server Settings The easiest way to change settings in the wireless print server is through the embedded Web server For this to work you must successfully complete the installation of the printer on your network 1 Open the Safari Web browser and select Show All Bookmark...

Page 147: ...on must be installed and used in strict accordance with the manufacturer s instructions as described in the user documentation that comes with the product For country specific approvals see Radio Approvals Dell Inc is not responsible for any radio or television interference caused by unauthorized modification of the devices included with this Dell 5210 5310 Wireless Option card or the substitution...

Page 148: ...installed and used in strict accordance with the manufacturer s instructions as described in the user documentation that comes with the prod uct Any other installation or use will violate FCC Part 15 regulations Modifications not expressly approved by Dell could void your authority to operate the equipment This device must not be co located or operating in conjunction with any other antenna or tra...

Page 149: ...sta placa WLAN sem fios está em conformidade com os requisitos essenciais e outras provisoes relevantes da Directiva 1999 5 EC Настоящим корпорация Dell заявляет что дополнительная плата беспроводной связи Dell 5210 5310 соответствует основным требованиям и соответствующим постановлениям инструкции 1999 5 EC 因此 Dell Inc 宣布此 Dell 5210 5310 无线选件符合 1999 5 EC 指令的基本要求和其它相关规定 Por medio de la presente De...

Page 150: ... label of your device is listed on the radio approval list posted on the general Dell support site at http support dell com In countries other than the United States and Japan verify that the Location set ting from the Regional Options tab in Regional and Language Options from Control Panel has been set to the country in which you are using your Dell 5210 5310 Wireless Option This ensures complian...

Reviews: