background image

Dell™ 2335dn MFP User's Guide

Click the links to the left for information on the features, options, and operation of your printer. For
information on other documentation included with your printer, see 

"Finding Information"

.

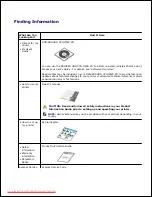
To order replacement toner cartridges or supplies from Dell:

Double-click the 

Dell 2335dn MFP Toner Reorder

 icon on your desktop.

1.

OR

Visit Dell's website, or order Dell printer supplies by phone.

2.

http://www.dell.com/supplies

Contacting Dell

NOTE: 

If you do not have an active Internet connection, you can find contact information on your

purchase invoice, packing slip, bill, or Dell product catalog.

Dell provides several online and telephone-based support and service options. Availability varies by country
and product, and some services may not be available in your area. To contact Dell for sales, technical
support, or customer service issues:

Visit 

www.support.dell.com

.

1.

Verify your country or region in the 

Choose A Country/Region

 drop-down menu at the bottom of the

page.

2.

Click 

Contact Us

 on the left side of the page.

3.

Select the appropriate service or support link based on your need.

4.

Choose the method of contacting Dell that is convenient for you.

5.

Downloaded from ManualsPrinter.com Manuals

Summary of Contents for 2335dn - Multifunction Monochrome Laser Printer B/W

Page 1: ...ction you can find contact information on your purchase invoice packing slip bill or Dell product catalog Dell provides several online and telephone based support and service options Availability varies by country and product and some services may not be available in your area To contact Dell for sales technical support or customer service issues Visit www support dell com 1 Verify your country or...

Page 2: ... materials in any manner whatsoever without the written permission of Dell Inc is strictly forbidden Trademarks used in this text Dell and DELL logo are trademarks of Dell Inc Microsoft and Windows are registered trademarks of Microsoft Corporation PaperPort is a registered trademark of ScanSoft Inc Adobe and PhotoShop are registered trademarks of Adobe Systems Incorporated Other trademarks and tr...

Page 3: ... about technical changes to your printer or advanced technical reference material for experienced users or technicians How to use my printer Owner s manual CAUTION Read and follow all safety instructions in your Product Information Guide prior to setting up and operating your printer NOTE Owner s Manual may not be provided with your product depending on your country How to set up my printer Setup ...

Page 4: ...he Dell Support Website provides several online tools including Solutions Troubleshooting hints and tips articles from technicians and online courses Upgrades Upgrade information for components such as memory Customer Care Contact information order status warranty and repair information Downloads Drivers Reference Printer documentation and product specifications You can access Dell Support at supp...

Page 5: ...or ventilators Away from sunlight extreme humidity or high fluctuations in temperature A clean dry and dust free location Select a level stable place with adequate space for air circulation See Setting up the hardware Do not set the machine close to the edge of your desk or table NOTE Leave the printer in the box until you are ready to install it In addition to the Dell 2335dn MFP ensure that you ...

Page 6: ...r product depending on your country c This item is only provided in some countries d NOTE Use the telephone line cord supplied with your printer You can also use AWG 26 or lower gauge cord that is less than 250 cms in length NOTE The power cord must be plugged into a grounded power socket Save the carton and packing material in case the printer needs to be repacked 3 Remove the packing tape from t...

Page 7: ... If the scan switch is locked you can not copy or scan NOTE When you are moving the printer or do not intend to use it for a long period of time move the switch BACKWARD to the lock position as shown To scan or copy a document the switch must be unlocked About Your Printer These are the main components of your printer The following illustrations show the standard Dell 2335dn Downloaded from Manual...

Page 8: ...MFP and an optional tray 2 attached Front View Rear View Downloaded from ManualsPrinter com Manuals ...

Page 9: ...Operator Panel Button Functions Common Keys Downloaded from ManualsPrinter com Manuals ...

Page 10: ...ber or enter alphanumeric characters Store frequently used fax numbers in memory or search for stored fax numbers or email addresses It also allows you to print a Phonebook list Insert a pause into a fax number in edit mode Understanding the Status LED When the problem occurs the Status LED indicates the machine s condition by the light color of it s action Downloaded from ManualsPrinter com Manua...

Page 11: ...otally empty Remove the old toner cartridge and install a new one A paper jam has occurred There is no paper in the tray Load paper in the tray The machine has stopped due to a major error Check the display message Internal Fonts The Dell 2335dn MFP Laser printer supports the PCL and PS fonts If you want to see the PCL and PS font list follow these steps Printing the PCL Font list Press Scroll or ...

Page 12: ...u read Placemat and complete following steps Select a stable location 1 Select a level stable place with adequate space for air circulation Allow extra space to open covers and trays The area should be well ventilated and away from direct sunlight or sources of heat cold and humidity Do not set the machine close to the edge of your desk or table Place the machine on a flat stable surface so that t...

Page 13: ...do not tilt or turn it upside down Otherwise the inside of the printer may be contaminated by toner which can cause damage to the printer or bad printing quality Installing the Toner Cartridge Open the front cover 1 CAUTION To prevent damage do not expose the toner cartridge to light for more than a few minutes CAUTION Do not touch the green underside of the toner cartridge Use the handle on the c...

Page 14: ...artridge 2 NOTE If toner comes into contact with your clothing wipe the toner off with a dry cloth and wash your clothing in cold water Hot water sets toner into fabric Holding the toner cartridge by the handle slide it into the printer until it locks firmly into place 3 Close the front cover 4 Downloaded from ManualsPrinter com Manuals ...

Page 15: ... faxing or Paper Tab for Computer printing Load the paper Pull the paper tray out of the printer 1 If you load paper that is longer than a standard Letter or A4 size such as Legal paper press and unlatch the guide lock and then slide the paper length guide out completely to extend the paper tray to its full length 2 Slide in the paper length guide until it rests against the end of the paper stack ...

Page 16: ...move it towards the stack of paper until it touches the side of the stack 4 Flex the sheets back and forth to loosen them and then fan them out Do not fold or crease the print media Align the edges on a level surface 5 Insert the paper stack into the paper tray with the side to be printed on facing down 6 Downloaded from ManualsPrinter com Manuals ...

Page 17: ...er limit marks on the both inside walls of the tray 7 NOTE Overloading the paper tray may cause paper jams NOTE Improper adjustment of paper guides can result in paper jams Slide the paper tray back into the printer 8 9 Downloaded from ManualsPrinter com Manuals ...

Page 18: ... line socket FAX and the other end into an active wall jack 1 To connect a telephone and or answering machine to your printer remove the plug from the extension telephone socket EXT and plug the telephone or answering machine into the extension telephone socket EXT Alternative setup of Fax connected to a wall socket and a external phone or Telephone answering device TAD 2 Downloaded from ManualsPr...

Page 19: ...Answer setting for the telephone answering device TAD If connecting a FAX using a computer modem NOTE Set rings to answer to digit greater than the Ring To Answer setting for the telephone answering device TAD NOTE For additional information see Using an Answering machine or Using a Computer Modem Downloaded from ManualsPrinter com Manuals ...

Page 20: ...cally Local printer refers to a printer connected to your computer using a USB cable If your printer is attached to a network instead of your computer skip this step and go on to Connecting the printer to the Network NOTE USB cables are sold separately Contact Dell to purchase a USB cable NOTE Connecting the printer to the USB port of the computer requires a certified USB cable You will need to bu...

Page 21: ...drop or hub and the other end to the Ethernet network port on the back of the printer The printer automatically adjusts for the network speed 2 NOTE After connecting the printer you need to configure the network parameters on the operator panel See Printing a Network Configuration Page Powering On the Printer CAUTION The fusing area at the rear part of the inside of your printer becomes hot once t...

Page 22: ...e These settings may be needed also after the firmware upgrade or after the printer reset Setting fax setup sequence Set the language See Changing the Display Language 1 Select the country See Selecting Country 2 Set the date and time See Setting the Time and Date 3 When Fax Setup appears press Scroll or to select Yes or No 4 If you selected No your printer restores the fax settings as default If ...

Page 23: ...lts Fax Line Test 4 Setup 5 USB Paper Setup Tray Behaviour Directory Reports Fax Setup Email Setup Network Setup Machine Setup Maintenance Restore Options Scan Defaults Copy Defaults Fax Defaults Job Management Print From Scan to Press Scroll or to highlight the desired menu function and then press Select 1 Press Scroll or to highlight the desired menu function and then press Select 2 Repeat use o...

Page 24: ...Scroll or to highlight Reports and then press Select 2 Press Scroll or to highlight Op panel Menu Tree and then press Select 3 The Op panel menu page prints out 4 Changing the Display Language To change the displayed language that the operator panel displays follow these steps Press Scroll or to highlight Setup and then press Select 1 Press Scroll or to highlight Machine Setup and then press Selec...

Page 25: ...ables your printer to reduce power consumption when it is not in actual use You can enable this mode by selecting the duration for which the printer waits after a job is printed before it switches to a reduced power state Press Scroll or to highlight Setup and then press Select 1 Press Scroll or to highlight Machine Setup and then press Select 2 Press Scroll or to highlight Print Power Save and pr...

Page 26: ...l or to move the cursor under the digit you want to correct and enter a new number To select AM or PM for a 12 hour format press the or the button 5 When the cursor is not under the AM or PM indicator pressing the or the button immediately moves the cursor to the indicator You can change the clock mode to a 24 hour format e g 01 00 PM as 13 00 Press Scroll or to highlight AM or PM and then press S...

Page 27: ...od to reduce power consumption and extend the lamp life The lamp automatically turns on and the warm up cycle begins whenever any key is pressed or the DADF cover is opened or a document is detected in the DADF You can set the duration for which the scan lamp waits after a scan job is completed before it switches to the Power Save mode Press Scroll or to highlight Setup and then press Select 1 Pre...

Page 28: ...seconds Selecting Off means that the printer does not restore the default settings until you press Start to begin copying or faxing or Cancel to cancel Press Select to save the selection 5 Press Cancel to return to the Standby mode 6 Setting the Default Mode Your machine is preset to Fax mode You can switch this default mode to Copy mode or Scan mode Press Scroll or to highlight Setup and then pre...

Page 29: ... drops below the setting level the device will display a warning message on the operator panel Press Scroll or to highlight Setup and then press Select 1 Press Scroll or to highlight Machine Setup and then press Select 2 Press Scroll or to highlight Toner Status Alert and then press Select 3 Press Scroll or to highlight Toner Low and then press Select 4 Press Scroll or to display the Toner Low lev...

Page 30: ...o return to the Standby mode 6 Setting the Job Management Press Scroll or to highlight Setup and then press Select 1 Press Scroll or to highlight Job Management and then press Select 2 Press Scroll or to display the option and then press Select Stored Jobs Print jobs currently stored in the hard disk When a user sends a confidential job from PC to the device it will hold the job until you release ...

Page 31: ...5 Downloaded from ManualsPrinter com Manuals ...

Page 32: ...itable Microsoft Word Excel or text files PaperPort provides improved scanning features and supports annotations on all image types PaperPort s enhanced search feature enables you to find items by specific item properties Dell ScanCenter This is the application that enables you to quickly scan documents into a variety of applications such as e mail photo editors and text editors Scan Driver TWAIN ...

Page 33: ... To launch the Dell Printer Configuration Web Tool just type your network printer s IP address in your Web browser If you do not know what your printer s IP address is print a network configuration page which lists the IP address Press Scroll or to highlight Setup and then press Select 1 Press Scroll or to highlight Reports and then press Select 2 Press Scroll or to highlight Network Settings and ...

Page 34: ...able Options for Administrator Administrator can enable or disable services and I O ports as the following items COPY service FAX service SCAN service USB Port USB Host Ethernet Wireless Radio Printer Server Settings This menu supports configuration of following items Basic Information about the administrator TCP IP SNMP Traps SNMP Community SNMPv3 SLP UPnP SSDP IPP EtherTalk Telnet Fax Settings D...

Page 35: ...ter the recipient s email address Customization Field You can customize the from to or subject field Prefix Input characters which shall be added in front of the customized field Suffix Input characters which shall be appended at the end of the customized field Email Settings Receive an email when the printer needs supplies or intervention Type your name or the key operator s name in the email lis...

Page 36: ... ccc ddd or as a DNS host name up to 63 characters And specifies the POP3 server port number up to 15 alphanumeric characters POP3 User Name a Specifies the POP3 account user name Up to 63 alphanumeric characters periods hyphens under bars and at symbols can be used If specifying more than one address separate them using commas POP3 User Password a Specifies the POP3 account password up to 31 alph...

Page 37: ...umeric characters periods hyphens under bars and at symbols can be used If specifying more than one address separate them using commas Password Specifies the LDAP account password up to 31 alphanumeric characters Maximum Number of Search Results 0 means that the number of LDAP search results does not have limit It shall be 5 100 entries Search Timeout Sets the timeout period from 5 to 100 seconds ...

Page 38: ...ireless Quick Reference Guide for more details on wireless module settings with the printer NOTE The Wireless menu appears only when you install the wireless network interface card to your machine Online Help Click Help to visit the Dell website for printer troubleshooting NOTE For more information about the All In One Main page View Saved Images page or the Maintain Troubleshoot page click the He...

Page 39: ...quired software Internet Explorer 5 0 or higher Installing Dell Software for Local Printing A local printer is a printer attached to your computer using a USB cable If your printer is attached to a network instead of your computer skip this step and go on to Installing Dell Software for Network Printing A printer driver is software that lets your computer communicate with your printer The procedur...

Page 40: ...tinue when the User Account Control screen appears NOTE If user has disabled auto continue Then please open setup exe from CD root folder If necessary select a language by pressing the Language button on the main screen 3 Select Personal Installation 4 Select Typical Installation to install the software and the User s Guide 5 If you select Custom Installation select the components to be installed ...

Page 41: ...er connecting the network cable to the printer In case no DHCP or BOOTP the printer will automatically assign a legacy IP address 192 0 0192 or local link address 169 254 xxx xxx To configure the IP address manually you can use the supplied DRIVERS AND UTILITIES CD Print the Configuration page of the printer to see the current network configuration and MAC address You will need this information to...

Page 42: ...the IP address for the printer exit the program 6 Installing Dell Software for Network Printing When you connect your printer to the network you must first configure the TCP IP settings for the printer After assigning and verifying the TCP IP settings you are ready to install the Dell software on each network printer You can install the Dell software on the network computers locally or remotely NO...

Page 43: ...led auto continue Then please open setup exe from CD root folder If necessary select a language by pressing the Language button on the main screen 3 Select Network Installation 4 If you want to install the drivers on this computer for network operation select Local Installation and then click Next 5 If you want to install the Dell software on remote computers or network servers on the same network...

Page 44: ...then click Next 6 If you do not see your printer in the list click Refresh to refresh the list or click Add Printer to add your printer to the network To add the printer to the network enter the port name and an existing IP address for the printer If you want to install the printer on a server select the I am setting up this printer on a server check box The screen displays the printer drivers ins...

Page 45: ...allation and close the wizard You are now ready to print 10 NOTE For information about installing the wireless network interface card and configuring the network parameters refer to Wireless Network Quick Install Guide Uninstalling Software You should remove the printer drivers if you are upgrading the software or if your driver installation fails You can remove the software using the DRIVERS AND ...

Page 46: ... removed click Finish 3 Using the Dell Toner Management System The Printer Status Monitor displays the status of printer which connect with local or network Printer Ready Printer Offline and Error Check Printer and the toner level or Toner Low will be appeared for your printer Printer Status Monitor The Printer Status Monitor screen launches when you send a print job to the printer This only appea...

Page 47: ...ity window you can set up fax system data options and create and edit Phonebook entries from your computer When you install the software the Printer Settings Utility is automatically installed For information about installing the software see Installing Software in Microsoft Windows Operating System To open the Printer Settings Utility From the Start menu select Programs Dell Printers Dell 2335dn ...

Page 48: ...it button at the bottom of the window The Directory Section Click the Phonebook or Address Book section and the Setting button to create and edit Phonebook or Emailbook entries The Fax Setting Section Click each items underFax Setting to setup the fax configuration The printer setup contains the printer ID and printer fax number Your can select Printger Setup Toll Save and Default Output Options D...

Page 49: ...andling specifications from the drop down list Your can select Copies Paper Size Paper Type Paper Source and Tray Linking The Graphic Section Click the Graphic section and select the degree of darkness from the drop down list Your can select Darkness The Emulation Section Click the Emulation section and select the emulation from the drop down list Also you can add additional fonts Your can select ...

Page 50: ... Utility From the Start menu select Programs Dell Printers Dell 2335dn MFP Firmware Update Utility 1 Download the latest firmware Click http support dell com 2 If your printer is connected with an USB cable click USB Connected Printer 3 Or if your printer is connected with a network cable click Network Connected Printer Click Browse and select downloaded firmware file 4 Click Update Firmware 5 Dow...

Page 51: ...the network cable to your machine 1 Print the Network Configuration page of the printer to see the current network configuration and MAC address 2 From the Start menu select Programs Dell Printers Dell 2335dn MFP Set IP Address Utility 3 Click in the SetIP window to open the TCP IP configuration window 4 Enter the network card s MAC address IP address subnet mask default gateway and then click App...

Page 52: ...y use 75 g m2 20 lb xerographic long grain paper Try a sample of any paper you are considering using with the printer before buying large quantities When loading paper note the recommended print side on the paper package and load the paper accordingly See Loading Print Media in the Paper Tray and Using the MPF Multi purpose feeder for detailed loading instructions Paper Characteristics The followi...

Page 53: ...formance Grain Direction Grain refers to the alignment of the paper fibers in a sheet of paper Grain is either long grain running the length of the paper or short grain running the width of the paper For 60 to 90 g m2 16 to 24 lb bond paper grain long fibers are recommended For papers heavier than 90 g m2 24 lb bond grain short is preferred For the MPF 60 to 90 g m2 16 to 24 lb bond paper grain lo...

Page 54: ...curled papers Recycled papers containing more than 25 post consumer waste that do not meet DIN 19 309 Recycled paper having a weight less than 60 g m2 16 lb Multiple part forms or documents Selecting Paper Proper paper loading helps prevent jams and ensures trouble free printing To help avoid jams or poor print quality Always use new undamaged paper Before loading paper know the recommended print ...

Page 55: ...zardous emissions Use inks that are not affected by the resin in the toner or the silicone in the fuser Inks that are oxidation set or oil based should meet these requirements latex inks might not If you are in doubt contact your paper supplier Preprinted papers such as letterheads must be able to withstand temperatures up to 180 C 356 F without melting or releasing hazardous emissions Printing on...

Page 56: ...manufacturing techniques Use the following guidelines to select and use prepunched paper Test paper from several manufacturers before ordering and using large quantities of pre punched paper Paper should be punched at the paper manufacturer and not drilled into paper already packaged in a ream Drilled paper can cause jams when multiple sheets feed through the printer Prepunched paper can include m...

Page 57: ...encies are compatible with laser printers that heat transparencies to 180 C 356 F Use only transparencies that are able to withstand these temperatures without melting discoloring offsetting or releasing hazardous emissions Envelopes Try a sample of any envelopes you are considering using with the printer before buying large quantities See Using the MPF Multi purpose feeder for instructions on loa...

Page 58: ...width guide to fit the width of the envelopes Load an envelope with the flap side down and with the stamp area on the top left side The end of the envelope with the stamp area enters the MPF first See Using the MPF Multi purpose feeder for instructions on loading an envelope NOTE You can improve the printing quality of envelopes by pulling down the rear door to open and pushing the two blue pressu...

Page 59: ...s Adhesive material contaminates your printer and could void your warranty If zone coating of the adhesive is not possible a 0 125 in 3 mm strip should be removed on the leading and driver edge and a non oozing adhesive should be used Remove a 0 125 in 3 mm strip from the leading edge to prevent labels from peeling inside the printer Portrait orientation is preferred especially when printing bar c...

Page 60: ...ntifying Print Media Sources and Specifications The following tables provide information on standard and optional sources including the print media sizes that you can select from the paper size menu and supported weights NOTE If you use a print media size not listed select the next larger size Media Input Capacity Papera Paper Tray tray 1 and optional tray 2 MPFb Plain paper 250 sheets of 75 g m2 ...

Page 61: ... b Print Media Sizes and Support Legend Y indicates Support Dimensions Paper Tray tray 1 and optional tray 2 MPF Duplex printing Print Media Size A4 8 27 x 11 7 in 210 x 297 mm Y Y Y A5a 5 83 x 8 27 in 148 x 210 mm Y Y A6 4 13 x 5 85 in 105 x 148 5 mm Y JIS B5 7 17 x 10 1 in 182 x 257 mm Y Y ISO B5 6 93 x 9 84 in 176 x 250 mm Y Y Letter 8 5 x 11 in 215 9 x 279 4 mm Y Y Y Legal 8 5 x 14 in 215 9 x ...

Page 62: ...62 x 229 mm Y EnvelopeC6 4 49 x 6 38 in 114 x 162 mm Y Custom 3 x 5 in to 8 5 x 14 in 76 x 127 mm to 216 x 356 mm Y Ensure the A5 paper is NOT A4 paper that has been cut in half a Print Media Supported Print Media Paper Types Paper Tray tray 1 and optional tray 2 MPF Plain Thin Recycled Letterhead Y Y Thick Bond Preprinted Colored Y Card Stock Y Transparencies Y Labels Y Dual web and Integrated La...

Page 63: ... stock maximum grain short a Index Bristol 163 g m2 43 lb Tag 163 g m2 43 lb Cover 163 g m2 43 lb Transparenciesb Laser printer 138 146 g m2 37 39 lb bond Labels maximum Paper 163 g m2 43 lb bond Dual web paper 163 g m2 43 lb bond Polyester 163 g m2 43 lb bond Vinyl 163 g m2 43 lb liner Integrated Forms Pressure sensitive area must enter the printer first 135 140 g m2 36 40 lb bond Paper base grai...

Page 64: ...r door face up To use the output tray ensure that the rear door is closed To use the rear door open it NOTE If paper coming out of the output tray has problems such as excessive curl try printing to the rear door NOTE To avoid paper jams do not open or close the rear door while the printer is printing Printing to the Output Tray Face down The output tray collects printed paper face down in the cor...

Page 65: ...nting from the MPF to the rear door provides a straight paper path Using the rear door might improve the output quality with special materials To use the rear door Open the rear door by pulling it CAUTION The fuser area inside of the rear door of your printer becomes very hot when in use Take care when you access this area Loading Print Media in the Paper Tray Downloaded from ManualsPrinter com Ma...

Page 66: ...should be placed at the front side of the tray For details about loading paper in the paper tray see Loading Paper NOTE If you experience problems with paper feed place the paper in the MPF NOTE You can load previously printed paper The printed side should be facing up with an uncurled edge at the front If you experience problems with paper feed turn the paper around Note that the print quality is...

Page 67: ...uality problems NOTE Flatten any curl on postcards envelopes and labels before loading them into the MPF To use the MPF Open the MPF and unfold the paper support extension as shown 1 If you are using paper flex or fan the edge of the paper stack to separate the pages before loading 2 For transparencies hold them by the edges and avoid touching the print side Oils from your fingers can cause print ...

Page 68: ...ith the design face up top edge toward the printer Card stock load them with the print side up and the short edge entering the printer first Pre printed paper the printed side should be facing down with an uncurled edge toward the printer Squeeze the width guide and adjust it to the width of the print material Do not force too much or the paper will be bent which will result in a paper jam or skew...

Page 69: ...and labels before loading them into the MPF When you print on 3 by 5 in 76 by 127 mm sized media on the MPF open the rear door for a straight paper path to avoid paper jams Ensure that to open the rear door when you print on transparencies If not they may tear while exiting the machine Setting the Paper Size After loading paper in the paper tray you need to set the paper size using the operator pa...

Page 70: ... Paper Tray This feature allows you to select the tray and paper that you want to use for a printing job Paper size and paper tray can be adjusted here Setting the Tray linking If tray 1 and tray 2 are filled with letter size paper when tray1 is empty and this option is On then the machine continues printing using the paper in tray 2 Press Scroll or to highlight Setup and then press Select 1 Press...

Page 71: ...croll or to find the paper tray you are using and then press Select Bypass Mode When sending a print job from the computer and the MPF is filled with paper the printer uses the paper in the MPF first In this mode the printer pulls the paper from MPF first unless it is closed or empty MPF gets the highest priority and pulls whatever media present in the MPF Bypass Mode is set as a default setting T...

Page 72: ... feeds print media from the next linked tray By linking all trays standard and optional you effectively create a single source with a capacity of up to 550 sheets Make sure you load the same size and type of print media in each tray in order to link the trays Set the paper size and type for each tray To disable tray linking you can either choose unique paper size type for each tray or using operat...

Page 73: ...this mode the printer pulls the paper from MPF first unless it is closed or empty MPF gets the highest priority and pulls whatever media present in the MPF NOTE You can use this feature in print and copy job Tray Mode In this mode the MPF is treated as another paper tray Instead of treating MPF as first preference paper source printer pulls paper from the tray that matches the size and type The fi...

Page 74: ...as Top Margin Left Margin Short Binding Long Binding and etc to set the paper margin 5 Enter the value you want using the number keypad 6 Press Cancel to return to the Standby mode 7 Downloaded from ManualsPrinter com Manuals ...

Page 75: ...determine which print driver is best suited for the job The features provided by each printer driver are as follows Feature Printer Driver PCL PS Print quality option Y Y Poster Y N Reduce Enlarge Y Y Multiple Pages per Side Y Y Fit to Page Y Y Watermark Y N Overlay Y N The following procedure describes the general steps required for printing from various Windows applications The exact steps for p...

Page 76: ... go to step 5 4 If you see Setup Printer or Options click that button instead Then click Properties on the next screen Click OK to close the printer properties window 5 To start the print job click Print or OK depending on the program or operating system in the Print window 6 Canceling a Print Job There are two ways to cancel a print job To stop a print job from the operator panel Press Cancel Dow...

Page 77: ...indows desktop From the Windows Start button 1 For Windows 2000 click Settings and point to Printers 2 For Windows XP Server 2003 click Printers and Faxes For Windows Vista Server 2008 click Control Panel Hardware and Sound Printers For Windows 7 click Control Panel Hardware and Sound Devices and Printers For Windows Server 2008 R2 click Control Panel Hardware Devices and Printers For Windows 2000...

Page 78: ...e settings you change remain in effect only while you are using the current program To make your changes permanent make them in the Printers folder Follow these steps Click the Windows Start button a For Windows 2000 click Settings and point to Printers b For Windows XP Server 2003 click Printers and Faxes For Windows Vista Server 2008 click Control Panel Hardware and Sound Printers For Windows 7 ...

Page 79: ...on One Sheet of the Paper Printing Posters and Printing Booklets Double sided Printing Double sided Printing allows you to print on both sides of paper For details see Printing on Both Sides of Paper Paper Tab Use the following options to set the paper handling needs when you access the printer properties Click the Paper tab to access the paper properties NOTE When you select an option in properti...

Page 80: ... paper size and click OK The setting appears on the list so that you can select it Source Ensure that Source is set to the corresponding paper tray If the paper source is set to Auto Selection the printer automatically picks up print materials from the MPF first and then the paper tray Type Ensure that Type is set to Printer Default If you load a different type of print material select the corresp...

Page 81: ...the sharper the clarity of printed characters and graphics Higher settings may increase the time it takes to print a document TrueType Options TrueType Options This option determines what the driver tells the printer about how to image the text in your document Select the appropriate setting according to the status of your document Download as Outline When this option is selected the driver will d...

Page 82: ...ess the following features Property Description Watermark You can create a background image of text to print on each page of your document See Using Watermarks This feature is not available when using the PostScript PS driver Overlay Overlays are often used to take the place of preprinted forms and letterhead paper See Using Overlays Output Options Print Subset You can set the sequence for the pag...

Page 83: ... can set the password not to delete the print data file by mistake Proof When printing several copies of print the printer prints out the first copy of print and continue to print the rest of them User ID You can enter the user name with combination of alphabet and number This information will be displayed on the touch screen when you find the file Job Name You can enter the job name with combinat...

Page 84: ...ng Printer Default from the list Using Help Your printer has a help screen that can be activated by the Help button in the printer s properties window These help screens give detailed information about the printer features provided by the printer driver You can also click from the upper right hand corner and then click on any setting Printing Multiple Pages on One Sheet of the Paper Downloaded fro...

Page 85: ...le Pages per Side on the Layout Options drop down list 2 Select the number of pages you want to print per sheet 1 2 4 6 9 or 16 on the Pages per Side drop down list 3 If necessary select the page order on the Pages Order drop down list 4 Check Print Page Border to print a border around each page on the sheet Print Page Border is enabled only if the Pages per Side setting is set to a number greater...

Page 86: ... the printer properties 1 From the Paper tab select Reduce Enlarge on the Output size drop down list 2 Enter the scaling rate in the Percentage input box 3 You can also click the or button Select the paper source size and type 4 Click OK and print the document 5 Fitting Your Document to a Selected Paper Size Downloaded from ManualsPrinter com Manuals ...

Page 87: ...own list 2 Select the correct size from the Fit to Page drop down list 3 Select the paper source size and type 4 Click OK and print the document 5 Printing Posters You can print a single page document onto 4 9 or 16 sheets of paper for the purpose of pasting the sheets together to form one poster size document When you change the print settings from your software application access the printer pro...

Page 88: ...gure the poster option 3 You can select the page layout from Poster 2x2 Poster 3x3 Poster 4x4 or Custom If you select Poster 2x2 the output will be automatically stretched to cover 4 physical pages If the option is set to Custom you can enlarge the original from 150 to 400 Depending on the level of the enlargement the page layout is automatically adjusted to Poster 2x2 Poster 3x3 Poster 4x4 Specif...

Page 89: ...oduce a booklet When you change the print settings from your software application access the printer properties 1 From the Layout tab select Booklet Printing on the Layout Options drop down list 2 NOTE The Booklet Printing option is not available for all paper sizes In order to find out the available paper size for this feature select the paper size in the Paper size option on the Paper tab then c...

Page 90: ...ich is the type often used with calendars NOTE Do not print on both sides of labels transparencies envelopes or thick paper Damage to the printer and paper jamming might result NOTE To use the double sided printing you can use only the following paper size A4 Letter Legal and Folio When you change the print settings from your software application access the printer properties 1 From the Layout tab...

Page 91: ...g DRAFT or CONFIDENTIAL printed diagonally across the first page or all pages of a document There are several predefined watermarks that come with your printer They can be modified or you can add new ones to the list Using an Existing Watermark When you change the print settings from your software application access the printer properties 1 Click the Other Options tab and select a watermark on the...

Page 92: ...termark section The Edit Watermarks window appears 2 Enter the text message you want to print in the Watermark Message box 3 The message displays in the preview image window The preview image is provided so that you can see how the watermark will appear on the printed page When the First Page Only box is checked the watermark is printed on the first page only Downloaded from ManualsPrinter com Man...

Page 93: ...plication access the printer properties 1 Click the Other Options tab and click Edit in the Watermark section The Edit Watermarks window appears 2 Select the watermark you want to edit on the Current Watermarks list and change the watermark message and the options 3 Click Update to save the changes 4 Click OK 5 Deleting a Watermark When you change the print settings from your software application ...

Page 94: ...erhead overlay on your document Creating a New Page Overlay To use a page overlay you must create a new page overlay containing your logo or image NOTE The overlay document size must be the same as documents you will print with the overlay Do not create an overlay with a watermark Create or open a document containing text or an image for use in a new page overlay Position the items exactly as you ...

Page 95: ...red in your computer Using a Page Overlay After an overlay has been created it is ready to be printed with your document To print an overlay with a document NOTE The resolution of the overlay must be the same as the resolution of the document that will print with the overlay Create or open the document you want to print 1 When you change the print settings from your software application access the...

Page 96: ... overlay from the Overlay List box If necessary click Confirm Page Overlay When Printing When this box is checked a message window appears each time you submit a document for printing asking you to confirm that you want to print an overlay on your document 6 Answering Yes to the window means that the selected overlay will be printed with your document Answering No to the window cancels the use of ...

Page 97: ...s window click the Other Options tab 1 Click Edit in the Overlay section 2 Select the overlay you want to delete from the Overlay List box 3 Click Delete Overlay 4 When a confirming message window appears click Yes 5 Click OK until you exit the Print window 6 Downloaded from ManualsPrinter com Manuals ...

Page 98: ... paper tray that you will use for the copy job Press Scroll or to highlight Copy and then press Select 1 Press Scroll or to highlight Select Tray and then press Select 2 Press Scroll or to display the paper tray you want 3 You can select from Tray1 Tray2 option and MPF multi purpose tray If you do not install the optional tray 2 the Tray2 option menu item will not appear on the display Press Selec...

Page 99: ... sizes or weights of paper Do not load booklets pamphlets transparencies or documents having other unusual characteristics Loading an Original Document You can use the DADF Duplex Automatic Document Feeder or the document glass to load an original document Using the DADF you can load up to 50 sheets of 75 g m2 20 lb paper at a time Using the document glass you can load one sheet at a time NOTE Ens...

Page 100: ...ottom of the document stack matches the paper size marked on the document input tray 2 For detailed guidelines for preparing an original document see Preparing a Document To load the document in the document glass Open the document cover 1 Downloaded from ManualsPrinter com Manuals ...

Page 101: ...eparing a Document Close the document cover 3 NOTE If you are copying a page from a book or magazine lift the cover until its hinges are caught by the stopper and then close the cover If the book or magazine is thicker than 30 mm start copying with the cover open NOTE Leaving the cover open while copying may affect the copy quality and toner consumption Downloaded from ManualsPrinter com Manuals ...

Page 102: ... Cancel button If necessary you can use special copy features such as Auto Fit Clone Poster and ID copying referring to Using Special Copy Features 3 Press Start to begin copying The display shows the copy processing 4 NOTE You can cancel the copy job at any time Press Cancel and the copying will stop Setting Copy Options The Copy menus on the operator panel let you customize all the basic copy op...

Page 103: ...your copy To select from the predefined copy sizes Press Scroll or to highlight Copy and then press Select 1 Press Scroll or to highlight Zoom and then press Select 2 Press Scroll or to find the size setting you want and then press Select 3 You can select from 100 78 83 94 and 104 To fine tune the size of copies Press Scroll or to highlight Copy and then press Select 1 Press Scroll or to highlight...

Page 104: ...ght Original Type and then press Select 2 Press Scroll or to select the image quality mode and then press Select Text Use for documents with fine details such as fine text Text Photo Use for documents with both text and photo gray tones Photo Use for documents with photo or gray tones 3 Using Special Copy Features NOTE Some features may not be available depending on where you loaded the document o...

Page 105: ...iginal document is larger than the printable area some portions may not be printed This special copy mode can be applied when you load a document using only the document glass If a document is detected in the DADF the ID copying feature does not work NOTE You cannot adjust the copy size using the Zoom menu for ID copying To make the ID copying Load the document to be copied on the document glass a...

Page 106: ...ng the Zoom menu while the Auto Fit copying is enabled To make the Auto Fit copying Load the document to be copied on the document glass and close the document cover 1 Press Scroll or to highlight Copy and then press Select 2 Press Scroll or to highlight Layout and then press Select 3 Press Scroll or to highlight Auto Fit and then press Select 4 If necessary customize the copy settings including t...

Page 107: ... the cover 1 Press Scroll or to highlight Copy and then press Select 2 Press Scroll or to highlight Layout and then press Select 3 Press Scroll or to highlight Poster and then press Select 4 If necessary customize the copy settings including the number of copies contrast and image quality by using the Copy menus See Setting Copy Options 5 Press Start to begin copying 6 Your original document is di...

Page 108: ...stomize the copy settings including number of copies contrast and image quality by using the Copy menus See Setting Copy Options 5 Press Start to begin copying 6 Deciding the form of copy output This special copy mode can be applied when you load a document using only the DADF Load the document to be copied in the DADF 1 Press Scroll or to highlight Copy and then press Select 2 Press Scroll or to ...

Page 109: ...ait or Landscape according to the original paper s orientation 5 Press Select 6 If necessary customize the copy settings including number of copies contrast and image quality by using the Copy menus See Setting Copy Options 7 Press Start to begin copying 8 Printing Copies on Both Sides of Paper You can set the printer to print copies on both sides of paper Load the documents to be copied in the DA...

Page 110: ...luding contrast image quality copy size and the number of copies can be set to the most frequently used modes When you copy a document the default settings are used unless they are changed by using the Copy menus NOTE While you set copy options pressing Cancel cancels the changed settings and returns to the default status To create your own default settings Press Scroll or to highlight Copy and th...

Page 111: ... email scan to computer local and network and scan to USB Dell ScanCenter Use your Dell 2335dn MFP to convert pictures and text into editable images on your computer After you install the software from the DRIVERS AND UTILITIES CD you can start scanning images using Dell ScanCenter on your computer or through the network using Dell Dell Scan Manager which enables you to scan a document on your pri...

Page 112: ...mmended for graphics NOTE The first time you use PaperPort you must open PaperPort on your computer before you start scanning in order for the scanned document to be stored in your computer NOTE If you prefer to use another application such as Adobe PhotoShop you must assign the application to the printer by selecting it from the list of available applications Please refer to Scanning Using Dell S...

Page 113: ...network connection Setting scan information in Dell Scan Manager You can find out about Dell Scan Manager program information and installed scan driver s condition Also you can change scan settings and add or delete the folders in which documents scanned to computer are saved in Dell Scan Manager program NOTE Dell Scan Manager program can only be used in the Window system From the Start menu selec...

Page 114: ...2 In the Set Scan Button window select the scan setting option 3 Downloaded from ManualsPrinter com Manuals ...

Page 115: ...fter the setting is done 4 Setting Quick Scan Default The default scan destination can be set to the most frequently used one When you scan a document the default destination is shown for quick and simple scanning Press Scroll or to highlight Scan and then press Select 1 Press Scroll or to highlight Scan Defaults and then press Select 2 3 Downloaded from ManualsPrinter com Manuals ...

Page 116: ...to highlight Local PC or Network PC and then press Select 4 If you select Network PC enter your computer ID and password using the number keypad and then press Select Press Scroll or to select an application to which you want to send the scanned image Microsoft Paint Sends the scanned image to Microsoft Paint Email Sends the scanned image to your default email program on the computer A new message...

Page 117: ...size Letter A4 Legal Executive A5 or B5 and then press Select or Start 11 Scanning is started 12 The selected application window opens Adjust the scan settings and start scan For details please refer to the user s guide of the application 13 NOTE If you selected My Document scanned image is saved in computer s My Document My Pictures Dell folder NOTE You can use Twain driver to scan quickly in Del...

Page 118: ...hen press Select 7 NOTE You can enter the name you have stored in the Address Book See Setting up Address Book The display asks if you want to enter another address To enter an additional address press Scroll or to select Add and repeat step 7 8 To continue to the next step press Select when Done appears The display asks if you want to review addresses 9 Press Scroll or to review addresses press S...

Page 119: ...e WIA driver enables you to scan an image and easily manipulate those images without using additional software NOTE The WIA driver works only on Windows XP Server 2003 Server 2008 Vista 7 Load the document s face up with top edge in first into the DADF 1 OR Place a single document face down on the document glass For details about loading a document see Loading an Original Document Click Start Cont...

Page 120: ...Memory You can scan a document and save the scanned image on the USB memory There are two ways of doing this you can scan to the USB Memory using the default settings or you can manually select your own settings About USB Memory USB memory is available with various memory capacities to give you enough space to store documents presentations downloaded music and videos high resolution photographs or...

Page 121: ...y a USB memory key whose connector style is A Plug Type Insert a USB memory key into the USB memory port on the front of your printer CAUTION Do not remove the USB memory key during scanning operation This may damage your printer Scanning Using the Default Settings Image Size Version Resolution Letter USA A4 UK JPEG 200 dpi Insert the USB memory key into the USB memory port on your printer 1 NOTE ...

Page 122: ...ing table shows the options you can select Image Size Version Color Resolution Letter A4 Legal Folio Executive A5 A6 B5 JPEG BMP TIFF PDF Color Gray Mono 100 200 300 600dpi NOTE 600 dpi resolution is available in color scanning only when additional memory DIMM is installed Insert the USB memory key into the USB memory port on your printer 1 Load the document s face up with top edge in first into t...

Page 123: ... Select 10 Press Scroll or to select the scan color mode Color Gray or Mono and then press Select 11 Press Scroll or to highlight to the resolution 100 dpi 200 dpi 300 dpi or 600 dpi and then press Select 12 If you place a single document face down on the document glass and select TIFF or PDF press Scroll or to select multi page option and then press Select or Start 13 Scanning is started 14 For t...

Page 124: ...ed a folder press Scroll or to select the file you want to delete and then press Select Press Select when Yes appears to confirm your selection 8 The display asks if you want to delete another file 9 Select Yes or No Press Cancel to return to the Standby mode 10 Formatting the USB Memory Insert the USB memory key into the USB memory port on your printer 1 Press Scroll or to highlight Scan and then...

Page 125: ... selected a folder press Scroll or to select the file you want to print and press Select Enter the number of prints and then press Select 6 Printing is started If the selected file format is not supported File Format Not Supported appears The display asks if you want to print another file 7 Select Yes or No Press Cancel to return to the Standby mode 8 Viewing the USB Memory Status You can check th...

Page 126: ...il Account Press Scroll or to highlight Setup and then press Select 1 Press Scroll or to highlight Email Setup and then press Select 2 Press Scroll or to highlight the menu item you want and then press Select 3 If necessary press Scroll or until the submenu item you want appears and then press Select 4 Enter the required information or select the desired status and then press Select 5 Repeat steps...

Page 127: ...email account Default From You can set the default email address for the From address displays Default Subject You can set the default subject in your emails Email Forward You can set the printer to forward all of the outgoing or incoming faxes to specified e mail addresses See Fax Forward to E mail addresses Control Access You can protect the Email Setup feature with a passcode Set Passcode You c...

Page 128: ...ite of your machine 1 Click Email Settings Authentication 2 Select User Authentication 3 Enter your auth ID password 4 You need to enter the registered user ID and password in the machine when you start scanning to email from the control panel Click Submit 5 Setting up an e mail account To scan and send an image as an email attachment you need to set up network parameters using Embedded Web Servic...

Page 129: ... NOTE LDAP Referral LDAP client will search referral server in case LDAP server has no data to reply of query and LDAP server has any referral server Click Submit 7 Available Options for LDAP Server Option Description LDAP Server Setup LDAP Server and Port Specifies the LDAP server address in IP address format of aaa bbb ccc ddd or as a DNS host name up to 63 characters And specifies the LDAP serv...

Page 130: ... user id has cn user name form Choose Email Address if user id has mail user name form Choose Surname Given Name otherwise Setting up an e mail alert To configure detailed settings for email alert Enter your machine s IP address as the URL in a browser and click Go to access the web site of your machine 1 Click Email Settings Email Alert Setup 2 Enter the item you want appears 3 Click Submit 4 NOT...

Page 131: ...t with each E mail Alert Email Alert Setup Email List 1 2 Sets acceptable e mail addresses for the E Mail Alert feature up to 255 alphanumeric characters Select Alerts for List 1 Supply Alert Select the check box to receive an E Mail Alert for consumables Paper Handling Alert Select the check box to receive an E Mail Alert for paper handling Select Alerts for List 2 Supply Alert Select the check b...

Page 132: ...r address To enter additional addresses press Scroll or to select Add and repeat step 7 8 To continue to the next step press Select when Done appears The display asks if you want to review addresses 9 Press Scroll or to review addresses press Select to select Yes and check the address you have entered To continue to the next setup press Scroll or to select No and then press Select The display asks...

Page 133: ...ok with the email addresses you use frequently via Embedded Web Service and then easily and quickly enter email addresses by entering the location numbers assigned to them in Address Book Enter your machine s IP address as the URL in a browser and click Go to access the web site of your machine 1 Click Email Settings Address Book 2 Click Local Address Book 3 Click Add 4 Select a location number an...

Page 134: ... Press Scroll or to highlight Email and then press Select 3 Press Scroll or to highlight Email Address and then press Select 4 Press Scroll or to highlight Send and then press Select 5 Enter the sender s name and then press Select 6 Sender s name is the one you have set in the User Setup setting See Available Options for Email Account Setup Enter your login ID and then press Select 7 Login ID is t...

Page 135: ...ay asks if you want to send the e mail to yourself 12 To send to your e mail address press Select to select Yes Or press Scroll or to select No and then press Select Enter the email subject and then press Select 13 Press Scroll or to select the file type to which the scanned image may be converted and then press Select 14 Press Scroll or to select the resolution you want and then press Select 15 P...

Page 136: ...User Setup setting See Available Options for Email Account Setup Enter your login password and then press Select 7 Password is the one you have set in the User Setup setting See Available Options for Email Account Setup Press Scroll or to enter the recipient s email address and then press Select 8 NOTE You can enter the name you have stored in the Address Book See Setting up Address Book The displ...

Page 137: ...play asks if you want to log off your account press Scroll or to select Yes or No and then press Select 16 Your printer returns to the Standby mode Sending an Email using an Global Address via LDAP server NOTE You first need to configure the LDAP server settings See Network authorized user by LDAP for network parameters NOTE You need to configure the User Setup settings in order to use the emails ...

Page 138: ... asks if you want to enter another address To enter an additional address press Scroll or to select Add and repeat step 8 9 To continue to the next step press Select when Done appears The display asks if you want to review addresses 10 Press Scroll or to review addresses press Select to select Yes and check the address you have entered To continue to the next setup press Scroll or to select No and...

Page 139: ...Select 3 Press Scroll or to highlight Edit and then press Select 4 Press Scroll or to select the e mail address you want to edit or delete and then press Select 5 To delete the selected address press Select 6 OR To edit the selected address press Scroll or to select Edit and then press Select If you select Edit edit the name and then press Select Edit the e mail address and then press Select 7 Pre...

Page 140: ... you want 5 Select local email numbers that will be included in the group 6 Click Submit 7 Assigning Email Addresses to a Group Number Press Directory in the operator panel 1 Press Scroll or to highlight Email and then press Select 2 Press Scroll or to highlight Group Mail and then press Select 3 Press Scroll or to highlight New and then press Select 4 Enter a group location number between 1 and 5...

Page 141: ...up Numbers Press Directory in the operator panel 1 Press Scroll or to highlight Email and then press Select 2 Press Scroll or to highlight Group Mail and then press Select 3 Press Scroll or to highlight Edit and then press Select 4 Enter a group location number you want to edit and then press Select 5 Edit the group name and then press Select 6 Press Select when View appears to check the group add...

Page 142: ...ss Select 4 Press Scroll or to highlight Send and then press Select 5 Enter the sender s name and then press Select 6 The e mail address you have assigned for the name appears Press Select 7 The display asks you if you want to send e mail to yourself 8 Select Yes or No and then press Select Enter the group location number and then press Select 9 The display asks if you want to review addresses 10 ...

Page 143: ...ess Directory in the operator panel 1 Press Scroll or to highlight Email and then press Select 2 Press Scroll or to highlight Email Address and then press Select 3 Press Scroll or to highlight Print and then press Select 4 Press Scroll or to select Individual Group Address or All and then press Select 5 The selected list prints out Changing Default Settings You can set up default scan settings Pre...

Page 144: ...ou first need to configure the network settings See Dell Printer Configuration Web Tool for network parameters Press Scroll or to highlight Scan and then press Select 1 Press Scroll or to highlight Fax Server and then press Select 2 Enter the remote fax phone number using the number keypad 3 If you place a single document face down on the document glass skip to step 6 4 Press Scroll or to highligh...

Page 145: ...7 Downloaded from ManualsPrinter com Manuals ...

Page 146: ...ng the printer to the Network Printing Across a Network Whether the printer is locally connected or network connected you need to install the Dell 2335dn MFP software on each computer that prints documents using the printer Setting Up the Locally Shared Printer You can connect the printer directly to a selected computer which is called the host computer on the network Your printer can be shared by...

Page 147: ... all network clients printing to this printer 7 Click OK 8 If you are missing files you are prompted to insert the server operating system CD Insert the DRIVERS AND UTILITIES CD ensure that the drive letter is correct for your CD ROM drive and then click OK a If you are using Windows Vista 7 Brows to a client computer running the operating system and then click OK If you are using any other Window...

Page 148: ...o print a test page Peer to Peer If you use the Peer to Peer method the printer driver is fully installed on each client computer Network clients retain control of driver modifications The client computer handles the print job processing For Windows 2000 click the Start button Settings Printer 1 For Windows XP Server 2003 click the Start button and point to Printers and Faxes For Windows Vista Ser...

Page 149: ...rs For Windows Server 2008 R2 click the Start button and click Control Panel Hardware Devices and Printers Double click your printer icon 2 Click the File menu and point to Properties 3 Click the General tab and select Print Test Page 4 Setting Up a Network connected Printer You must set up the network protocols on the printer to use it as your network printer Protocols can be set up by the follow...

Page 150: ... 2 Suse linux Enterprise Version 10 Redhat WS Linux 5 0 UNIX TBD SUN 8 9 10 HP UX 11i IBM AIX 5 2 5 3 Citrix Windows Terminal Server SAP Network Protocols TCP IPv4 IPv6 DHCP DNS 9100 LPR SNMP HTTP IPSec EtherTalk Novell NetWare NDPS services via TCP IP IPP on 5 x 6 x DHCP BOOTP SLP SSDP Bonjour Rendezvous DDNS WINS TCP Port 2000 LPR Port 515 Raw Port 9100 SNMPv1 2 3 HTTP Telnet SMTP E mail Notific...

Page 151: ...ct 3 If you selected Ethernet Speed select a network speed 4 If you selected TCP IP IPv4 or TCP IP IPv6 assign a TCP IP address For details see Configuring TCP IP If you selected AppleTalk Press Scroll or to select Activate and then press Select a Press Scroll or to change the setting to On enable or Off disable b NOTE When you set AppleTalk you must restart your machine to apply new settings Pres...

Page 152: ...tivate and then press Select a Press Scroll or to change the setting to On enable or Off disable b Press Cancel to return to the Standby mode d Static Addressing To enter the TCP IP address from your printer s operator panel take the following steps Press Scroll or to highlight Setup and then press Select 1 Press Scroll or to highlight Network Setup and then press Select 2 Press Scroll or to highl...

Page 153: ...to highlight TCP IP IPv4 and then press Select 3 Press Scroll or to highlight Set IP Address and then press Select 4 Press Scroll or to highlight DHCP and then press Select 5 To assign the address from the BOOTP server press Select when BOOTP displays Restoring the Network Configuration You can return the network configuration to its default settings Press Scroll or to highlight Setup and then pre...

Page 154: ... different printer s status from the status on your printer try to set this option Press Scroll or to highlight Setup and then press Select 1 Press Scroll or to highlight Network Setup and then press Select 2 Press Scroll or to highlight iPrint Notification and then press Select 3 Press Scroll or to select the client operating system Win XP 2K 2003 Windows Vista Windows 7 4 Press Select to save th...

Page 155: ...rinter Press Scroll or to highlight Setup and then press Select 1 Press Scroll or to highlight Machine Setup and then press Select 2 Press Scroll or to highlight Machine ID and then press Select 3 Enter your fax number using the number keypad 4 NOTE If you make a mistake while entering numbers press the left Scroll button to delete the last digit Press Select when the number on the display is corr...

Page 156: ...ber When you store fax numbers in memory you may also enter the corresponding names When prompted to enter a letter press the appropriate button until the correct letter appears on the display For example to enter the letter O press 6 Each time you press 6 the display shows a different letter M N O and finally 6 To enter additional letters repeat the first step Press 1 to enter a space or special ...

Page 157: ...n order for the access code to function For example enter the access code 9 and then press Pause before entering the telephone number A appears on the display to indicate when a pause is entered Setting the Time and Date The time and date are printed on all faxes NOTE It may be necessary to reset the correct time and date if loss of power to the printer occurs To set the time and date Press Scroll...

Page 158: ...he time and date on the display is correct 6 NOTE The printer beeps and does not allow you to proceed to the next step if a wrong number is entered Setting Daylight Savings Time If your country switches to Daylight Savings Time each year use this procedure to automatically switch to Daylight Savings Time and to Standard time Press Scroll or to highlight Setup and then press Select 1 Press Scroll o...

Page 159: ...ounds Speaker Ringer Button and Alarm Sounds Press Scroll or to highlight Setup and then press Select 1 Press Scroll or to highlight Machine Setup and then press Select 2 Press Scroll or to highlight Sound Volume and then press Select 3 Press Scroll or to scroll through the options Press Select when you see the sound option you want 4 Press Scroll or to display the status or loudness you want for ...

Page 160: ...arts sending toll save faxes using the number keypad 5 To select AM or PM for 12 hour format press Scroll or to highlight AM or PM and then press Scroll or Press Select when the starting time on the display is correct 6 After 1 second enter the time and date when the toll save transmission ends using the number keypad 7 Press Select to save the setting 8 Press Cancel to return to the Standby mode ...

Page 161: ...olor Ring To Answer You can specify the number of times the printer rings 1 7 before answering an incoming call Receive Mode You can select the default fax receiving mode Fax mode automatic receive mode The printer answers an incoming call and automatically goes into receive mode The number of rings before the printer answers can be set in the Ring To Answer option If the user memory is full the p...

Page 162: ...he available options are On or Off Auto Reduction When receiving a document as long as or longer than the paper loaded in the paper tray the printer can reduce the size of the document to fit the size of paper loaded in the printer Select On if you want to automatically reduce the incoming document With this feature set to Off the printer cannot reduce the document to fit onto one page The documen...

Page 163: ...one 3 The printer displays the test result If the fax line connection test has failed check the telephone line cord connection or contact your telephone service provider NOTE If test pass you can start using the Fax functionality If test fail Need to direct them to the troubleshooting section for fax If you cannot hear the dial tone during the Dial Tone Test contact your telephone service provider...

Page 164: ...rd typed or printed documents Darker works well with light print or faint pencil markings Lighter works well with dark print 3 Adjusting the Document Resolution Use the Quality setting to improve the output quality of the original or to scan photographs Press Scroll or to highlight Fax and then press Select 1 Press Scroll or to highlight Send Quality and then press Select 2 Press Scroll or to disp...

Page 165: ...uplex Automatic Document Feeder 1 OR Place a single document face down on the document glass For details about loading a document see Adjusting the Document Contrast Adjust the document contrast and resolution to suit your fax needs 2 Press Scroll or to highlight Fax 3 Enter the remote fax phone number using the number keypad 4 You can use one two or three digit speed or group dial numbers For det...

Page 166: ...smissions When the last page of your document has been sent successfully the printer beeps and returns to Standby mode If something goes wrong while sending your fax an error message appears on the display For a listing of error messages and their meanings see Clearing LCD Error Messages If you receive an error message press Cancel to clear the message and try to send the document again You can se...

Page 167: ...t dials the number and sends the fax 5 Receiving a Fax NOTE The Dell 2335dn MFP can print mono faxes only If a color formatted fax is received the data will be automatically changed to mono fax About Receiving Modes NOTE To use the Ans Fax mode attach an answering machine to the extension telephone socket on the back of your printer When the memory is full the printer can no longer receive any inc...

Page 168: ... printer detects a fax tone it automatically initiates reception of the fax NOTE If you have set your printer to Ans Fax mode and your answering machine is switched off or no answering machine is connected to your machine your printer may automatically go into Fax mode after a predefined number of rings Receiving Manually Using an Extension Telephone This features works best when you are using an ...

Page 169: ...2 Press Scroll or to highlight DRPD Mode and then press Select 3 The LCD displays Waiting Ring Press Scroll or to highlight Set and then press Select 4 Call your fax number from another telephone It is not necessary to place the call from a fax machine 5 When your printer begins to ring do not answer the call The printer requires several rings to learn the pattern 6 When the printer completes lear...

Page 170: ...ight Add Person and then press Select 3 Enter a name and then press Select For details about how to enter names see Using the Number Keypad to Enter Characters 4 Enter a one two or three digit speed dial number between 0 399 using the number keypad and then press Select 5 Or select the location by pressing Scroll or and then press Select Enter the fax number you want to store using the number keyp...

Page 171: ...n press Select 6 Enter the correct name you want and then press Select 7 If you want to edit another speed dial number repeat from step 5 8 OR Press Cancel to return to the Standby mode Sending a Fax using a Speed Number Load the document s face up with top edge in first into the DADF 1 OR Place a single document face down on the document glass For details about loading a document see Loading an O...

Page 172: ...ly send the same document to several destinations you can create a group of these destinations and set them under a one two or three digit group dial locations This enables you to use a group dial number setting to send the same document to all the destinations in the group NOTE You cannot include one group dial number within another group dial number Setting Group Dial Press Directory in the oper...

Page 173: ...p or add a new number to the selected group Press Directory in the operator panel 1 OR Press Scroll or to highlight Fax and then press Select Press Scroll or to highlight Phone Book and then press Select 2 Press Scroll or to highlight Edit and then press Select 3 Press Scroll or to highlight Edit Group and then press Select 4 Enter the group number you want to edit or select the group number by pr...

Page 174: ...digit button and hold the last digit button For a three digit speed dial number press the first and second digit buttons and hold the last digit button You can use only one group number for one operation Then continue the procedure to complete the desired operation Your printer automatically scans the document loaded in the DADF or on the document glass into the memory The printer dials each of th...

Page 175: ...or Select to dial 6 Searching with a Particular First Letter Load the document s face up with top edge in first into the DADF 1 OR Place a single document face down on the document glass For details about loading a document see Loading an Original Document Press Directory in the operator panel 2 OR Press Scroll or to highlight Fax and then press Select Press Scroll or to highlight Phone Book and t...

Page 176: ...ocuments are automatically stored in the memory and sent to a remote station After transmission the documents are automatically erased from the memory Load the document s face up with top edge in first into the DADF 1 OR Place a single document face down on the document glass For details about loading a document see Loading an Original Document Press Scroll or to highlight Fax and then press Selec...

Page 177: ...t glass the display asks if you want to load another page Select Yes to add Otherwise select No The printer begins sending the document in the order of the numbers that you have entered 10 Sending a Delayed Fax You can set your printer to store and then send a fax at a later time Load the document s face up with top edge in first into the DADF 1 OR Place a single document face down on the document...

Page 178: ... time the document will be sent at that time the following day Press Select when the start time displays correctly 11 The document is scanned into the memory before transmission The display shows the memory capacity and the number of pages being stored in memory 12 For the document loaded on the document glass the display asks if you want to load another page Select Yes to add Otherwise select No ...

Page 179: ...play 6 If you want to assign a name to the transmission enter the name If not skip this step 7 For details on how to enter the name using the number keypad see Using the Number Keypad to Enter Characters Press Select 8 The document is scanned into the memory before transmission The display shows the memory capacity and the number of pages being stored in the memory For the document loaded on the d...

Page 180: ...and the number of pages For the document loaded on the document glass the display asks if you want to load another page Select Yes to add Otherwise select No After storing the printer displays the numbers of total pages and added pages and then returns to the Standby mode 6 Canceling a Scheduled Fax Press Scroll or to highlight Fax and then press Select 1 Press Scroll or to highlight Cancel Job an...

Page 181: ...l address When you select this option you should choose whether the printer prints out the incoming faxes 5 Press Scroll or to highlight Attachment Type and then press Select 6 Select the attachment type either TIFF or PDF by pressing Scroll or and then press Select 7 Press Scroll or to highlight From Address and then press Select 8 Enter the sender s name and then press Select 9 Press Scroll or t...

Page 182: ...light Secure Receive and then press Select 3 Press Select when On displays 4 Enter a four digit passcode you want to use using the number keypad and then press Select 5 Re enter the passcode again and then press Select 6 Press Cancel to return to the Standby mode 7 When a fax is received in the secure receiving mode your printer stores it into memory and displays Secure Receive to let you know tha...

Page 183: ...bout the menu functions list Phonebook List This list shows all of the numbers currently stored in the printer s memory as speed dial and group dial numbers You can print this Phonebook list using Directory on the operator panel see Printing a Phonebook List Email Address Book This report shows information about the Email address list Out going Fax Report This report shows information about the fa...

Page 184: ...y PCL or PS Font List This report shows the PCL or PS font list Network Settings This list shows the status of the network options You may print this list to confirm your changes after changing any settings Email Report This report shows information about the emails that you have recently sent Printing a Report Press Scroll or to highlight Setup and then press Select 1 Press Scroll or to highlight...

Page 185: ...For details about printing the list see Printing a Report Changing Setting Options Press Scroll or to highlight Setup and then press Select 1 Press Scroll or to highlight Fax Setup and then press Select 2 Press Scroll or until you see the desired menu item and then press Select 3 When the option that you want displays choose the desired status by pressing Scroll or or enter the desired value using...

Page 186: ...heir numbers are stored in the memory as junk fax numbers This feature is useful for blocking any unwanted faxes Select Off to turn the feature off Anybody can send you a fax Select On to turn the feature on You can set up to 10 fax numbers as junk fax numbers After storing the numbers you do not receive any faxes from the registered stations Secure Receive You can keep your received faxes from be...

Page 187: ...f your printer as shown in Figure 1 Set your printer to Ans Fax mode and set the Ring To Answer to a digit greater than the Rings to Answer setting for the TAD When the TAD picks up the call the printer monitors and takes the line if fax tones are received and then starts receiving the fax If the answering device is off the printer automatically goes into Fax mode after a predefined number of ring...

Page 188: ...t use the computer modem if your printer is sending or receiving a fax To fax via the computer modem follow the instructions provided with your computer modem and fax application You can capture images using your printer and Dell ScanDirect and send them using your fax application with the computer modem Sending a fax from a Computer You can send a fax from your Computer without going to the print...

Page 189: ... use 3 NOTE If you MS Office Outlook and Windows Address Book are installed on your computer Select Address Book field will be activated Select the multi function printer to be used by choosing Local or Network 4 If you select Network click Browse and search or enter IP address the printer you will use Click OK 5 Sending a fax from your Computer Open the document to be sent 1 Select Print from the...

Page 190: ...ck Print or OK 4 Compose the cover page and click Continue 5 If you want to skip cover page check Skip Cover Page Enter the recipients numbers and click Continue 6 Downloaded from ManualsPrinter com Manuals ...

Page 191: ...ax Fax data back up The Dell 2335dn MFP has 4 MB Approx 200 pages at ITU T 1 Chart back up memory If there are no paper or no toner left during the fax receiving the received fax data cannot be printed In this case the machine automatically saves fax data in the back up memory But if the machine fails to complete the receiving fax the rest of the fax data will not be saved the memory Downloaded fr...

Page 192: ...computer Verify the following before you install the printer software Operating System Requirements CPU RAM Free Disk Space Mac OS X 10 4 or lower Power PC G4 G5 Intel processors 128 MB for a Power PC based MAC 512 MB 512 MB for an Intel based Mac 1 GB 1 GB Mac OS X 10 5 867MHz or faster Power PC G4 G5 Intel processors 512 MB 1 GB 1 GB Mac OS X 10 6 Intel processors 1 GB 2 GB 1 GB Install the prin...

Page 193: ...ck the MAC_Printer folder 4 Double click the Dell Laser MFP Installer icon 5 Enter the password and click OK 6 Click Continue 7 Click Uninstall and then click Uninstall 8 After the uninstallation is finished click Quit 9 Install the Scan driver Ensure that you connect your printer to the computer Turn on your computer and printer 1 Insert the DRIVERS AND UTILITIES CD which came with your printer i...

Page 194: ... Set up for your printer will be different depending on which cable you use to connect the printer to your computer the network cable or the USB cable For a Network connected Macintosh Follow the instructions on Installing Software for Macintosh to install the PPD and Filter files on your computer 1 Open the Applications folder Utilities and Print Setup Utility 2 For MAC OS 10 5 10 6 open System P...

Page 195: ... your printer name in Print Using Click Add 8 Your printer s IP address appears on the Printer List and is set as the default printer 9 For a USB connected Macintosh Follow the instructions on Installing Software for Macintosh to install the PPD and Filter files on your computer 1 Open the Applications folder Utilities and Print Setup Utility 2 For MAC OS 10 5 10 6 open System Preferences from the...

Page 196: ...ntosh you need to check the printer software setting in each application you use Follow these steps to print from a Macintosh Open a Macintosh application and select the file you want to print 1 Open the File menu and click Page Setup Document Setup in some applications 2 Choose your paper size orientation scaling and other options and click OK 3 Open the File menu and click Print 4 Choose the num...

Page 197: ...of paper Select Layout from the Presets drop down list to access the following features For details see Printing Multiple Pages on One Sheet of the Paper and Duplex Printing Printing Multiple Pages on One Sheet of Paper You can print more than one page on a single sheet of paper This feature provides a cost effective way to print draft pages From your Macintosh application select Print from the Fi...

Page 198: ...ndars CAUTION If you have selected duplex printing and then try to print multiple copies of a document the printer may not print the document in the way you want In case of Collated copy if your document has odd pages the last page of the first copy and the first page of the next copy will be printed on the front and back of one sheet In case of Uncollated copy the same page will be printed on the...

Page 199: ...s can be useful when you want to check fine details on a small document Paper Type Ensure that Paper Type is set to Printer Default If you load a different type of print material select the corresponding paper type Resolution You can select the printing resolution The higher the setting the sharper the clarity of printed characters and graphics The higher setting also may increase the time it take...

Page 200: ...age Capture s help Set the scan options on this program 4 Scan and save your scanned image 5 NOTE For more information about using Image Capture please refer to the Image Capture s help NOTE You can also using TWAIN compliant software such as Adobe Photoshop NOTE Scan process differ according to TWAIN compliant software Please refer to the user s guide of the software NOTE When scanning does not o...

Page 201: ... system the driver package enables you to monitor a number of MFP devices via USB port The acquired documents can then be edited printed on the same local MFP or network printers sent by e mail uploaded to an FTP site or transferred to an external OCR system The MFP driver package is supplied with a smart and flexible installation program You do not need to search for additional components that mi...

Page 202: ...es NOTE The Linux scanner driver supports the optical resolution at maximum Software Linux Kernel 2 4 or higher Glibc 2 2 or higher CUPS SANE Installing the MFP Driver Ensure that you connect your multi function to your computer Turn both the computer and the printer on 1 When the Administrator Login window appears type in root in the Login field and enter the system password 2 NOTE You must log i...

Page 203: ...ed to run the CD ROM type the followings in sequence root localhost root umount dev hdc root localhost root mount t iso9660 dev hdc mnt cdrom NOTE The installation program runs automatically if you have an autorun software package installed and configured Click Install 2 When the welcome screen appears click Next 3 Installation is started When the installation is almost complete the Add printer wi...

Page 204: ...ing the USB cable the following window appears Select your printer from the drop down list and click Next 5 OR If you connect your printer using the network cable the following window appears Downloaded from ManualsPrinter com Manuals ...

Page 205: ...ect your printer from the drop down list Click Next If you connect your printer using the USB cable you should choose a port you will use with your printer After choosing the port click Next 6 Downloaded from ManualsPrinter com Manuals ...

Page 206: ...er using the network cable skip to the next step Select the driver and click Next 7 Enter your printer s name location description and click Next 8 Click Finish to complete installation 9 Downloaded from ManualsPrinter com Manuals ...

Page 207: ...e through your system menu or can otherwise be called from the driver package windows applications such as Unified Driver Configurator or Image Editor Uninstalling the MFP Driver When the Administrator Login window appears type in root in the Login field and enter the system password 1 NOTE You must log in as a super user root to install the printer software If you are not a super user ask your sy...

Page 208: ...nfigured Click Uninstall 3 Click Next 4 Click Finish 5 Using the Unified Driver Configurator Unified Driver Configurator is a tool primarily intended for configuring MFP devices Since an MFP device combines the printer and scanner the Unified Driver Configurator provides options logically grouped for printer and scanner functions There is also a special MFP port option responsible for the regulati...

Page 209: ...n window 2 You can use the onscreen help by clicking Help After changing the configurations click Exit to close the Unified Driver Configurator 3 Printers Configuration Printers configuration has the two tabs Printers and Classes Printers Tab You can see the current system s printer configuration by clicking on the printer icon button on the left side of the Unified Driver Configurator window Down...

Page 210: ...fault sets the current printer as a default printer Stop Start stops starts the printer Test allows you to print a test page to check if the machine is working properly Properties allows you to view and change the printer properties For details see Configuring Printer Properties Classes Tab The Classes tab shows a list of available printer classes Downloaded from ManualsPrinter com Manuals ...

Page 211: ...nter class Remove Class Removes the selected printer class Scanners Configuration In this window you can monitor the activity of scanner devices view a list of installed Dell MFP devices change device properties and scan images Downloaded from ManualsPrinter com Manuals ...

Page 212: ...ter via the parallel port or USB port Since the MFP device contains more than one device printer and scanner it is necessary to organize proper access of consumer applications to these devices via the single I O port The Dell MFP driver package provides an appropriate port sharing mechanism that is used by Dell printer and scanner drivers The drivers address their devices via so called MFP ports T...

Page 213: ... top of the window General allows you to change the printer location and name The name entered in this tab displays on the printer list in Printers configuration Connection allows you to view or select another port If you change the printer port from USB to parallel or vice versa while in use you must re configure the printer port in this tab Driver allows you to view or select another printer dri...

Page 214: ...CUPS You can print on your machine from any such application From the application you are using select Print from the File menu 1 Select Print directly using lpr 2 In the LPR GUI window select the model name of your machine from the Printer list and click Properties 3 Change the printer and print job properties 4 Downloaded from ManualsPrinter com Manuals ...

Page 215: ...n paper source and destination Click OK to apply the changes and close the Properties window 5 Click OK in the LPR GUI window to start printing 6 The Printing window appears allowing you to monitor the status of your print job 7 To abort the current job click Cancel Printing Files You can print many different types of files on the Dell MFP device using the standard CUPS way directly from the comma...

Page 216: ...r window Double click the Unified Driver Configurator on your desktop 1 Click the button to switch to Scanners Configuration 2 Select the scanner on the list 3 When you have only one MFP device and it is connected to the computer and turned on your scanner appears on the list and is automatically selected If you have two or more scanners attached to your computer you can select any scanner to work...

Page 217: ... resolution for the image Scan Area allows you to select the page size The Advanced button enables you to set the page size manually If you want to use one of the preset scan option settings select from the Job Type drop down list For details about the preset Job Type settings see Adding Job Type Settings You can restore the default setting for the scan options by clicking Default When you have fi...

Page 218: ...Adding Job Type Settings You can save your scan option settings to retrieve for a later scanning To save a new Job Type setting Change the options from the Scanner Properties window 1 Click Save As 2 Enter the name for your setting 3 Click OK 4 Your setting is added to the Saved Settings drop down list To save a Job Type setting for the next scan job Select the setting you want to use from the Job...

Page 219: ...tting Select the setting you want to delete from the Job Type drop down list 1 Click Delete 2 The setting is deleted from the list Using the Image Editor The Image Manager window provides you with menu commands and tools to edit your scanned image You can use the following tools to edit the image Downloaded from ManualsPrinter com Manuals ...

Page 220: ...ually or set the rate to scale proportionally vertically or horizontally Allows you to rotate the image you can select the number of degrees from the drop down list Allows you to flip the image vertically or horizontally Allows you to adjust the brightness or contrast of the image or to invert the image Shows the properties of the image For further details about the Image Manager program refer to ...

Page 221: ...l of your settings to the factory default Paper Setup Restores all of the Paper Setting options to the factory default Tray Behaviour Restores all of the Tray Behavior options to the factory default Copy Defaults Restores all of the copy options to the factory default Fax Settings Fax Defaults Restores all of the Fax Setup options to the factory default Advance Setup Restores all of the Advanced F...

Page 222: ...r 1 Press Scroll or to highlight Setup and then press Select 2 Press Scroll or to highlight Machine Setup and then press Select 3 Press Scroll or to highlight Export Setting and then press Select 4 The data is backed up to the USB memory key Press Cancel to return to the Standby mode 5 Restoring Data Insert the USB memory key into the USB memory port on your printer 1 Press Scroll or to highlight ...

Page 223: ...Paper toner and dust particles can accumulate inside the printer and cause print quality problems such as smearing or toner specks Clean inside the printer to prevent these problems Power the printer off and unplug the power cord Allow a reasonable amount of time for the printer to cool down 1 Open the front cover and pull the toner cartridge straight out Set it on a clean flat surface 2 CAUTION T...

Page 224: ...l from your fingers may cause print quality problems Locate the long strip of glass Laser Scanning Unit LSU inside the top of the cartridge compartment and gently swab the glass to see if dirt turns the white cotton black 4 Downloaded from ManualsPrinter com Manuals ...

Page 225: ...es Dell recommends cleaning the scanner at the start of each day and during the day as needed NOTE If there are lines present on copied or faxed documents check your scanner and DADF glass for any particles Slightly dampen a soft lint free cloth or paper towel with water 1 Open the document cover 2 Wipe the surface of the document glass and DADF glass until it is clean and dry 3 Downloaded from Ma...

Page 226: ...e sheet until it is clean and dry 4 Close the document cover 5 Maintaining the Toner Cartridge Storing the Toner Cartridge Store the toner cartridge in the original packaging until you are ready to install it Do not store the toner cartridge in Temperatures greater than 40 C 104 F An environment with extreme changes in humidity or temperature Direct sunlight Dusty places A car for a long period of...

Page 227: ...ning message Toner Low Thoroughly shake the cartridge from side to side 5 or 6 times to distribute the toner evenly inside the cartridge and temporarily improve print quality This is not intended to be a long term method of correction but meant to assist your printing needs until you obtain a new cartridge assembly Open the front cover 1 Pull the toner cartridge out 2 3 Downloaded from ManualsPrin...

Page 228: ...the toner cartridge by the handle and slowly insert the cartridge into the opening in the printer 4 Tabs on the sides of the cartridge and corresponding grooves within the printer will guide the cartridge into the correct position until it locks into place completely 5 Close the front cover Ensure that the cover is surely closed 6 Replacing the Toner Cartridge When the toner eventually runs out on...

Page 229: ... reliability are not guaranteed if you do not use Dell supplies To replace the toner cartridge Open the front cover 1 Pull the toner cartridge out 2 Remove the new toner cartridge from its bag 3 Remove the packing tape and thoroughly shake the cartridge from side to side to distribute the toner 4 Save the box and the cover for shipping NOTE If toner comes into contact with your clothing wipe the t...

Page 230: ...leaning procedure ensure that paper is loaded in the paper tray 1 Press Scroll or to highlight Setup and then press Select 2 Press Scroll or to highlight Maintenance and then press Select 3 The first available menu item Clean Drum displays Press Select twice 4 The display confirms your selection The printer prints out a cleaning page Toner particles on the drum surface are affixed to the paper If ...

Page 231: ...lled by a trained service professional Ordering Supplies You can order supplies using the Dell Toner Management System or the Dell Printer Configuration Web Tool If your printer is connected to a network type your printer s IP address in your Web browser and click the toner supplies link Double click the Dell 2335dn MFP Toner Reorder icon on your desktop 1 OR From the Start menu select Programs De...

Page 232: ...ess in your Web browser to launch the Dell Printer Configuration Web Tool and click the supplies link 3 NOTE Refer to the following table to order toner cartridges Toner cartridge Part number Dell Standard Capacity Toner Cartridge 3 000 pagesa CR963 Dell High Capacity Toner Cartridge 6 000 pages HX756 ISO standard page coverage in accordance with ISO IEC 19752 testing methodology a Downloaded from...

Page 233: ...s while it passes through the DADF Document Jam appears on the display NOTE To prevent document jams use the document glass for thick thin or mixed documents Remove the remaining documents from the DADF 1 If the document is jammed in the paper feed area Open the DADF cover a Remove the document by gently pulling it out b Downloaded from ManualsPrinter com Manuals ...

Page 234: ...load the document into the DADF c If the document is jammed in the paper exit area Open the DADF cover a Open the document input tray upwards and pull the document gently out of the DADF b Downloaded from ManualsPrinter com Manuals ...

Page 235: ...gently pulling it out c Close the DADF cover and the document input tray Then load the documents back into the DADF d If the document is jammed in the duplex path Open the DADF cover a Downloaded from ManualsPrinter com Manuals ...

Page 236: ...a Open the DADF inner cover b Remove the document by gently pulling it out c d Downloaded from ManualsPrinter com Manuals ...

Page 237: ...e document cover 2 Remove the document from the feed area by carefully pulling it gently to the right 3 Close the document cover Then load the documents back into the DADF 4 Clearing Jams in the Paper Tray When a paper jam occurs Paper Jam appears on the display Refer to the table below to locate and clear the paper jam Downloaded from ManualsPrinter com Manuals ...

Page 238: ...Exit Jam Paper Exit Jam Open Rear Door Duplex Jam 0 between the duplex unit and fuser area Duplex Jam 0 Remove paper Open Close Front Door Duplex Jam 1 in the duplex unit Duplex Jam 1 Open Rear Door To avoid tearing the paper pull the jammed paper out gently and slowly Follow the steps below to clear the jam Paper Feed Jam tray 1 Open and close the front cover The jammed paper automatically exits ...

Page 239: ...f you cannot see the paper or the paper does not move when pulled check the fuser area For more information see Fuser Area Jam Insert the paper tray into the printer until it snaps into place 4 Printing automatically resumes Paper Feed Jam optional tray 2 Pull the optional tray 2 open 1 Downloaded from ManualsPrinter com Manuals ...

Page 240: ...rom the printer 2 If you cannot see the paper in this area or the paper does not move when pulled go to the next step Pull the tray 1 half way out 3 Pull the paper straight up and out 4 Downloaded from ManualsPrinter com Manuals ...

Page 241: ...mes MPF Jam If the paper is not feeding properly pull the paper out of the printer 1 Open and close the front cover to resume printing 2 Fuser Area Jam NOTICE The fuser area is hot Take care when removing paper from the printer 1 Downloaded from ManualsPrinter com Manuals ...

Page 242: ...move the paper by gently pulling it straight out 2 Replace the toner cartridge and close the front cover 3 Printing automatically resumes Paper Exit Jam Open and close the front cover The jammed paper automatically exits the printer 1 Downloaded from ManualsPrinter com Manuals ...

Page 243: ... of the output tray 2 If you cannot see the paper in the output tray or the paper does not move when pulled open the rear door 3 If you see the jammed paper push the two blue pressure levers down and remove the paper Skip to step 9 4 Downloaded from ManualsPrinter com Manuals ...

Page 244: ...4 If you do not see the paper go to the next step Fully open the rear door as shown 5 Unfold the duplex guide fully 6 7 Downloaded from ManualsPrinter com Manuals ...

Page 245: ...r Pull the jammed paper out 8 If the jammed paper does not move when you pull push the two blue pressure levers up to loosen the paper and then remove it Return the levers fuser door and duplex guide to their original position 9 Close the rear door 10 Open and close the front cover 11 Printing automatically resumes Duplex Jam 1 Downloaded from ManualsPrinter com Manuals ...

Page 246: ...the printer 1 Remove the jammed paper from the duplex unit 2 If the paper does not come out with the duplex unit remove the paper from the bottom of the printer Push the duplex unit to the printer 3 4 Downloaded from ManualsPrinter com Manuals ...

Page 247: ...ou do not push the duplex unit correctly paper jam may occur Duplex Jam 1 Open the rear door 1 Unfold the duplex guide fully 2 Pull the jammed paper out 3 Return the duplex guide and close the rear door 4 Open and close the front cover 5 Downloaded from ManualsPrinter com Manuals ...

Page 248: ...creased damp or curled paper Do not mix paper types in the paper tray Use only recommended print materials See Paper Specifications Ensure that the recommended print side of print materials is facing down in the paper tray and facing up in the MPF Ensure that the duplex unit is installed correctly Clearing LCD Error Messages NOTE xxx indicates the media type NOTE yyy indicates the tray NOTE zzz in...

Page 249: ... correct item again File Format Not Supported The selected file format is not supported Enter the correct item again Fuser Door Open The fuser door is not securely latched Open the rear door and close the fuser door until it locks into place For the location of the fuser door see Paper Exit Jam Open Rear Door Close Fuser Door Fuser Error Fuser Not Installed Check Rear Door There is a problem in th...

Page 250: ...dy engaged Try again after a few minutes Line Error Your printer cannot connect with a remote printer or has lost contact because of a problem with the phone line OR No dial tone sounds Try again If the problem persists please wait for an hour or try a different phone line if possible and then try to connect again OR Turn the ECM mode on See ECM Mode OR Check that the phone line is connected prope...

Page 251: ...smit after more memory becomes available Memory Full Divide the Job The memory is full Split the transmission into more than one operation Memory Full Fax memory is full Print received fax job The memory is full Print received faxes Memory Full Too many faxes are queued to be sent The memory is full Cancel reserved fax in the Priority Fax feature Memory Full Too many faxes are received Print recei...

Page 252: ...he problem persists please call for service Paper Jam 0 Paper has jammed in the feeding area of the paper tray Clear the jam See Paper Feed Jam tray 1 Paper Feed Jam optional tray 2 or MPF Jam Open Tray 1 Remove paper Open Close Front Door Paper Jam 1 Paper has jammed in the fuser area Clear the jam See Fuser Area Jam Remove Cartridge Paper Jam 2 Paper has jammed in the paper exit area Clear the j...

Page 253: ...igure the authentication setting Send Error There is a problem on the NIC Card There is a problem on the network interface card Configure your network interface card correctly SMTP Error SMTP Connection has a problem Connection with the SMPT server failed Check that the network cable is connected properly OR Contact your SMPT server administrator Toner Almost Empty Replace Toner The toner cartridg...

Page 254: ...d flex or fan the paper Humid conditions may cause some paper to stick together Multiple sheets of paper do not feed Different types of paper may be stacked in the paper tray Load paper of only one type size and weight If multiple sheets have caused a paper jam clear the paper jam See Clearing Jams in the Paper Tray Paper does not feed into the printer Remove any obstructions from inside the print...

Page 255: ...ot closed Paper is jammed No paper is loaded The toner cartridge is not installed If a printer system error occurs contact your service representative The connection cable between the computer and the printer is not connected properly Disconnect the printer cable and reconnect it The connection cable between the computer and the printer is defective If possible attach the cable to another computer...

Page 256: ...ther computer and try a print job that you know works Finally try a new printer cable The wrong printer driver was selected Check the application s printer selection menu to ensure that your printer is selected The software application is malfunctioning Try printing a job from another application The operating system is malfunctioning Exit Windows and reboot the computer Power the printer off and ...

Page 257: ... You may be able to temporarily extend the toner cartridge life See Redistributing Toner If this does not improve the print quality install a new toner cartridge The paper may not meet paper specifications for example the paper is too moist or too rough See Paper Specifications A combination of faded or smeared defects may indicate that the toner cartridge needs cleaning See Cleaning the Interior ...

Page 258: ...t a service representative Vertical lines If black vertical streaks appear on the page the drum inside the toner cartridge has probably been scratched Install a new toner cartridge See Replacing the Toner Cartridge If white vertical streaks appear on the page the surface of the LSU part inside the printer may be dirty Clean the LSU see Cleaning the Interior Gray background If the amount of backgro...

Page 259: ...rb too much moisture If background scatter occurs on an envelope change the printing layout to avoid printing over areas that have overlapping seams on the reverse side Printing on seams can cause problems If background scatter covers the entire surface area of a printed page adjust the print resolution through your software application or the printer properties Misformed characters If characters ...

Page 260: ...side of the printer See Cleaning the Interior Black pages The toner cartridge may not be installed properly Remove the cartridge and reinsert The toner cartridge may be defective and need replacing Install a new toner cartridge See Replacing the Toner Cartridge The printer may require repair Contact a service representative Loose toner Clean the inside of the printer See Cleaning the Interior Chec...

Page 261: ... in the paper tray Also try rotating the paper 180 in the paper tray Try printing to other rear door Fax Problems Condition Suggested solutions Receiving fax calls are not being answered by the printer Receive mode set to Tel mode manual receive mode The rings to answer setting might not be set correctly Under Ans Fax mode set the Ring To Answer to a digit greater than the Ring To Answer setting f...

Page 262: ...er Toner empty conditions the printer will store the fax job into memory as soon as possible replace the print cartridge and then reprint the fax Faxes are printed on two pages instead of one The auto reduction setting may be turned Off try enabling this setting Receiving Faxes are not been printed by the printer Receive Forward feature might be turned Off try enabling this setting You can set the...

Page 263: ...machine might be off or might have an error condition such as being out of paper A fax might be in memory because it is waiting to redial a busy number other jobs that are ahead of it are waiting to be sent or the fax is set up for a delayed send Send faxes have a shading at the trailing edge of each media DADF Flat bed scan size might be set to incorrect size The document stops in the middle of f...

Page 264: ...ly Replace the paper in the paper tray with paper from a new package In high humidity areas do not leave paper in the printer for the extended periods of time Frequent copy paper jams occurs Fan the stack of paper then turn it over in the paper tray Replace the paper in the tray with a fresh supply If necessary check adjust the paper guides Ensure that the paper is the proper paper weight 75 g m2 ...

Page 265: ... are scanned more slowly than text Communication speed becomes slow in scan mode because of the large amount of memory required to analyze and reproduce the scanned image Message appears on your computer screen Device can t be set to the H W mode you want Port is being used by another program Port is Disabled Scanner is busy receiving or printing data When the current job is completed try again In...

Page 266: ...ing the query can avoid this situation d_LDAP_ADDR_NOT_FOUND This case is happening only when connection was successful and search result was nothing d_LDAP_SVR_NOT_FOUND It could be a wrong IP address setup or Server is not working correctly Administrator can suspect the physical condition device client configuration and server status In case of device configuration administrator should check IP ...

Page 267: ...zard to set up your device Check if the printer is started Open Printers configuration and select your printer on the printers list Look at the description in the Selected printer pane If its status contains stopped string please press the Start button After that normal operation of the printer should be restored The stopped status might be activated when some problems in printing occurred For ins...

Page 268: ...ort pane you can see if the port is occupied by some other application If this is the case you should wait for completion of the current job or should press Release port button if you are sure that the present port s owner is not functioning properly The printer doesn t scan Check if a document is loaded into the printer Check if your machine is connected to the computer Ensure that if it is conne...

Page 269: ...ng Since Linux MFP driver locks MFP port while printing the abrupt termination of the driver keeps the port locked and therefore unavailable for subsequent print jobs If this situation occurred try to release the MFP port Common Macintosh Problems Problems in the choose r Condition Suggested solutions The printer does not print a document from Acrobat Reader Incompatibility between the PDF file an...

Page 270: ...on is available for printing Limit Check Error The print job may be too complex Reduce the complexity of the page or try adjusting the print quality settings Or expand the memory capacity A PS error page prints Print job may not be PS Ensure that the print job is a PS job Check to see whether the software application expected a setup or PS header file to be sent to the printer The optional tray 2 ...

Page 271: ...r removing an internal printer memory discharge static electricity from your body by touching something metal on any device plugged into a grounded power source If you walk around before finishing installation discharge any static electricity once again Installing Printer Memory Additional printer memory is provided on a Dual In line Memory Module DIMM Your printer has 256 MB of memory Additional ...

Page 272: ...odule by the edges align the memory module on the slot at about a 30 degree tilt Ensure that the notches of the module and the grooves on the slot fit each other 4 Press the memory module into the slot with care until you hear a click 5 Downloaded from ManualsPrinter com Manuals ...

Page 273: ...ure the updated memory Installing an Optional Tray 2 You can increase the paper handling capacity of your printer by installing an optional tray 2 This tray holds 250 sheets of paper Power the printer off and unplug all cables from the printer 1 Remove the packing tape and the tape fastening the optional tray 2 cable from the bottom of the optional tray 2 2 Find the location of the paper option tr...

Page 274: ... printer over the tray aligning the feet on the printer with the alignment pins in the optional tray 2 4 Connect the cable into the connector on the back of the printer 5 Downloaded from ManualsPrinter com Manuals ...

Page 275: ...ne is equipped with a network interface which allows you to use your printer on a network You can also purchase a wireless network interface card to enable the use of the printer in wireless network environments For information about installing the network printer server see the network printer server user s guide For information about installing the wireless network interface card and configuring...

Page 276: ... 75 g m2 20 lb special paper 5 sheets 75 g m2 20 lb Paper output capacity Output tray 150 sheets face down rear door 1 sheet face up Paper type Paper tray tray 1 and optional tray 2 Plain paper 60 90 g m2 16 24 lb MPF Plain paper Transparencies Labels Card Post card 60 163 g m2 16 43 lb Envelopes 75 90 g m2 20 24 lb Duplex printing Plain paper 75 90 g m2 20 24 lb Consumables 1 piece toner cartridg...

Page 277: ...ges Printer dimension W x D x H 18 3 x 17 3 x 18 1 in 465 2 x 440 1 x 461 mm Random Access Memory DDR2 SDRAM 256MB Basic 512MB Max Maximum Monthly Duty Cycle Up to 60 000 pages per month Weight Net 17 7 Kg including toner cartridge 16 6 Kg except toner cartridge Gross 22 Kg including consumables accessories and package Package weight Paper 2 7 Kg Plastic 0 7 Kg Power consumption can very depend on...

Page 278: ...s DADF 15 lineart 20 gray 30 color seconds First Copy Out Time FCOT a From Standby Mode via DADF As Quick as 15 seconds via Platen As Quick as 8 5 seconds From Sleep Mode via Platen As Quick as 35 seconds Copy speed SDMC Single Document Multiple Copy 35 cpm copies per minute for letter 33 cpm for A4 MDMC Multi document Multiple Copy at Text Text Photo Photo 21 cpm copies per minute for letter 20 c...

Page 279: ...l TCP IPv4 IPv6 DHCP DNS 9100 LPR SNMP HTTP IPSec EtherTalk Novell NetWare NDPS services via TCP IP IPP on 5 x 6 x DHCP BOOTP SLP SSDP Bonjour Rendezvous DDNS WINS TCP Port 2000 LPR Port 515 Raw Port 9100 SNMPv1 2 3 HTTP Telnet SMTP E mail Notification Client Network Operating System Windows 2000 XP 64 bit Home Pro XP 32 bit Home Pro Server 2003 2008 Vista 32bit 64bit Starter Home Basic Home Premi...

Page 280: ...andard fax resolution mode DADF approx 2 5 seconds Letter at standard fax resolution mode 5 seconds Letter at fine fax resolution mode Multiple page scan speed approx 21 ppm Letter at standard fax resolution mode DADF approx 2 5 seconds Letter at standard fax resolution mode 5 seconds Letter at fine fax resolution mode Maximum document length document glass 297 mm DADF 356 mm Paper size document g...

Page 281: ...s no control NOTE Before purchasing large quantities of paper insure the paper meets the requirements specified in this User s Guide CAUTION Using paper that does not meet these specifications may cause problems requiring repairs These repairs are not covered by the Dell warranty or service agreements Supported Sizes of Paper Paper Dimensionsa Weight Capacityb Letter 8 5 X 11 in 216 X 279 mm 60 90...

Page 282: ...gth of less than 127 mm 5 inches For optimum performance ensure that you are storing and handling the paper correctly Please refer to Printer and Paper Storage Environment NOTE You can use A4 Letter Folio Oficio Legal sized paper for duplex printing Guidelines for Using Paper For the best result use conventional 75 g m2 20 lb paper Ensure that the paper is of good quality and free of cuts nicks te...

Page 283: ...ding Ragged edges Use good quality paper NOTE Do not use letterhead paper printed with low temperature inks such as those used in some types of thermography NOTE Do not use raised or embossed letterhead NOTE The printer uses heat and pressure to fuse toner to the paper Insure that any colored paper or preprinted forms use inks that are compatible with this fusing temperature 180 C or 356 F for 0 1...

Page 284: ... This can cause paper jams Care should be taken not to purchase more paper than can be used in a short time about 3 months Paper stored for long periods may experience heat and moisture extremes which can cause damage Planning is important to prevent damage to large supplies of paper Unopened paper in sealed reams can remain stable for several months before use Opened packages of paper have more p...

Reviews: