background image

VEP4600 Operating System Installation Guide

March 2020

Summary of Contents for 210-APGV

Page 1: ...VEP4600 Operating System Installation Guide March 2020 ...

Page 2: ... to hardware or loss of data and tells you how to avoid the problem WARNING A WARNING indicates a potential for property damage personal injury or death Copyright 2018 Dell Inc or its subsidiaries All rights reserved Dell EMC and other trademarks are trademarks of Dell Inc or its subsidiaries Other trademarks may be trademarks of their respective owners 2020 03 Rev A02 ...

Page 3: ...h BMC 21 Check the existing firmware version 21 Configure BMC Management Address in BIOS 21 Configure BMC Management address on BMC console 23 Run the Unified Firmware Updater from a Linux server 23 7 Upgrade rNDC Firmware workaround 27 Upgrade rNDC firmware when ESXi is running on VEP4600 27 Upgrade rNDC firmware when CentOS is running on VEP4600 27 8 Prepare bootable USB with OS ISO image 31 Pre...

Page 4: ...VA OS Installation 62 Configure BIOS to boot from SSD 63 12 Configure BIOS and Install ESXi OS 66 Configure BIOS to boot from USB 66 Install ESXi OS 69 Configure BIOS to boot from SSD 72 Logging into ESXi 72 Configuring the network on ESXi 74 How to add ESXi license 76 4 Contents ...

Page 5: ...VEP4600 platform see the following documents at https www dell com support BMC User Guide BIOS User Guide VEP4600 Installation Guide VEP4600 Setup Guide uCPE Networking DIAG OS Guide This document describes the steps for OS installation on VEP4600 device The OS installation steps are tested and verified on VEP4600 device with the OS versions listed below DiagOS image diagos recovery x86_64 dellemc...

Page 6: ... Manager to get the COM port Windows Device Manager It s the USB Serial Port drive in this case for our USB to serial console adapter The COM port number is 4 2 Using Putty configure a console connection with the right COM port and speed PuTTy session options 2 6 VEP4600 start up and serial console connection ...

Page 7: ...3 Plug in a power cord to the back of VEP4600 It starts to power up immediately Watch for VEP4600 console window VEP4600 console window VEP4600 start up and serial console connection 7 ...

Page 8: ... the Delete button until the Press DEL string displays on the console window Console window NOTE If you miss the setup screen a boot up screen displays If this happens power cycle the VEP4600 and press the Delete button Repeat the process until you see the setup screen Setup screen 8 VEP4600 start up and serial console connection ...

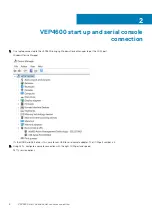
Page 9: ...VEP4600 start up and serial console connection 9 ...

Page 10: ...s Config1 VEP4600 preinstalled with ESXi Config2 VEP4600 preinstalled with DiagOS Config3 VEP4600 preinstalled with Versa flex NFV Config1 ESXi v6 7 Ux is installed on the VEP4600 Update firmware from the BMC See Upgrade Firmware through BMC Config2 DiagOS is installed on the VEP4600 Update to the latest version of DiagOS See Upgrade Firmware through DiagOS Update the firmware Config3 Versa flex N...

Page 11: ... the DIAG OS ISO image to the Linux computer using TCP SCP or a similar protocol 4 Use the following dd data duplicator Linux command to burn the DIAG OS install image to the USB dd if diagos recovery x86_64 dellemc_vep4600_d21xyt r0 3 41 3 81 6 iso of dev sdb bs 4M NOTE Use dev sdb not sdb number even if fdisk did show sdb as one of the USBs plugged in Device Boot Start End Sectors Size Id Type d...

Page 12: ...n USB Device to boot the DIAG OS from a USB drive DIAG OS USB to boot UEFI DIAG OS USB to boot USB device 3 Verify that Boot Option 1 lists the DIAG OS USB as the boot option Boot Option 1 12 Update to the Latest DiagOS ...

Page 13: ...t the utility Save and Exit prompt 5 Confirm saving the configuration by selecting Yes and press Enter 6 The system will boot from the USB and start the installation DiagOS Installation 1 Select VEP4600 DiagOS Install Update to the Latest DiagOS 13 ...

Page 14: ... reboots remove the USB Configure BIOS and boot into DiagOS 1 Boot into the BIOS settings again 2 Select Boot Option number 1 from the Boot configuration screen to select boot from DIAG OS on the hard disk Boot configuration screen 3 Press the F4 key to Save the changes and exit the utility 14 Update to the Latest DiagOS ...

Page 15: ...r Save exit 5 The system will boot into the Diag OS and the login command prompt displays 6 To login type root calvin Update to the latest DiagTools 1 Check the Diag Tool version using dpkg list grep dn diags vep4600 deb DiagTool Version Update to the Latest DiagOS 15 ...

Page 16: ...600 NOTE Diag Tools will contain some file in opt dellemc Remove dellemc file so that no other files exist 4 Use dpkg i dn diags VEP4600 DiagOS 3 41 4 81 17 deb to install the Diag Tools Installing Latest DiagTools 5 Verify the latest Diag Tools is running dpkg list grep dn diags VEP4600 deb 16 Update to the Latest DiagOS ...

Page 17: ... firmware version To check the current VEP4600 firmware versions from the DiagOS run the following command DiagOS installed login and type updatetool D ALL V Copy the Unified Firmware Updater to USB 1 Download the Unified Firmware Updater UFW from the Dell support site 2 Unzip vep4600_ufw_2 8 zip which contains the Unified Firmware Updater zip file vep4600_ufw_2 8 zip Contents of zip file vep4600_...

Page 18: ...ying archive integrity 100 MD5 checksums are OK All good Uncompressing release 100 Selecting previously unselected package zlib1g dev amd64 Reading database 20150 files and directories currently installed Preparing to unpack zlib1g dev_1 3a1 x x dfsg 2 b1_amd64 deb Unpacking zlib1g dev amd64 1 1 x x dfsg 2 b1 Setting up zlib1g dev amd64 1 1 x x dfsg 2 b1 Processing triggers for man db 2 7 0 2 5 fo...

Page 19: ...I Configuration File not found Default options will not be applied Creating IPMI session via USB Done YAFUFlash Firmware Upgrade Utility Version 4 11x x C Copyright 2016 American Megatrends Inc Beginning BIOS Update Uploading Image 100 done Flashing Firmware Image 100 done Verifying Firmware Image 100 done Done with updating image Will continue to update rest of components Power cycle cpu to boot ...

Page 20: ...D version XxXX 5 rNDC left CPLD image CPLD version 0x2 6 rNDC right CPLD image CPLD version 0x2 q Exit Enter your choice q 4 After firmware upgrade complete enter q to exit 5 Once all firmware updates are complete a system power cycle is required either with remote power cycler or manually unplugging and plugging back the power cord NOTE Please note that the power down state should be minimum of 1...

Page 21: ...led login and type updatetool D ALL V b To find the BMC version From BMC mgmt console type ipmitool I lanplus H 127 0 0 1 U admin P admin mc info ipmitool I lanplus H 127 0 0 1 U admin P admin mc info Device ID 32 Device Revision 1 Firmware Revision 2 00 IPMI Version 2 0 Manufacturer ID 12290 Manufacturer Name Unknown 0x3002 Product ID 1147 0x047b Product Name Unknown 0x47B Device Available yes Pr...

Page 22: ...ay address Select Static 5 Press the F4 key to Save the changes and exit the utility 6 Confirm saving the configuration by selecting Yes and press Enter to boot 7 Log into the CPU mgmt DiagOS console and run the following command root dellemc diag os ipmitool lan set 1 ipsrc bios this will update the etc network interfaces file to what you have set in the bios 22 Upgrade Firmware through BMC ...

Page 23: ...P4600 BIOS 3 41 0 9 15 BIN firmware_updater AZUL_CPLD_V10_refresh vme firmware_updater libcrypto so 1 0 0 firmware_updater ipmitool firmware_updater AZUL_CPLD_V10_norefresh vme firmware_updater mstr_01_20181226 vme firmware_updater MCCARD_mstr_cpld_00_02_201809101600 vme firmware_updater libcrypto so 1 1 firmware_updater x520 firmware_updater x520 Intel_Proprietary_License pdf firmware_updater x52...

Page 24: ...re_updater x710 PIEInfo txt firmware_updater x710 DX69G txt firmware_updater x710 os_mapping xml firmware_updater x710 en prop firmware_updater x710 duppmdatacollector bin firmware_updater x710 demere_map txt firmware_updater x710 nvmupdate cfg firmware_updater x710 nvmupdate64e firmware_updater x710 XD56X txt firmware_updater x710 package xml firmware_updater x710 nvminv cfg firmware_updater x710...

Page 25: ...be applied Creating IPMI session via network with address xxx xx xxx xxx Done Continuing with Full Firmware Update WARNING FIRMWARE UPGRADE MUST NOT BE INTERRUPTED ONCE IT IS STARTED PLEASE DO NOT USE THIS FLASH TOOL FROM THE REDIRECTION CONSOLE Preserving Env Variables done Uploading Firmware Image 100 done Uploading Firmware Image 100 done Flashing boot Module Flashing Firmware Image 100 done Ve...

Page 26: ...es to take effect Package version x x Packaged images BMC image x x BIOS image x xx x x xx CPLD image XxXX Wifi CPLD image XxX Note If BMC version is less than 1 23 CPLD versions will not be shown correctly 1 Automatically update all firmware components 2 BMC image Primary version x x backup version 1 23 3 BIOS image Booted version x xx x x xx 4 CPLD image CPLD version XxXX 5 rNDC left CPLD image ...

Page 27: ...erify the FW upgrade by checking the lights on the ports a Connect a cable to both ports You should see a green light on both ports If not it means you have not successfully upgraded firmware 10 Check both fixed 10G ports and rNDC 10G ports 11 Check both fixed 1G ports and rNDC 1G ports if applicable Upgrade rNDC firmware when CentOS is running on VEP4600 If the unit has an OS other than ESXi inst...

Page 28: ...521 00 002 Update not Connection available 02 Intel R I210 Gigabit Network 3 37 3 25 1533 00 004 Update not Connection available 03 Intel R Gigabit 4P I350 t rNDC 1 103 1 67 1521 00 023 Update not available 04 Intel R Ethernet 10G 4P X710 SFP 6 00 6 00 1572 00 101 Update rNDC available the bin file was for the x710 That s why i350 shows not available 05 Intel R Ethernet Connection X722 3 51 3 33 3...

Page 29: ...ether e4 43 4b 3c b9 91 brd ff ff ff ff ff ff 12 enp23s0f2 NO CARRIER BROADCAST MULTICAST UP mtu 1500 qdisc mq state DOWN group default qlen 1000 link ether e4 43 4b 3c b9 92 brd ff ff ff ff ff ff 13 enp23s0f3 NO CARRIER BROADCAST MULTICAST UP mtu 1500 qdisc mq state DOWN group default qlen 1000 link ether e4 43 4b 3c b9 93 brd ff ff ff ff ff ff 19 enp101s0f0 NO CARRIER BROADCAST MULTICAST UP mtu ...

Page 30: ...tics yes supports test yes supports eeprom access yes supports register dump yes supports priv flags yes Optional commands root localhost rmmod i40e command to remove module root localhost modprobe i40e command to add module 30 Upgrade rNDC Firmware workaround ...

Page 31: ...ure you need a bootable USB On a Windows CPU use Rufus to burn the bootable USB Topics Prepare bootable USB Download Rufus Prepare bootable USB Download Rufus 1 To download Rufus go to https rufus akeo ie 2 Open Rufus and click on SELECT button to load the ISO image from the Windows disks Prepare bootable USB 8 Prepare bootable USB with OS ISO image 31 ...

Page 32: ... Navigate to the ISO file and click to select the file Select ISO file 4 Verify that the file name selected displays at the bottom of the Rufus device dialog box 32 Prepare bootable USB with OS ISO image ...

Page 33: ...Rufus device dialog box NOTE Use the same process to burn a USB with Ubuntu Adva and ESXi ISO images Prepare bootable USB with OS ISO image 33 ...

Page 34: ...and tab to the Boot menu For more information on how to access the BIOS see VEP4600 Start up and serial console 2 Select the Advanced tab Select CSM Configuration and press Enter CSM Configuration CSM support enabled 3 Use UEFI to install the Red Hat OS 4 Select the Boot menu tab 5 Highlight the UEFI USB Drive BBS Priorities option using the left and right arrows and press Enter 9 34 Configure BIO...

Page 35: ...4 key to Save the changes and exit the utility 8 Confirm saving the configuration by selecting Yes and press Enter 9 The system will now boot from the USB Install Red Hat OS 1 Boot into the Red Hat GRUB installation menu Configure BIOS and Install RHEL OS 35 ...

Page 36: ...ttach the console ttyS0 115200 string to the end of the first install line 4 Press ctrl x to start the installation 5 Select 4 for Software selection Installation wizard 6 Select Minimal Install from the options 36 Configure BIOS and Install RHEL OS ...

Page 37: ...ter 1 for hard drive then enter c to continue Configure Installation Destination 8 Enter 3 to Use Free Space then enter c to continue CAUTION You must select this option If you do not select this option the Red Hat OS deletes the DIAG OS Configure BIOS and Install RHEL OS 37 ...

Page 38: ...9 Enter 3 to select LVM then enter c to continue 10 Enter 2 to configure the Time settings 38 Configure BIOS and Install RHEL OS ...

Page 39: ...11 Enter 9 to configure User creation 12 Optionally configure the root password Configure BIOS and Install RHEL OS 39 ...

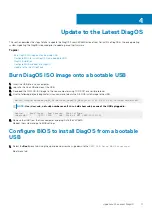
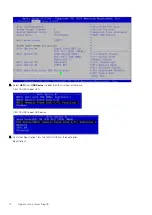
Page 40: ...40 Configure BIOS and Install RHEL OS ...

Page 41: ...Configure BIOS and Install RHEL OS 41 ...

Page 42: ...r network configuration of management interface Configure Network interface 14 And assign IPV4 netmask gateway name server as per network setup Setting IP subnet mask nameserver 42 Configure BIOS and Install RHEL OS ...

Page 43: ...Network configuration complete Start Red Hat OS installation 1 Enter b to start the installation Start installation Configure BIOS and Install RHEL OS 43 ...

Page 44: ...2 The installation process begins 44 Configure BIOS and Install RHEL OS ...

Page 45: ...3 Remove the USB and press Return to reboot the system after the installation completes Configure BIOS and Install RHEL OS 45 ...

Page 46: ...ings 2 Navigate to Boot Tab Scroll to Hard Disk Drive BBS Priorities using the up and down arrow keys and press Enter 3 Select Red Hat Boot Manager as Boot Option 1 4 Configure the boot order priorities and select Red Hat as the first boot option 46 Configure BIOS and Install RHEL OS ...

Page 47: ...5 Traverse to Save Exit tab and hit enter on Save Changes and Exit SelectYes to start reboot Red Hat 7 5 boot screen 6 Enter the user credentials and verify Configure BIOS and Install RHEL OS 47 ...

Page 48: ...7 Enter the root credentials and verify 48 Configure BIOS and Install RHEL OS ...

Page 49: ...boot from USB Ubuntu OS installation Configure BIOS to boot from SSD Configure BIOS to boot from USB 1 Boot into BIOS settings select CSM configuration under Advanced Tab 2 Change the Boot option filter to UEFI only mode 10 Configure BIOS and Install Ubuntu OS 49 ...

Page 50: ...3 Go to the Boot tab 4 Under Boot Option 1 press Enter and select USB 50 Configure BIOS and Install Ubuntu OS ...

Page 51: ...5 If you don t see required USB boot go down to UEFI USB Drive BBS Priorities and press Enter 6 Make sure the required USB is selected Configure BIOS and Install Ubuntu OS 51 ...

Page 52: ...8 Confirm saving the configuration by selecting Yes and press Enter 9 The system will boot from the USB and start the installation Ubuntu OS installation 1 Boot into Ubuntu GRUB menu Highlight Install Ubuntu Server option 52 Configure BIOS and Install Ubuntu OS ...

Page 53: ...s shown in the following figure Edit Boot Entry 3 Press ctrl x to start the installation 4 Choose Preferred Language In this case preferred language selection is English 5 Select Done 6 Select Install Ubuntu Configure BIOS and Install Ubuntu OS 53 ...

Page 54: ...the installation wizard to complete interface configuration In this case choose Edit IPv4 from the list to modify Interface configuration for static IP assignment Choose Edit IPv4 9 Fill the entries manually according to your network Subnet Address Gateway and Name Server 10 Click Done to apply network configuration 54 Configure BIOS and Install Ubuntu OS ...

Page 55: ...twork configuration 11 Click Done Proxy address 12 Click Done 13 Select Use Entire Disk and Set Up LVM or follow the installation wizard for different configuration options Configure BIOS and Install Ubuntu OS 55 ...

Page 56: ...14 Select Hard Drive 15 Click Done to continue the selected disk partition format 16 Select Continue to start the installation 56 Configure BIOS and Install Ubuntu OS ...

Page 57: ...file information and choose Done 18 Click Done to start the installation 19 After Installation completes remove the USB from the device 20 Choose Reboot Now Installation complete Configure BIOS and Install Ubuntu OS 57 ...

Page 58: ...Configure BIOS to boot from SSD 1 Change the Boot Option Priority to Ubuntu Hard Drive in the Boot Tab Select Ubuntu Hard Drive 2 Save and Exit 58 Configure BIOS and Install Ubuntu OS ...

Page 59: ...Boot up screen Configure BIOS and Install Ubuntu OS 59 ...

Page 60: ... boot from USB ADVA OS Installation Configure BIOS to boot from SSD Configure BIOS to boot from USB 1 Boot into the BIOS and go to the Advanced menu tab 2 Select CSM Configuration and press Enter 3 Change the Boot option filter to UEFI and Legacy mode 4 Disable Hyper Threading 11 60 Configure BIOS and Install Adva OS ...

Page 61: ...press Enter and select Disable 5 Go to the Boot menu select USB using the up and down arrows for Boot Option 1 and press Enter Select USB 6 Press the F4 key to Save the changes and exit the utility 7 Confirm saving the configuration by selecting Yes and press Enter Configure BIOS and Install Adva OS 61 ...

Page 62: ...The system will boot from the USB and start the installation ADVA OS Installation 1 The OS installation starts Disk formatting and installation complete successfully 62 Configure BIOS and Install Adva OS ...

Page 63: ...ed to power on off device either physically or by using PDU Configure BIOS to boot from SSD 1 After the install completes reboot the system and go into the BIOS settings 2 In the Boot menu select Hard Drive BBS Priorities then press Enter Configure BIOS and Install Adva OS 63 ...

Page 64: ...as Boot Option 1 4 Press the F4 key to Save the changes and exit the utility 5 Confirm saving the configuration by selecting Yes and press Enter 6 The system will boot from the hard drive 64 Configure BIOS and Install Adva OS ...

Page 65: ...7 Login to the ADVA OS with username as root and password as overture Configure BIOS and Install Adva OS 65 ...

Page 66: ...w to add ESXi license Configure BIOS to boot from USB 1 In BIOS set Boot Option Filter to UEFI only a Select the Advanced menu tab using the up and down arrow keys from the Setup Utility screen Select CSM Configuration b Verify that UEFI is selected for the Boot option filter from the Compatibility Support Module Configuration screen 12 66 Configure BIOS and Install ESXi OS ...

Page 67: ...2 Enable Hyper Threading a Tab to Socket Configuration press Enter on Processor Configuration b Scroll down to Hyper Threading press Enter and select Enable Configure BIOS and Install ESXi OS 67 ...

Page 68: ...een then press Enter to save the changes 4 Press the F4 key to Save the changes and exit the utility 5 Confirm saving the configuration by selecting Yes and press Enter 6 The system will boot from the USB and start the ESXI installation ESXi installation output 68 Configure BIOS and Install ESXi OS ...

Page 69: ...Install ESXi OS 1 Press Enter to continue installation process 2 Press F11 to Accept and Continue Licence Agreement Configure BIOS and Install ESXi OS 69 ...

Page 70: ... the keyboard layout option using up down keys and press Enter 4 Enter Root Password and press Enter 5 Select SSD from the VMware ESXi 6 7 0 screen as the destination disk 70 Configure BIOS and Install ESXi OS ...

Page 71: ...artition and installation 7 Confirm the disk selection by pressing Enter 8 The ESXi installation status screen displays 9 Press Enter to reboot after the installation completion screen displays Configure BIOS and Install ESXi OS 71 ...

Page 72: ...settings and select the Boot menu tab 2 Configure the hard disk as Boot Option 1 3 Press Save and Exit Reboot the system Logging into ESXi NOTE Logging into the ESXi console will invoke the 90 day license You can log into the browser based vSphere UI without starting the clock on the license 72 Configure BIOS and Install ESXi OS ...

Page 73: ...can also be found in the BIOS 2 To view Service tag in the BIOS go to Server Mgmt tab 3 Scroll down to View FRU information and press Enter NOTE System serial number is the service tag 4 To log into the serial console a After ESXi boots press F2 b Enter the required login and password credentials at the login screen then press Enter Configure BIOS and Install ESXi OS 73 ...

Page 74: ...he network on ESXi 1 After booting with ESXi Press F2 to configure the static network 2 Select Configure network management from the System Customization screen then press Enter 74 Configure BIOS and Install ESXi OS ...

Page 75: ...rom the Configure Management Network screen and press Enter 4 Select IPv4 Configuration 5 Select Set Static IPv4 address and network configuration 6 Select Network Adapter which is connected and press Enter to save changes Configure BIOS and Install ESXi OS 75 ...

Page 76: ...the management network 9 Select Troubleshooting Options and press Enter 10 Select Enable ESXi Shell from the Troubleshooting Mode Options menu Enable ESXi Shell 11 Press Enter to enable the service 12 Login to the ESXI Shell and add the following entries in the passthru map file located at etc vmware passthru map 168c 003c d3d0 false How to add ESXi license 1 Log into ESXi vSphere UI 76 Configure ...

Page 77: ...2 Click Manage from the menu on the left panel Click on the Licensing tab 3 Enter a valid license and click Check license Configure BIOS and Install ESXi OS 77 ...

Page 78: ...78 Configure BIOS and Install ESXi OS ...

Reviews: