background image

w w w . d e l l . c o m   |   s u p p o r t . d e l l . c o m

Dell™ Vostro™ 1700 Owner’s Manual

Model PP22X

Summary of Contents for 1700 - Personal Laser Printer B/W

Page 1: ...w w w d e l l c o m s u p p o r t d e l l c o m Dell Vostro 1700 Owner s Manual Model PP22X ...

Page 2: ...orbidden Trademarks used in this text Dell the DELL logo Vostro Wi Fi Catcher and Dell MediaDirect are trademarks of Dell Inc Intel is a registered trademark and Core is a trademark of Intel Corporation Microsoft Windows Outlook and Windows Vista are either trademarks or registered trademarks of Microsoft Corporation in the United States and or other countries Bluetooth is a registered trademark o...

Page 3: ... Left Side View 27 Right Side View 29 Back View 31 Bottom View 33 3 Setting Up Your Computer 35 Connecting to the Internet 35 Setting Up Your Internet Connection 36 Transferring Information to a New Computer 37 Microsoft Windows XP 37 Microsoft Windows Vista 41 Setting Up a Printer 41 Printer Cable 41 Connecting a USB Printer 42 ...

Page 4: ...Display to a Projector 45 Setting Display Resolution and Refresh Rate 45 Microsoft Windows XP 46 Windows Vista 46 5 Using the Keyboard and Touch Pad 47 Numeric Keypad 47 Key Combinations 47 System Functions 47 Display Functions 47 Battery 47 Power Management 48 Microsoft Windows Logo Key Functions 48 Dell QuickSet Key Combinations 48 Adjusting Keyboard Settings 48 Touch Pad 49 Customizing the Touc...

Page 5: ...y Power 54 Configuring Power Management Settings 54 Using the Sleep Power State 55 Charging the Battery 55 Replacing the Battery 56 Storing a Battery 57 7 Using Multimedia 59 Playing Media 59 Playing Media Using Dell Travel Remote 61 Copying CD and DVD Media 62 How to Copy a CD or DVD 62 Using Blank CD or DVD Media 63 Helpful Tips 64 Adjusting the Volume 64 Adjusting the Picture 65 Using Dell Medi...

Page 6: ...ard Audio 76 Component Video and S PDIF Digital Audio 79 Enabling the Display Settings for a TV 82 8 Using ExpressCards 85 ExpressCard Blanks 85 Installing an ExpressCard 86 Removing an ExpressCard or Blank 87 9 Using the Memory Card Reader 89 Memory Card Blanks 89 Installing a Memory Card 89 Removing a Memory Card or Blank 90 10 Setting Up and Using Networks 91 Connecting a Network or Broadband M...

Page 7: ... Need to Establish a Mobile Broadband Network Connection 97 Checking Your Dell Mobile Broadband Card 97 Connecting to a Mobile Broadband Network 98 Enabling Disabling the Dell Mobile Broadband Card 99 Dell Wi Fi Catcher Network Locator 99 11 Securing Your Computer 101 Security Cable Lock 101 Passwords 101 If Your Computer Is Lost or Stolen 102 12 Troubleshooting 105 Dell Technical Update Service 1...

Page 8: ...rnal Keyboard problems 123 Unexpected characters 124 Lockups and Software Problems 125 The computer does not start 125 The computer stops responding 125 A program stops responding or crashes repeatedly 125 A program is designed for an earlier Microsoft Windows operating system 126 A solid blue screen appears 126 Dell MediaDirect problems 126 Other software problems 127 Memory Problems 128 Network ...

Page 9: ...Pad or Mouse Problems 134 Video and Display Problems 135 If the display is blank 135 If the display is difficult to read 136 If only part of the display is readable 137 Drivers 137 What Is a Driver 137 Identifying Drivers 137 Reinstalling Drivers and Utilities 138 Troubleshooting Software and Hardware Problems 141 Restoring your Microsoft Windows Operating System 142 Restoring Windows Vista 142 Re...

Page 10: ...emoving the Optical Drive 158 Hinge Cover 159 Removing the Hinge Cover 160 Replacing the Hinge Cover 160 Keyboard 161 Removing the Keyboard 161 Replacing the Keyboard 162 Memory 163 Removing the DIMM A Memory Module 164 Replacing the DIMM A Memory Module 165 Removing the DIMM B Memory Module 166 Replacing the DIMM B Memory Module 168 Subscriber Identity Module 169 Wireless Mini Cards 170 Removing ...

Page 11: ...s Technology 181 Removing the Card 181 Coin Cell Battery 182 Removing the Coin Cell Battery 182 Replacing the Coin Cell Battery 183 14 Dell QuickSet Features 185 15 Traveling With Your Computer 187 Identifying Your Computer 187 Packing the Computer 187 Travel Tips 188 Traveling by Air 188 16 Getting Help 189 Obtaining Assistance 189 Technical Support and Customer Service 190 DellConnect 190 Online...

Page 12: ...5 17 Specifications 197 18 Appendix 205 Using the System Setup Program 205 Viewing the System Setup Screen 206 System Setup Screen 206 Commonly Used Options 206 Cleaning Your Computer 208 Computer Keyboard and Display 208 Touch Pad 209 Mouse 209 Media 210 Dell Technical Support Policy U S Only 210 Definition of Dell Installed Software and Peripherals 211 Definition of Third Party Software and Peri...

Page 13: ...Contents 13 FCC Notice U S Only 211 FCC Class B 211 Macrovision Product Notice 213 Glossary 215 Index 233 ...

Page 14: ...14 Contents ...

Page 15: ... your computer You can use the Drivers and Utilities media to reinstall drivers see Reinstalling Drivers and Utilities on page 138 or run the Dell Support 3 utility see Dell Support on page 110 Readme files may be included on your Drivers and Utilities media to provide last minute updates about technical changes to your computer or advanced technical reference material for technicians or experienc...

Page 16: ...ervice Tag and Express Service Code Microsoft Windows Product Key Service Tag and Microsoft Windows Product Key These labels are located on your computer Use the Service Tag to identify your computer when you use support dell com or contact support Enter the Express Service Code to direct your call when contacting support NOTE As an increased security measure the newly designed Microsoft Windows l...

Page 17: ... NSS If you reinstall the operating system on your computer you should also reinstall the NSS utility NSS automatically detects your computer and operating system and installs the updates appropriate for your configuration providing critical updates for your operating system and support for Dell 3 5 inch USB floppy drives Intel processors optical drives and USB devices NSS is necessary for correct...

Page 18: ...n the screen Microsoft Windows Vista 1 Click the Windows Vista Start button and then click Help and Support 2 In Search Help type a word or phrase that describes your problem and then press Enter or click the magnifying glass 3 Click the topic that describes your problem 4 Follow the instructions on the screen Information on network activity the Power Management Wizard hotkeys and other items cont...

Page 19: ...te Dell PC Restore may not ship with your computer Operating System Installation Media If you received operating system media with your computer you can use it to restore your operating system For more information see Restoring your Microsoft Windows Operating System on page 142 After you reinstall your operating system use the Drivers and Utilities media to reinstall drivers for the devices that ...

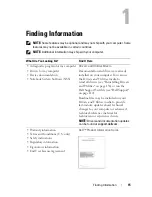
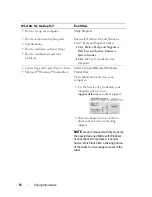
Page 20: ...20 Finding Information ...

Page 21: ...igurations To determine your computer s video controller configuration 1 Click Start and then click Help and Support 2 Under Pick a Task click Use Tools to view your computer information and diagnose problems 3 Under My Computer Information select Hardware From the My Computer Information Hardware screen you can view the type of video controller installed in your computer as well as the other hard...

Page 22: ...22 About Your Computer Front View 1 camera indicator optional 2 camera optional 3 display latch 4 display 5 power button 6 keyboard 7 device status lights 8 touch pad 4 5 13 3 6 12 11 9 8 7 14 2 1 10 ...

Page 23: ...ge 45 POWER BUTTON Press the power button to turn on the computer or exit a power management mode see Configuring Power Management Settings on page 54 NOTICE To avoid losing data turn off your computer by performing a Microsoft Windows operating system shutdown rather than by pressing the power button If the computer stops responding press and hold the power button until the computer turns off com...

Page 24: ...management mode Hard drive activity light Turns on when the computer reads or writes data NOTICE To avoid loss of data never turn off the computer while the light is flashing Battery status light Turns on steadily or blinks to indicate battery charge status WiFi status light Turns on when wireless networking is enabled To enable or disable wireless networking use the wireless switch see wireless s...

Page 25: ... when you use the touch pad to move the cursor on the display see Touch Pad on page 49 MEDIA CONTROL BUTTONS Control CD DVD and Media Player playback Bluetooth status light Turns on when an internal card with Bluetooth wireless technology is enabled NOTE The internal card with Bluetooth wireless technology is an optional feature The light turns on only if you ordered the card with your computer Fo...

Page 26: ...ATUS LIGHTS The blue lights located above the keyboard indicate the following DIGITAL ARRAY MICROPHONES Built in microphone for conferencing and chat Turn the volume up Stop Play or pause Turns on when the numeric keypad Num Lock is enabled Turns on when the uppercase letter Caps Lock function is enabled Turns on when the scroll lock function is enabled 9 A ...

Page 27: ... fan on when the computer gets hot Fan noise is normal and does not indicate a problem with the fan or the computer HARD DRIVE Stores software and data EXPRESSCARD SLOT Supports one ExpressCard The computer ships with a plastic blank installed in the slot For more information see Using ExpressCards on page 85 WIRELESS SWITCH When enabled through Dell QuickSet this switch can scan for a wireless lo...

Page 28: ... 99 4 Dell Wi Fi Catcher Network Locator light Flashing green Searching for networks Solid green Strong network found Solid yellow Weak network found Flashing yellow Error Off No signal found NOTE The Wi Fi Catcher Network Locator light appears only when the computer is turned off and the wireless switch is configured in the system setup program BIOS to control WiFi network connections 1 2 3 4 ...

Page 29: ...e activity light 3 power light 4 USB connectors 2 5 network connector RJ 45 6 video connector 7 IEEE 1394 connector 8 8 in 1 memory card reader 9 eject button 10 optical drive 11 audio connectors Attach headphones to the connector Attach a microphone to the connector 10 8 7 5 4 6 9 11 1 2 3 ...

Page 30: ...d MultiMediaCard MMC Memory Stick Memory Stick PRO xD Picture Card Hi Speed SD Hi Density SD IEEE 1394 CONNECTOR Connects devices supporting IEEE 1394 high speed transfer rates such as some digital video cameras VIDEO CONNECTOR NETWORK CONNECTOR RJ 45 NOTICE The network connector is slightly larger than the modem connector To avoid damaging the computer do not plug a telephone line into the networ...

Page 31: ...a mouse keyboard or printer 1 S video TV out connector 2 USB connectors 2 3 AC adapter connector 4 modem connector RJ 11 5 USB connector Connects your computer to a TV Also connects digital audio capable devices using the TV digital audio adapter cable Connect USB devices such as a mouse keyboard or printer 1 2 3 4 5 ...

Page 32: ...orks with electrical outlets worldwide However power connectors and power strips vary among countries Using an incompatible cable or improperly connecting the cable to the power strip or electrical outlet may cause fire or equipment damage NOTICE When you disconnect the AC adapter cable from the computer grasp the connector not the cable itself and pull firmly but gently to help prevent damage to ...

Page 33: ...on CONSUMER IR SENSOR Receives the signal from the Dell travel remote controller for basic multimedia navigation control 1 left speaker 2 consumer IR sensor 3 memory module coin cell battery cover 4 right speaker 5 Mini Card cover 6 battery 7 battery charge health gauge 8 battery release latches 2 9 air vents 10 hard drive 3 2 4 5 10 7 1 6 8 9 ...

Page 34: ... Battery on page 51 BATTERY CHARGE HEALTH GAUGE Provides information on the battery charge see Checking the Battery Charge on page 52 BATTERY RELEASE LATCHES Releases the battery see Replacing the Battery on page 56 for instructions CAUTION Do not block push objects into or allow dust to accumulate in the air vents Do not store your computer in a low airflow environment such as a closed briefcase ...

Page 35: ...t access through a satellite television system Dial up connections that provide Internet access through a telephone line Dial up connections are considerably slower than DSL cable and satellite modem connections Wireless Wide Area Network WWAN or Mobile Broadband technology provides a connection to the Internet using cellular technology at broadband rates Wireless Local Area Network WLAN connectio...

Page 36: ...t your ISP to check the service status or try connecting again later Windows XP 1 Save and close any open files and exit any open programs 2 Click Start Internet Explorer The New Connection Wizard appears 3 Click Connect to the Internet 4 In the next window click the appropriate option If you do not have an ISP and want to select one click Choose from a list of Internet service providers ISPs If y...

Page 37: ...lp me choose or contact your ISP Follow the instructions on the screen and use the setup information provided by your ISP to complete the setup Transferring Information to a New Computer You can use your operating system wizards to help you transfer files and other data from one computer to another for example from an old computer to a new computer For instructions see the following section that c...

Page 38: ...k with the Files and Settings Transfer Wizard Running the Files and Settings Transfer Wizard With the Operating System Media NOTE This procedure requires the Operating System media This media is optional and may not be included with certain computers To prepare a new computer for the file transfer 1 Open the Files and Settings Transfer Wizard click Start All Programs Accessories System Tools Files...

Page 39: ...n applied the Finished screen appears 3 Click Finished and restart the new computer Running the Files and Settings Transfer Wizard Without the Operating System Media To run the Files and Settings Transfer Wizard without the Operating System media you must create a wizard disk that will allow you to create a backup image file to removable media To create a wizard disk use your new computer with Win...

Page 40: ... transfer and click Next After the information has been copied the Completing the Collection Phase screen appears 8 Click Finish To transfer data to the new computer 1 On the Now go to your old computer screen on the new computer click Next 2 On the Where are the files and settings screen select the method you chose for transferring your settings and files and click Next Follow the instructions on...

Page 41: ...system setup before you connect a printer to the computer See the documentation that came with the printer for setup information including how to Obtain and install updated drivers Connect the printer to the computer Load paper and install the toner or ink cartridge For technical assistance refer to the printer owner s manual or contact the printer manufacturer Printer Cable Your printer connects ...

Page 42: ...e USB connectors fit only one way 3 Turn on the printer and then turn on the computer If the Add New Hardware Wizard window appears click Cancel 4 Depending on your computer s operating system a printer wizard may be available to help you install the printer driver If your computer is running the Microsoft Windows XP operating system and the Add New Hardware Wizard window appears click Cancel 1 US...

Page 43: ...amage to your computer from voltage spikes that can occur during electrical storms or after power interruptions Some surge protector manufacturers include warranty coverage for certain types of damage Carefully read the device warranty when choosing a surge protector A device with a higher joule rating offers more protection Compare joule ratings to determine the relative effectiveness of differen...

Page 44: ...sure maximum battery operating time connect only your computer to a UPS Connect other devices such as a printer to a separate power strip that provides surge protection A UPS protects against power fluctuations and interruptions UPS devices contain a battery that provides temporary power to connected devices when AC power is interrupted The battery charges while AC power is available See the UPS m...

Page 45: ...el the Brightness Meter may appear but the brightness level on the external device does not change Switching the Video Image From Your Computer Display to a Projector When you start the computer with an external device attached such as an external monitor or projector and turned on the image may appear on either the computer display or the external device Press Fn F8 to switch the video image betw...

Page 46: ...an the display supports the settings adjust automatically to the closest supported values To set the display resolution and refresh rate for your display Microsoft Windows XP 1 Click Start Settings Control Panel 2 Under Pick a category click Appearance and Themes 3 Under Pick a task click the area you want to change or under or pick a Control Panel icon click Display 4 In the Display Properties wi...

Page 47: ...Shift Esc Opens the Task Manager window Fn F8 Displays icons representing all currently available display options display only external monitor or projector only both display and projector etc Highlight the desired icon to switch the display to that option Fn and up arrow key Increases brightness on the integrated display only not on an external monitor Fn and down arrow key Decreases brightness o...

Page 48: ...r management mode You can reprogram this keyboard shortcut to activate a different power management mode using the Advanced tab in the Power Options Properties window see Configuring Power Management Settings on page 54 Windows logo key and m Minimizes all open windows Windows logo key and Shift m Restores all minimized windows This key combination functions as a toggle to restore minimized window...

Page 49: ...y tap once on the surface of the touch pad or use your thumb to press the left touch pad button To select and move or drag an object position the cursor on the object and tap twice on the touch pad On the second tap leave your finger on the touch pad and move the selected object by sliding your finger over the surface To double click an object position the cursor on the object and tap twice on the...

Page 50: ...touch pad or adjust the touch pad settings 1 Click Start and then click Control Panel 2 Click Hardware and Sound 3 Click Mouse 4 In the Mouse Properties window Click the Device Select tab to disable the touch pad Click the Touch Pad tab to adjust touch pad settings 5 Click OK to save the settings and close the window ...

Page 51: ...a NOTE Battery operating time the time the battery can hold a charge decreases over time Depending on how often the battery is used and the conditions under which it is used you may need to purchase a new battery during the life of your computer NOTE It is recommended that you connect your computer to an electrical outlet when writing to media Battery operating time varies depending on operating c...

Page 52: ...ION Misuse of the battery may increase the risk of fire or chemical burn Do not puncture incinerate disassemble or expose the battery to temperatures above 65 C 149 F Keep the battery away from children Handle damaged or leaking batteries with extreme care Damaged batteries may leak and cause personal injury or equipment damage Checking the Battery Charge You can check the battery charge on your c...

Page 53: ...To check the battery charge press and release the status button on the battery charge gauge to illuminate the charge indicator lights Each light represents approximately 20 percent of the total battery charge For example if the battery has 80 percent of its charge remaining four of the lights are on If no lights are on the battery has no charge Check the Battery Health NOTE You can check battery h...

Page 54: ...ettings on page 54 Conserving Battery Power To conserve battery power on your portable computer do any of the following Connect the computer to an electrical outlet when possible battery life is largely determined by the number of times the battery is used and recharged Configure the power management settings using either Dell QuickSet or Microsoft Windows Power Options to optimize your computer s...

Page 55: ...drive and then returns you to your previous work session without restarting your computer NOTICE If your computer loses AC and battery power while in Sleep state it may lose data To enter Sleep state Click Start click and then click Sleep or Depending on how you set the power management options in the Windows Power Options or Dell QuickSet use one of the following methods Press the power button Cl...

Page 56: ...ng the Battery CAUTION Using an incompatible battery may increase the risk of fire or explosion Replace the battery only with a compatible battery purchased from Dell The battery is designed to work with your Dell computer Do not use batteries from other computers with your computer CAUTION Before performing these procedures turn off the computer disconnect the AC adapter from the electrical outle...

Page 57: ... the battery into the bay until it latches into place Storing a Battery Remove the battery when you store your computer for an extended period of time A battery discharges during prolonged storage After a long storage period recharge the battery fully see Charging the Battery on page 55 before you use it 1 battery 2 battery release latches 2 2 1 ...

Page 58: ...58 Using a Battery ...

Page 59: ...CE Do not move the computer while playing media 1 Press the eject button on the front of the drive 2 Place the disc label side up in the center of the tray and snap the disc onto the spindle 3 Push the tray back into the drive To format media for storing or copying data see the media software that came with your computer NOTE Ensure that you follow all copyright laws when copying media ...

Page 60: ...f available Play Move backward within the current track Pause Move forward within the current track Stop Go to the previous track Eject Go to the next track Stop Restart the current chapter Play Fast forward Pause Fast reverse Advance a single frame while in pause mode Go to the next title or chapter Continuously play the current title or chapter Go to the previous title or chapter Eject ...

Page 61: ... details go to the Dell Support website at support dell com To play media using Dell Travel Remote 1 Install the CR2106 coin cell battery in your remote control 2 Launch Windows Vista Media Center and then click Start Programs 3 Use the remote control buttons to play media 1 Infrared Transmitter 2 Page Up 3 Page Down 4 Arrow Up 5 OK Enter Select 6 Arrow Right 1 2 3 4 5 6 7 8 9 10 11 16 15 14 13 12...

Page 62: ...t HD DVD media For a list of supported media formats see Using Blank CD or DVD Media on page 63 How to Copy a CD or DVD NOTE Most commercial DVDs have copyright protection and cannot be copied using Roxio Creator 1 Click Start All Programs Roxio Creator Projects Copy 2 Under the Copy tab click Copy Disc 3 To copy the CD or DVD If you have one optical drive insert the source disc into the drive ens...

Page 63: ...t CD R again see the Sonic documentation for more information Use a blank CD RW if you plan to erase rewrite or update information on that disc later Blank DVD R media can be used to permanently store large amounts of information After you create a DVD R you may not be able to write to that disc again if the disc is finalized or closed during the final stage of the disc creation process Use blank ...

Page 64: ...ues If you make a mistake you can erase the data on the CD RW and try again You can also use blank CD RWs to test music file projects before you record the project permanently to a blank CD R You cannot create audio DVDs with Roxio Creator Commercially available DVD players used in home theater systems may not support all available DVD formats For a list of formats supported by your DVD player see...

Page 65: ...ove Programs Programs and Features 2 Select the program you want to remove 3 Click Uninstall See the program documentation for installation instructions Microsoft Windows Vista Operating System 1 Click Start Control Panel Appearance and Personalization 2 Under Personalization click Adjust screen resolution 3 On Display Settings click and drag the bar to reduce the resolution setting 4 In the drop ...

Page 66: ...tacting Dell on page 195 For more information on using Dell MediaDirect use the Help menu in the Dell MediaDirect application Connecting Your Computer to a TV or Audio Device NOTE Video and audio cables for connecting your computer to a TV or other audio device may not be included with your computer Cables and TV digital audio adapter cables are available for purchase from Dell 1 Dell MediaDirect ...

Page 67: ...ut connector a composite video input connector or a component video input connector Depending on what type of connector is available on your TV you can use a commercially available S video cable composite video cable or component video cable to connect your computer to your TV 1 S video TV out connector 2 S video cable 1 S video TV out connector 2 composite video adapter 3 S PDIF digital audio con...

Page 68: ...n you should use When you finish connecting the video and audio cables between your computer and your TV you must enable your computer to work with the TV See Enabling the Display Settings for a TV on page 82 to ensure that the computer recognizes and works properly with the TV Additionally if you are using S PDIF digital audio see Enabling S PDIF Digital Audio on page 82 1 S video TV out connecto...

Page 69: ... you can connect an S video cable directly to the S video TV out connector on the computer without the TV digital audio adapter cable 2 Plug one end of the S video cable into the S video output connector on the computer 3 Plug the other end of the S video cable into the S video input connector on your TV 1 audio connector 2 S video TV out connector 1 standard S video cable 2 standard audio cable 1...

Page 70: ...e into the audio input connectors on your TV or other audio device 6 Turn on the TV and any audio device that you connected if applicable and then turn on the computer 7 See Enabling the Display Settings for a TV on page 82 to ensure that the computer recognizes and works properly with the TV S Video and S PDIF Digital Audio 1 S video TV out connector 2 composite video adapter 1 2 ...

Page 71: ... the S video cable into the S video output connector on the composite video adapter 4 Plug the other end of the S video cable into the S video input connector on the TV 5 Plug one end of the S PDIF digital audio cable into the digital audio connector on the composite video adapter cable 1 composite video adapter 2 S video cable 3 S PDIF digital audio cable 1 composite video adapter 2 S video cable...

Page 72: ...evice that you connected if applicable and then turn on the computer 8 See Enabling the Display Settings for a TV on page 82 to ensure that the computer recognizes and works properly with the TV Composite Video and Standard Audio 1 composite video adapter 2 S PDIF digital audio cable 1 audio input connector 2 S video TV out connector 3 composite video adapter 1 2 2 1 3 ...

Page 73: ...r on your computer 3 Plug one end of the composite video cable into the composite video output connector on the composite video adapter 4 Plug the other end of the composite video cable into the composite video input connector on the TV 1 composite video adapter 2 composite video cable 3 standard audio cable 1 composite video adapter 2 composite video cable 1 2 3 2 1 ...

Page 74: ... the audio input connectors on your TV or other audio device 7 Turn on the TV turn on any audio device that you connected if applicable and then turn on the computer 8 See Enabling the Display Settings for a TV on page 82 to ensure that the computer recognizes and works properly with the TV Composite Video and S PDIF Digital Audio 1 S video TV out connector 2 composite video cable 1 2 ...

Page 75: ... cable into the composite video input connector on the composite video adapter 4 Plug the other end of the composite video cable into the composite video input connector on the TV 5 Plug one end of the S PDIF digital audio cable into the S PDIF audio connector on the composite video adapter 1 composite video adapter 2 composite video cable 3 standard audio cable 1 composite video adapter 2 composi...

Page 76: ...n any audio device that you connected if applicable and then turn on the computer 8 See Enabling the Display Settings for a TV on page 82 to ensure that the computer recognizes and works properly with the TV Component Video and Standard Audio 1 composite video adapter 2 S PDIF digital audio cable 1 S video TV out connector 2 component video adapter 1 2 2 1 ...

Page 77: ...e S video TV out connector on your computer 3 Plug all three ends of the component video cable into the component video output connectors on the component video adapter Make sure that the red green and blue colors of the cable match the corresponding adapter ports 1 component video adapter 2 component video adapter 3 standard audio cable 1 2 3 ...

Page 78: ...end of the audio cable into the headphone connector on the computer 6 Plug the two RCA connectors on the other end of the audio cable into the audio input connectors on your TV or audio device 7 Turn on the TV turn on any audio device that you connected if applicable and then turn on the computer 8 See Enabling the Display Settings for a TV on page 82 to ensure that the computer recognizes and wor...

Page 79: ...Using Multimedia 79 Component Video and S PDIF Digital Audio 1 S video TV out connector 2 composite video cable 1 2 ...

Page 80: ...he S video TV out connector on the computer 3 Plug all three ends of the component video cable into the component video output connectors on the component video adapter Make sure that the red green and blue colors of the cable match the corresponding adapter ports 1 component video adapter 2 composite video cable 3 standard audio cable 1 2 3 ...

Page 81: ...tor on the component video adapter 6 Plug the other end of the digital audio cable into the S PDIF input connector on your TV or other audio device 7 Turn on the TV turn on any audio device that you connected if applicable and then turn on the computer 8 See Enabling the Display Settings for a TV on page 82 to ensure that the computer recognizes and works properly with the TV 1 component video ada...

Page 82: ...Advanced 4 Click the tab for your video card NOTE To determine the type of video card installed in your computer see the Windows Help and Support Center To access the Help and Support Center click Start Help and Support Under Pick a Task click Use Tools to view your computer information and diagnose problems Then under My Computer Information select Hardware 5 In the display devices section select...

Page 83: ...p and Support click Start Help and Support Under Pick a Task click Use Tools to view your computer information and diagnose problems Then under My Computer Information select Hardware 5 In the display devices section select the appropriate option for using either a single display or multiple displays ensuring that the display settings are correct for your selection ...

Page 84: ...84 Using Multimedia ...

Page 85: ...ape with a 34 mm connector The 34 mm card fits into both the 34 mm and 54 mm card slots The 54 mm card only fits into a 54 mm card slot See Specifications on page 197 for information on supported ExpressCards NOTE An ExpressCard is not a bootable device ExpressCard Blanks Your computer shipped with a plastic blank installed in the ExpressCard slot Blanks protect unused slots from dust and other pa...

Page 86: ...ch end to insert into the slot The cards are keyed to prevent incorrect insertion If card orientation is not clear see the documentation that came with the card CAUTION Before you begin any of the procedures in this section follow the safety instructions in the Product Information Guide To install an ExpressCard 1 Hold the card with the top side of the card facing up 2 Slide the card into the slot...

Page 87: ...ard or Blank CAUTION Before you begin any of the procedures in this section follow the safety instructions in the Product Information Guide Press the release latch and remove the card or blank For some release latches you must press the latch twice once to pop the latch out and then a second time to pop the card out Save a blank to use when no ExpressCard is installed in a slot Blanks protect unus...

Page 88: ...88 Using ExpressCards ...

Page 89: ...reader Blanks protect unused slots from dust and other particles Save the blank for use when no memory card is installed in the slot blanks from other computers may not fit your computer Remove the blank before installing a memory card To remove the blank see Removing a Memory Card or Blank on page 90 Installing a Memory Card You can install a memory card in the computer while the computer is runn...

Page 90: ...ads the appropriate device driver If the configuration program tells you to load the manufacturer s drivers use the media that came with the memory card if applicable Removing a Memory Card or Blank CAUTION Before you begin any of the procedures in this section follow the safety instructions in the Product Information Guide NOTICE Use the memory card configuration utility click the icon in the not...

Page 91: ...e you through the process of networking computers For more information about Networking access Windows Help and Support click Start and then click Help and Support Connecting a Network or Broadband Modem Cable Before you connect your computer to a network the computer must have a network adapter installed and a network cable connected to it 1 Connect the network cable to the network adapter connec...

Page 92: ...ther over the air waves rather than through a network cable connected to each computer In a WLAN a radio communications device called an access point or wireless router connects network computers and provides Internet or network access The access point or wireless router and the wireless network card in the computer communicate by broadcasting data from their antennas over the air waves What You N...

Page 93: ...2 Click Classic View on the menu on the left side of the Control Panel 3 Double click Device Manager NOTE The User Account Control window may open 4 Click Continue on the User Account Control window if it opens 5 Click the plus sign next to Network adapters to list the utility that manages your wireless network card If a network adapter is not listed you may not have a wireless network card If a n...

Page 94: ...cable from the electrical outlet 6 Disconnect the network cable from the computer and the modem 7 Disconnect the AC adapter cable from your wireless router to ensure that there is no power connected to the router NOTE Wait for a minimum of 5 minutes after disconnecting your broadband modem before continuing with the network setup 8 Insert a network cable into the network RJ 45 connector on the unp...

Page 95: ... cards with Bluetooth wireless technology or cellular products This section provides general procedures for connecting to a network using wireless technology Specific network names and configuration details vary See Wireless Local Area Network on page 92 for more information about how to prepare for connecting your computer to a WLAN Your wireless network card requires specific software and driver...

Page 96: ...the Wireless Network Card Through Dell QuickSet The wireless activity indicator provides you with an easy way to monitor the status of your computer s wireless devices To turn the wireless activity indicator on or off click the QuickSet icon in the taskbar and select Hotkey Popups If Wireless Activity Indicator Off is not checked the indicator is on If Wireless Activity Indicator Off is checked th...

Page 97: ...our computer s configuration NOTE For instructions on using ExpressCards see Using ExpressCards on page 85 An activated Mobile Broadband ExpressCard or activated Subscriber Identity Module SIM for your service provider The Dell Mobile Broadband Card Utility already installed on your computer if you purchased the card when you purchased your computer or on the media that accompanied your card if pu...

Page 98: ...roadband service through your cellular service provider For instructions and for additional information about using the Dell Mobile Broadband Card Utility see the user s guide available through Windows Help and Support click Start and then click Help and Support The user s guide is also available on the Dell Support website at support dell com and on the media included with your Mobile Broadband c...

Page 99: ...wireless switch positions see wireless switch on page 27 To monitor the status of your wireless device see Monitoring the Status of the Wireless Network Card Through Dell QuickSet on page 96 Dell Wi Fi Catcher Network Locator The wireless switch on your Dell computer uses the Dell Wi Fi Catcher Network Locator to scan for wireless networks in your vicinity To scan for a wireless network slide and ...

Page 100: ... and Using Networks NOTE The Wi Fi Catcher Network Locator light appears only when the computer is turned off and the wireless switch is configured in the system setup program BIOS to control WiFi network connections ...

Page 101: ...on your Dell computer For more information see the instructions included with the device NOTICE Before you buy an antitheft device ensure that it will work with the security cable slot on your computer Passwords Passwords prevent unauthorized access to your computer When you first start your computer you must assign a primary password at the prompt If you do not enter a password within 2 minutes t...

Page 102: ...reate a user password you must enter it each time you turn on or unlock your computer If you do not enter a password within 2 minutes the computer returns to its previous operating state For more information see your Windows documentation If you forget any of your passwords contact Dell see Contacting Dell on page 195 For your protection Dell technical support staff will ask you for proof of your ...

Page 103: ...f the investigating officer The Dell customer service representative will log your report under the computer Service Tag and record the computer as missing or stolen If someone calls Dell for technical assistance and gives your Service Tag the computer is identified automatically as missing or stolen The representative will attempt to get the phone number and address of the caller Dell will then c...

Page 104: ...104 Securing Your Computer ...

Page 105: ...lem with your computer perform the checks in Lockups and Software Problems on page 125 and run the Dell Diagnostics before you contact Dell for technical assistance It is recommended that you print these procedures before you begin NOTE The Dell Diagnostics only operates on Dell computers Enter the system setup program review your computer s configuration information and ensure that the device you...

Page 106: ...TE If you see a message stating that no diagnostics utility partition has been found run the Dell Diagnostics from the Drivers and Utilities media The computer runs the Pre boot System Assessment PSA a series of initial tests of your system board keyboard display memory and hard drive During the assessment answer any questions that appear If failures are detected the computer stops and beeps To st...

Page 107: ...ice menu use the up and down arrow keys to highlight CD DVD CD RW and then press Enter NOTE The Quickboot feature changes the boot sequence for the current boot only Upon restart the computer boots according to the boot sequence specified in the system setup program 4 Select the Boot from CD ROM option from the menu that appears and then press Enter 5 Type 1 to start the Drivers and Utilities menu...

Page 108: ...one memory test Test System Run System Diagnostics Exit Exit the Diagnostics Option Function Express Test Performs a quick test of system devices The test typically takes 10 to 20 minutes and requires no interaction on your part Run Express Test first to increase the possibility of tracing the problem quickly Extended Test Performs a thorough check of system devices The test typically takes an hou...

Page 109: ...ptom Tree option Tab Function Results Displays the results of the test and any error conditions encountered Errors Displays error conditions encountered error codes and the problem description Help Describes the test and any requirements for running the test Configuration Displays your hardware configuration for the selected device The Dell Diagnostics obtains configuration information for all dev...

Page 110: ... specific to your computer are available under Drivers Downloads Upgrades and System Information The top of the Dell Support Center home page displays your computer s model number along with its Service Tag Express Service code and warranty expiration details When permissions are given to Dell to use your Service Tag additional details about your computer such as available memory disk space instal...

Page 111: ...Dell PC TuneUp The automated or monthly version of Dell PC TuneUp allows you to choose the day and time of the month you want your computer tuned up A typical tune up includes hard drive defragmentation removal of unwanted and temporary files updated security settings verification of good restore points and other maintenance activities designed to improve computer performance and security The mont...

Page 112: ...ted setup alerting and device status Simplified tracking of networked devices through a visual display of network status Proactive troubleshooting and repair of network problems Tutorials setup wizards and frequently asked questions FAQs to enhance understanding of networking principles To access Dell Network Assistant 1 Click the Dell Support Center icon on your computer s desktop 2 Click Self He...

Page 113: ...remove viruses Viruses can sometimes prevent Windows from recognizing the drive TEST THE DRIVE Insert another floppy disk CD or DVD to eliminate the possibility that the original media is defective Insert a bootable floppy disk and restart the computer CLEAN THE DRIVE OR DISK See Cleaning Your Computer on page 208 ENSURE THAT THE CD OR DVD MEDIA IS SNAPPED ONTO THE SPINDLE CHECK THE CABLE CONNECTI...

Page 114: ...sert one end into the eject hole at the front of the drive then push firmly until the tray is partially ejected 3 Gently pull out the tray until it stops The drive makes an unfamiliar scraping or grinding sound Ensure that the sound is not caused by the program that is running Ensure that the disc is inserted properly Hard drive problems ALLOW THE COMPUTER TO COOL BEFORE TURNING IT ON A hot hard d...

Page 115: ...tlook Express click Tools Options Security 2 Click Do not allow attachments to remove the check mark as needed CHECK THE TELEPHONE LINE CONNECTION CHECK THE TELEPHONE JACK CONNECT THE MODEM DIRECTLY TO THE TELEPHONE WALL JACK USE A DIFFERENT TELEPHONE LINE Verify that the telephone line is connected to the jack on the modem the jack has either a green label or a connector shaped icon next to it En...

Page 116: ...onses the modem is operating properly Windows Vista 1 Click the Windows Vista Start button Control Panel Hardware and Sound Phone and Modem Options Modems 2 Click the COM port for your modem Properties Diagnostics Query Modem to verify that the modem is communicating with Windows If all commands receive responses the modem is operating properly ENSURE THAT YOU ARE CONNECTED TO THE INTERNET Ensure ...

Page 117: ...rrectly put spaces in the proper place and used the correct pathname CACHE DISABLED DUE TO FAILURE The primary cache internal to the microprocessor has failed Contact Dell see Contacting Dell on page 195 CD DRIVE CONTROLLER FAILURE The CD drive does not respond to commands from the computer see Drive Problems on page 113 DATA ERROR The hard drive cannot read the data see Drive Problems on page 113...

Page 118: ...stall the hard drive and restart the computer Run the Hard Disk Drive tests in the Dell Diagnostics see Dell Diagnostics on page 105 HARD DISK DRIVE CONTROLLER FAILURE 0 The hard drive does not respond to commands from the computer Shut down the computer remove the hard drive see Hard Drive on page 155 and boot the computer from a CD Then shut down the computer reinstall the hard drive and restart...

Page 119: ... test in the Dell Diagnostics see Dell Diagnostics on page 105 KEYBOARD STUCK KEY FAILURE For external keyboards or keypads check the cable connection Restart the computer and avoid touching the keyboard or keys during the boot routine Run the Stuck Key test in the Dell Diagnostics see Dell Diagnostics on page 105 LICENSED CONTENT IS NOT ACCESSIBLE IN MEDIADIRECT DellMediaDirect cannot verify the ...

Page 120: ...BOOT SECTOR ON HARD DRIVE The operating system may be corrupted Contact Dell see Contacting Dell on page 195 NO TIMER TICK INTERRUPT A chip on the system board may be malfunctioning Run the System Set tests in the Dell Diagnostics see Dell Diagnostics on page 105 NOT ENOUGH MEMORY OR RESOURCES EXIT SOME PROGRAMS AND TRY AGAIN You have too many programs open Close all windows and open the program t...

Page 121: ... Diagnostics on page 105 TIME OF DAY CLOCK LOST POWER System configuration settings are corrupted Connect your computer to an electrical outlet to charge the battery If the problem persists try to restore the data by entering the system setup program then immediately exit the program see Using the System Setup Program on page 205 If the message reappears contact Dell see Contacting Dell on page 19...

Page 122: ...d Problems CAUTION Before you begin any of the procedures in this section follow the safety instructions in the Product Information Guide CHECK THE EXPRESSCARD Ensure that the ExpressCard is properly inserted into the connector CHECK THAT THE CARD IS RECOGNIZED BY WINDOWS Double click the Safely Remove Hardware icon in the Windows taskbar Some cards do not support this feature If the card supports...

Page 123: ...OBLEMS WITH AN IEEE 1394 DEVICE NOT PROVIDED BY DELL Contact Dell or the IEEE 1394 device manufacturer see Contacting Dell on page 195 Ensure that the IEEE 1394 device is properly inserted into the connector Keyboard Problems CAUTION Before you begin any of the procedures in this section follow the safety instructions in the Product Information Guide NOTE Use the integrated keyboard when running t...

Page 124: ...ct the external keyboard 3 Turn on the computer 4 From the Windows desktop click Start All Programs Accessories Notepad 5 Type some characters on the internal keyboard and verify that they appear on the display If the characters appear now but did not with the external keyboard you may have a defective external keyboard Contact Dell see Contacting Dell on page 195 RUN THE KEYBOARD DIAGNOSTICS TEST...

Page 125: ...le to perform an operating system shutdown TURN THE COMPUTER OFF If you are unable to get a response by pressing a key on your keyboard or moving your mouse press and hold the power button for at least 8 to 10 seconds until the computer turns off then restart your computer A program stops responding or crashes repeatedly END THE PROGRAM 1 Press Ctrl Shift Esc simultaneously to access the Task Mana...

Page 126: ... screen click Next 3 Follow the instructions on the screen A solid blue screen appears TURN THE COMPUTER OFF If you are unable to get a response by pressing a key on your keyboard or moving your mouse press and hold the power button for at least 8 to 10 seconds until the computer turns off then restart your computer Dell MediaDirect problems CHECK THE DELL MEDIADIRECT HELP FILE FOR INFORMATION Use...

Page 127: ...t Dell for assistance see Contacting Dell on page 195 Other software problems CHECK THE SOFTWARE DOCUMENTATION OR CONTACT THE SOFTWARE MANUFACTURER FOR TROUBLESHOOTING INFORMATION Ensure that the program is compatible with the operating system installed on your computer Ensure that your computer meets the minimum hardware requirements needed to run the software See the software documentation for i...

Page 128: ... memory modules to ensure that your computer is successfully communicating with the memory see Memory on page 163 Run the Dell Diagnostics see Dell Diagnostics on page 105 IF YOU EXPERIENCE OTHER MEMORY PROBLEMS Reseat the memory modules to ensure that your computer is successfully communicating with the memory see Memory on page 163 Ensure that you are following the memory installation guidelines...

Page 129: ...MOBILE BROADBAND EXPRESSCARD You must activate the Mobile Broadband ExpressCard before you can connect to the network Position the mouse over the icon in the notification area to verify the status of the connection If the card is not activated follow the card activation instructions located within the Dell Mobile Broadband Card Utility To access the utility double click the icon located in the tas...

Page 130: ...ashes amber or is a steady amber the battery charge is low or depleted Connect the computer to an electrical outlet If the battery status light flashes blue and amber the battery is too hot to charge Shut down the computer disconnect the computer from the electrical outlet and then let the battery and computer cool to room temperature If the battery status light rapidly flashes amber the battery m...

Page 131: ... CONNECTIONS See the printer documentation for cable connection information Ensure that the printer cables are securely connected to the printer and the computer TEST THE ELECTRICAL OUTLET Ensure that the electrical outlet is working by testing it with another device such as a lamp VERIFY THAT THE PRINTER IS RECOGNIZED BY WINDOWS Windows XP 1 Click Start Control Panel Printers and Other Hardware V...

Page 132: ...CANNER Ensure that your scanner is unlocked RESTART THE COMPUTER AND TRY THE SCANNER AGAIN CHECK THE CABLE CONNECTIONS See the scanner documentation for cable connection information Ensure that the scanner cables are securely connected to the scanner and the computer VERIFY THAT THE SCANNER IS RECOGNIZED BY MICROSOFT WINDOWS Windows XP 1 Click Start Control Panel Printers and Other Hardware Scanne...

Page 133: ...your speakers have volume controls adjust the volume bass or treble to eliminate distortion ADJUST THE WINDOWS VOLUME CONTROL Click or double click the speaker icon in the lower right corner of your screen Ensure that the volume is turned up and that the sound is not muted DISCONNECT HEADPHONES FROM THE HEADPHONE CONNECTOR Sound from the speakers is automatically disabled when headphones are conne...

Page 134: ... up Check that the battery is also not weak Point your remote control to the receiver The receiver is underneath the touch pad of your computer Move the remote control closer to your computer REMOTE CONTROL IS STUCK IN THE SLOT Check that you have not incorrectly stored the remote control into a non Express Card slot Contact Dell Technical Support for removing it Touch Pad or Mouse Problems CHECK ...

Page 135: ...ts pointer movement and the operation of the touch pad or mouse buttons run the Mouse test in the Pointing Devices test group in the Dell Diagnostics on page 105 REINSTALL THE TOUCH PAD DRIVER See Reinstalling Drivers and Utilities on page 138 Video and Display Problems CAUTION Before you begin any of the procedures in this section follow the safety instructions in the Product Information Guide If...

Page 136: ...rom the computer or external monitor ELIMINATE POSSIBLE INTERFERENCE Turn off nearby fans fluorescent lights halogen lamps or other appliances ROTATE THE COMPUTER TO FACE A DIFFERENT DIRECTION Eliminate sunlight glare which can cause poor picture quality ADJUST THE WINDOWS DISPLAY SETTINGS Windows XP 1 Click Start Control Panel Appearance and Themes 2 Click the area you want to change or click the...

Page 137: ...rograms that use the device Each device has its own set of specialized commands that only its driver recognizes Dell ships your computer to you with required drivers already installed no further installation or configuration is needed NOTICE Your Drivers and Utilities media may contain drivers for operating systems that are not on your computer Ensure that you are installing software appropriate f...

Page 138: ...on point is next to the device name you may need to reinstall the driver or install a new driver see Reinstalling Drivers and Utilities on page 138 Reinstalling Drivers and Utilities NOTICE The Dell Support website at support dell com and your Drivers and Utilities media provide approved drivers for Dell computers If you install drivers obtained from other sources your computer might not work corr...

Page 139: ... Device Driver Rollback or System Restore see Restoring your Microsoft Windows Operating System on page 142 does not resolve the problem reinstall the driver from your Drivers and Utilities media 1 With the Windows desktop displayed insert your Drivers and Utilities media If this is your first time to use your Drivers and Utilities media continue to step 2 If not proceed to step 5 2 When the Drive...

Page 140: ...r is not required by your operating system Manually Reinstalling Drivers NOTE If your computer has a Consumer IR port and you are reinstalling a Consumer IR driver you must first enable the Consumer IR port in the system setup program see Using the System Setup Program on page 205 before continuing with the driver installation see Reinstalling Drivers and Utilities on page 138 For information abou...

Page 141: ...river software 6 Click Browse and browse to the location to which you previously copied the driver files 7 When the name of the appropriate driver appears click the name of the driver OK Next 8 Click Finish and restart your computer Troubleshooting Software and Hardware Problems If a device is either not detected during the operating system setup or is detected but incorrectly configured you can u...

Page 142: ...Search Help field at the top of the window Restoring your Microsoft Windows Operating System Restoring Windows Vista You can restore your Windows Vista operating system in the following ways Windows Vista includes the Backup and Restore Center to create backups of important files on your computer or to back up the entire hard drive You can then restore your operating system or files if needed Micr...

Page 143: ...state See the Windows Help and Support Center for information on using System Restore To access the Windows Help and Support Center click the Windows Vista Start button Help and Support NOTICE Make regular backups of your data files System Restore does not monitor your data files or recover them NOTE The procedures in this document were written for the Windows default view so they may not apply if...

Page 144: ... using System Restore 3 Click Continue in the User Account Control UAC dialog box asking for permission to run the application 4 Click Next in the System Restore window to view the most recent restore points in chronological order 5 Select the Show restore points older than 5 days check box to view the complete list of restore points 6 Select a restore point Try to restore from the most recent res...

Page 145: ...ion of the Windows operating systems NOTICE When you restore the computer to the default factory configuration all data on the hard drive is deleted Before performing this procedure back up personal files If you do not back up personal files the data is lost 1 Restart the computer To do this click the Windows Vista Start button Restart 2 As the computer restarts press F8 until the Advanced Boot Op...

Page 146: ...lation back up all data files on your primary hard drive For conventional hard drive configurations the primary hard drive is the first drive detected by the computer To reinstall Windows you need the following items Dell Operating System media Dell Drivers and Utilities media NOTE Your Drivers and Utilities media contains drivers that were installed during assembly of the computer Use your Driver...

Page 147: ... reinstall Dell MediaDirect if you voluntarily reformat the hard drive You need the installation software to reinstall Dell MediaDirect See Contacting Dell on page 195 Restoring Windows XP System Restore returns your computer to an earlier operating state without affecting data files Use System Restore as the first solution for restoring your operating system and preserving data files Dell PC Rest...

Page 148: ...ting System Restore NOTICE Before you restore the computer to an earlier operating state save and close any open files and exit any open programs Do not alter open or delete any files or programs until the system restoration is complete 1 Click Start All Programs Accessories System Tools System Restore 2 Click either Restore my computer to an earlier time or Create a restore point 3 Click Next and...

Page 149: ...ries or on certain computers Use Dell PC Restore only as the last method to restore your operating system These options restore your hard drive to the operating state it was in when you purchased the computer Any programs or files added since you received your computer including data files are permanently deleted from the hard drive Data files include documents spreadsheets e mail messages digital...

Page 150: ...em Dell PC Restore enables you to restore your hard drive to the operating state it was in when you purchased your computer It is recommended that you do not remove PC Restore from your computer even to gain additional hard drive space If you remove PC Restore from the hard drive you cannot ever recall it and you will never be able to use PC Restore to return your computer operating system to its ...

Page 151: ...oblem then use System Restore to return your operating system to the operating state it was in before you installed the new device driver see Using Microsoft Windows System Restore on page 148 NOTICE Before performing the installation back up all data files on your primary hard drive For conventional hard drive configurations the primary hard drive is the first drive detected by the computer To re...

Page 152: ...iately NOTE If you wait too long and the operating system logo appears continue to wait until you see the Microsoft Windows desktop then shut down your computer and try again NOTE The next steps change the boot sequence for one time only On the next start up the computer boots according to the devices specified in the system setup program 5 When the boot device list appears highlight CD DVD CD RW ...

Page 153: ... can be replaced or if purchased separately installed by performing the removal procedure in reverse order Recommended Tools The procedures in this document may require the following tools Small flat blade screwdriver Phillips screwdriver Small plastic scribe Flash BIOS update see the Dell Support website at support dell com Turning Off Your Computer NOTICE To avoid losing data save and close any ...

Page 154: ...When you disconnect a cable pull on its connector or on its strain relief loop not on the cable itself Some cables have a connector with locking tabs if you are disconnecting this type of cable press in on the locking tabs before you disconnect the cable As you pull connectors apart keep them evenly aligned to avoid bending any connector pins Also before you connect a cable ensure that both connec...

Page 155: ...he battery bay 8 Turn the computer top side up open the display and press the power button to ground the system board 9 Remove any installed cards from the ExpressCard slot see Removing an ExpressCard or Blank on page 87 and the 8 in 1 memory card reader see Removing a Memory Card or Blank on page 90 Hard Drive Depending on the configuration you ordered your computer may have two hard drives a pri...

Page 156: ...ndling the hard drive NOTE Dell does not guarantee compatibility or provide support for hard drives from sources other than Dell NOTE If you are installing a hard drive from a source other than Dell you need to install an operating system drivers and utilities on the new hard drive see Restoring your Microsoft Windows Operating System on page 142 and Reinstalling Drivers and Utilities on page 138 ...

Page 157: ...he new drive from its packaging Save the original packaging for storing or shipping the hard drive NOTICE Use firm and even pressure to slide the drive into place If you use excessive force you may damage the connector NOTICE If you are installing only one hard drive ensure you install the new drive in the primary hard drive bay NOTE The secondary hard drive is optional 2 Place the hard drive in t...

Page 158: ... computer as needed see Reinstalling Drivers and Utilities on page 138 Returning a Hard Drive to Dell Return your old hard drive to Dell in its original or comparable foam packaging Otherwise the hard drive may be damaged in transit Optical Drive CAUTION Before you begin any of the procedures in this section follow the safety instructions in the Product Information Guide Removing the Optical Drive...

Page 159: ...the safety instructions in the Product Information Guide NOTICE To avoid electrostatic discharge ground yourself by using a wrist grounding strap or by periodically touching an unpainted metal surface such as a connector on the back of the computer NOTICE To help prevent damage to the system board you must remove the battery from the battery bay before you begin working inside the computer 1 optic...

Page 160: ...e to the hinge cover do not lift the cover on both sides simultaneously 3 Insert a plastic scribe into the indent to lift the hinge cover on the right side 4 Ease the hinge cover up moving from right to left and remove it Replacing the Hinge Cover 1 Insert the left edge of the hinge cover 2 Press from left to right until the cover snaps into place 1 hinge cover 2 scribe 1 2 ...

Page 161: ...mputer NOTICE To help prevent damage to the system board you must remove the battery from the battery bay before you begin working inside the computer Removing the Keyboard 1 Follow the procedures in Before You Begin on page 153 2 Remove the hinge cover see Hinge Cover on page 159 3 Remove the four screws at the top of the keyboard NOTICE The keycaps on the keyboard are fragile easily dislodged an...

Page 162: ...the notch on the top of the keyboard on the tab on the base of the computer 2 Keeping the keyboard flat against the computer base slide the tabs on the bottom of the keyboard under the palm rest and ensure the tab on the computer base slides into the notch on the top of the keyboard 1 keyboard 2 keyboard screws 4 3 notch on keyboard 4 tab on computer base 2 1 4 3 ...

Page 163: ...de You can increase your computer memory by installing memory modules on the system board See Specifications on page 197 for information on the memory supported by your computer Install only memory modules that are intended for your computer NOTE Memory modules purchased from Dell are covered under your computer warranty 1 tabs 7 2 keyboard connector 3 notch on keyboard 4 tab on computer base 5 pa...

Page 164: ...Module NOTICE To avoid electrostatic discharge ground yourself by using a wrist grounding strap or by periodically touching an unpainted metal surface such as a connector on the back of the computer The DIMM A memory module is located under the keyboard 1 Follow the procedures in Before You Begin on page 153 2 Remove the hinge cover see Hinge Cover on page 159 3 Remove the keyboard see Keyboard on...

Page 165: ...mputer 1 Align the notch in the module edge connector with the tab in the connector slot 2 Slide the memory module firmly into the slot at a 45 degree angle and rotate the module down until it clicks into place If you do not feel the click remove the module and reinstall it NOTE If the memory module is not installed properly the computer may not boot No error message indicates this failure 1 memor...

Page 166: ...uration information To confirm the amount of memory installed in the computer click Start Help and Support Dell System Information Removing the DIMM B Memory Module The DIMM B memory module is located under the memory module coin cell battery cover on the bottom of the computer 1 Follow the procedures in Before You Begin on page 153 2 Turn the computer upside down loosen the captive screw on the m...

Page 167: ...urself by using a wrist grounding strap or by periodically touching an unpainted metal surface such as a connector on the back of the computer 3 Use your fingertips to carefully spread apart the memory module securing clips on each end of the memory module connector until the module pops up 4 Remove the memory module from the connector 1 memory module coin cell battery cover 2 captive screw 1 2 ...

Page 168: ...k of the computer 1 Align the notch in the module edge connector with the tab in the connector slot 2 Slide the memory module firmly into the slot at a 45 degree angle and rotate the module down until it clicks into place If you do not feel the click remove the module and reinstall it NOTE If the memory module is not installed properly the computer may not boot No error message indicates this fail...

Page 169: ...ectrical outlet 5 Turn on the computer As the computer boots it detects the additional memory and automatically updates the system configuration information To confirm the amount of memory installed in the computer click Start Help and Support Dell System Information Subscriber Identity Module Subscriber Identity Modules SIM identify users uniquely through an International Mobile Subscriber Identi...

Page 170: ...e SIM compartment with the cut off corner of the SIM facing away from the compartment Wireless Mini Cards CAUTION Before you begin any of the procedures in this section follow the safety instructions in the Product Information Guide NOTICE To help prevent damage to the system board you must remove the battery from the battery bay before you begin working inside the computer 1 battery bay 2 SIM 1 2...

Page 171: ...wireless Mini Cards Wireless Local Area Network WLAN Mobile Broadband or Wireless Wide Area Network WWAN Wireless Personal Area Network WPAN Removing a WLAN Card 1 Follow the procedures in Before You Begin on page 153 2 Turn the computer over 3 Loosen the captive screws on the Mini Card cover and remove the cover 1 captive screws 2 2 Mini Card cover 1 2 ...

Page 172: ...enna cables from the WLAN card 5 Release the WLAN card by pushing the metal securing tabs toward the back of the computer until the card pops up slightly 6 Lift the WLAN card out of its system board connector 1 antenna cable connectors 2 2 WLAN card 1 2 ...

Page 173: ...d on the system board and realign the card NOTICE To avoid damage to the WLAN card never place cables under the card 1 Insert the WLAN card connector at a 45 degree angle into the system board connector labeled WLAN 2 Press the other end of the WLAN card down into the securing tabs until the card clicks into place 1 metal securing tabs 2 2 WLAN card 3 mylar sleeve 1 2 3 ...

Page 174: ...l white black and gray connect the white antenna cable to the white triangle connect the black antenna cable to the black triangle and connect the gray antenna cable to the gray triangle 4 Secure unused antenna cables in the protective mylar sleeve 5 Replace the Mini Card cover and tighten the captive screws Removing a Mobile Broadband or WWAN Card NOTE WWAN is also available on an ExpressCard see...

Page 175: ...Adding and Replacing Parts 175 1 captive screws 2 2 Mini Card cover 1 2 ...

Page 176: ...ntenna cables from the WWAN card 5 Release the WWAN card by pushing the metal securing tabs toward the back of the computer until the card pops up slightly 6 Lift the WWAN card out of its system board connector 1 antenna cable connectors 2 2 WWAN card 1 2 ...

Page 177: ...he card and on the system board and realign the card NOTICE To avoid damage to the WWAN card never place cables under the card 1 Insert the WWAN card connector at a 45 degree angle into the system board connector labeled WWAN 2 Press the other end of the WWAN card down into the securing tabs until the card clicks into place 1 metal securing tabs 2 2 WWAN card 3 mylar sleeve 1 2 3 ...

Page 178: ...eplace the cover and tighten the captive screws Removing a WPAN Card 1 Follow the procedures in Before You Begin on page 153 2 Turn the computer over 3 Loosen the captive screws on the Mini Card cover and remove the cover 4 Disconnect the blue antenna cable from the WPAN card 5 Release the WPAN card by pushing the metal securing tabs toward the back of the computer until the card pops up slightly ...

Page 179: ...nused antenna cables in the protective mylar sleeve 5 Replace the Mini Card cover and tighten the captive screws Flash Cache Module The Flash Cache Module FCM is an internal flash drive that helps improve the performance of your computer If you ordered an FCM with your computer the card is already installed Removing the FCM 1 Follow the procedures in Before You Begin on page 153 2 Turn the compute...

Page 180: ...ot install an FCM in the WLAN card slot Doing so may cause damage to your computer 1 Insert the FCM connector at a 45 degree angle into the system board connector labeled FCM 2 Press the other end of the FCM down into the securing tabs until the card clicks into place 1 metal securing tabs 2 2 FCM 1 2 ...

Page 181: ...ce such as a connector on the back of the computer NOTICE To help prevent damage to the system board you must remove the battery from the battery bay before you begin working inside the computer If you ordered an internal card with Bluetooth wireless technology with your computer it is already installed Removing the Card 1 Follow the procedures in Before You Begin on page 153 2 Remove the hinge co...

Page 182: ...ng an unpainted metal surface such as a connector on the back of the computer NOTICE To help prevent damage to the system board you must remove the battery from the battery bay before you begin working inside the computer Removing the Coin Cell Battery 1 Follow the procedures in Before You Begin on page 153 2 Turn the computer over 3 Loosen the captive screw on the memory module coin cell battery ...

Page 183: ...lide the battery out of the mylar sleeve Replacing the Coin Cell Battery 1 Connect the coin cell battery cable to the system board 2 Slide the coin cell battery into the mylar sleeve 3 Replace the cover and tighten the captive screw 1 coin cell battery 2 mylar sleeve 3 battery cable connector 2 1 3 ...

Page 184: ...184 Adding and Replacing Parts ...

Page 185: ...s Network connectivity Power management Display System information Depending on what you want to do in Dell QuickSet you can start it by either clicking double clicking or right clicking the QuickSet icon in the Microsoft Windows notification area The notification area is located in the lower right corner of your screen For more information about QuickSet right click the QuickSet icon and select H...

Page 186: ...186 Dell QuickSet Features ...

Page 187: ...Computer Remove any external devices attached to the computer and store them in a safe place Fully charge the main battery and any spare batteries that you plan to carry with you Shut down the computer Disconnect the AC adapter NOTICE When the display is closed extraneous items on the keyboard or palm rest could damage the display Remove any extraneous items such as paper clips pens and paper from...

Page 188: ...f ownership or of your right to use the computer if it is company owned to speed your passage through customs Investigate the customs regulations of the countries you plan to visit and consider acquiring an international carnet also known as a merchandise passport from your government Find out what type of electrical outlets are used in the countries you will visit and have appropriate power adapt...

Page 189: ... See Online Services on page 190 for a more extensive list of Dell Support online 5 If the preceding steps have not resolved the problem see Contacting Dell on page 195 NOTE Call Dell Support from a telephone near or at the computer so that the support staff can assist you with any necessary procedures NOTE Dell s Express Service Code system may not be available in all countries When prompted by D...

Page 190: ...nection diagnose your problem and repair it all under your supervision For more information go to support dell com and click DellConnect Online Services You can learn about Dell products and services on the following websites www dell com www dell com ap Asian Pacific countries only www dell com jp Japan only www euro dell com Europe only www dell com la Latin American and Caribbean countries www ...

Page 191: ... touch tone telephone to select the subjects that correspond to your questions For the telephone number to call for your region see Contacting Dell on page 195 Automated Order Status Service To check on the status of any Dell products that you have ordered you can go to support dell com or you can call the automated order status service A recording prompts you for the information needed to locate ...

Page 192: ...f the invoice and a letter describing the reason for the return 3 Include a copy of the Diagnostics Checklist see Diagnostics Checklist on page 194 indicating the tests that you have run and any error messages reported by the Dell Diagnostics see Dell Diagnostics on page 105 4 Include any accessories that belong with the item s being returned power cables software floppy disks guides and so on if ...

Page 193: ...ics Checklist see Diagnostics Checklist on page 194 If possible turn on your computer before you call Dell for assistance and call from a telephone at or near the computer You may be asked to type some commands at the keyboard relay detailed information during operations or try other troubleshooting steps possible only at the computer itself Ensure that the computer documentation is available CAUT...

Page 194: ...ion Devices Expansion cards Are you connected to a network Yes No Network version and network adapter Programs and versions See your operating system documentation to determine the contents of the system s start up files If the computer is connected to a printer print each file Otherwise record the contents of each file before calling Dell Error message beep code or diagnostic code Description of ...

Page 195: ...ability varies by country and product and some services may not be available in your area To contact Dell for sales technical support or customer service issues 1 Visit support dell com 2 Verify your country or region in the Choose A Country Region drop down menu at the bottom of the page 3 Click Contact Us on the left side of the page 4 Select the appropriate service or support link based on your...

Page 196: ...196 Getting Help ...

Page 197: ...ding on model External bus frequency 533 MHz 667 MHz and 800 MHz System Information System chipset Mobile Intel 965 Express Chipset Family Data bus width 64 bits DRAM bus width dual channel 2 64 bit buses Processor address bus width 32 bits Flash EPROM 1 MB Graphics bus PCI E X16 PCI bus PCI Express used for video controllers 32 bits x16 ExpressCard NOTE The ExpressCard slot is designed only for E...

Page 198: ...ry Memory module connector two user accessible SoDIMM connectors Memory module capacities 512 MB 1 GB 2 GB Memory type 667 MHz SoDIMM DDR2 Minimum memory 1 GB Maximum memory 4 GB NOTE In order to take advantage of the dual channel bandwidth capability both memory slots must be populated and must match in size NOTE The available memory displayed does not reflect the complete maximum memory installe...

Page 199: ...ns Modem Type v 92 56K MDC Controller softmodem Interface Intel High Definition Audio Network adapter 10 100 Ethernet LAN on system board Wireless internal WLAN WWAN WPAN Mini Cards WWAN ExpressCard Bluetooth wireless technology Video Video type discrete video card Data bus PCI Express X16 Video controller nVIDIA GeForce 8400M GS or nVIDIA GeForce 8600M GT Video memory 128 MB GeForce 8400M GS or 2...

Page 200: ... 4 ohm speakers Internal speaker amplifier 2 Watts per channel into 4 ohms Internal microphone Dual digital microphone array Volume controls program menus media control buttons Display Type active matrix TFT 17 inch WXGA 17 inch WUXGA with TrueLife Dimensions Height 229 5 mm 9 04 in Width 367 2 mm 14 46 in Diagonal 433 0 mm 17 0 in Maximum resolutions WXGA 1440 x 900 at 262 K colors WXGA with True...

Page 201: ...sting Brightness on page 45 Keyboard Number of keys 86 103 U S and Canada 87 104 Europe 90 107 Japan Layout QWERTY AZERTY Kanji Touch Pad X Y position resolution graphics table mode 240 cpi Size Width 71 7 mm 2 8 in sensor active area Height 34 0 mm 1 3 in rectangle Battery Type 9 cell smart lithium ion 6 cell smart lithium ion Dimensions Depth 67 6 mm 2 66 inches 9 cell 47 5 mm 1 87 inches 6 cell...

Page 202: ...power intensive conditions see Power Problems on page 129 See Using a Battery on page 51 for more information on battery life Life span approximate 300 discharge charge cycles Temperature range Operating 0 to 35 C 32 to 95 F Storage 40 to 65 C 40 to 149 F Coin cell battery CR 2032 AC Adapter Input voltage 100 240 VAC Input current maximum 1 5 A Input frequency 50 60 Hz Output current 5 62 A maximu...

Page 203: ...hes Width 394 mm 15 5 inches Depth 293 mm 11 3 inches Weight with 6 cell battery Configurable to less than 3 8 kg 8 4 lb Environmental Temperature range Operating 0 to 35 C 32 to 95 F Storage 40 to 65 C 40 to 149 F Relative humidity maximum Operating 10 to 90 noncondensing Storage 5 to 95 noncondensing Maximum vibration using a random vibration spectrum that simulates user environment Operating 0 ...

Page 204: ... and a 2 ms halfsine pluse for storage Operating 142 G Storage 163 G Altitude maximum Operating 15 2 to 3048 m 50 to 10 000 ft Storage 15 2 to 10 668 m 50 to 35 000 ft Airborne Contaminant level C2 or lower as defined by ISA S71 04 1985 Camera Optional Still Resolution 2 Mega Pixel Video Resolution 640 x 480 at 30 fps Camera activation desktop icon Environmental continued ...

Page 205: ...uter password To verify information about the computer s current configuration such as the amount of system memory After you set up the computer run system setup to familiarize yourself with your system configuration information and optional settings You may want to write down the information for future reference The system setup screens display the current setup information and settings for your ...

Page 206: ...er appear less bright The upper right corner of the screen displays help information for the currently highlighted option the lower right corner displays information about the computer System setup key functions are listed across the bottom of the screen Commonly Used Options Certain options require that you reboot the computer for new settings to take effect Changing the Boot Sequence The boot se...

Page 207: ... press u to move the device up the list or d to move a device down the list Boot sequence changes take effect as soon as you save the changes and exit the system setup program Performing a One Time Boot You can set a one time only boot sequence without entering the system setup program you can also use this procedure to boot the Dell Diagnostics on the diagnostics utility partition on your hard dr...

Page 208: ...nstructions that are included with the product Moisten a soft lint free cloth with either water or a display cleaner Do not use alcohol or an ammonia based cleaner Wipe the display gently working from the center to the edges until it is clean and any fingerprints are removed Do not use excessive pressure NOTICE To prevent damage to the antiglare coating do not wipe the display with soap or alcohol...

Page 209: ...Optical Mouse 1 Clean the outside casing of the mouse with a cloth moistened with a mild cleaning solution 2 Turn the retainer ring on the underside of your mouse counterclockwise and then remove the ball 3 Wipe the ball with a clean lint free cloth 4 Blow carefully into the ball cage or use a can of compressed air to dislodge dust and lint 5 If the rollers inside the ball cage are dirty clean the...

Page 210: ...t try using water or a diluted solution of water and mild soap You can also purchase commercial products that clean discs and provide some protection from dust fingerprints and scratches Cleaning products for CDs are also safe to use on DVDs Dell Technical Support Policy U S Only Technician assisted technical support requires the cooperation and participation of the customer in the troubleshooting...

Page 211: ...some of the software programs that are installed on the computer during the manufacturing process Microsoft Office Norton Antivirus etc Dell installed peripherals include any internal expansion cards or Dell branded module bay or ExpressCard accessories In addition any Dell branded monitors keyboards mice speakers microphones for telephonic modems docking stations port replicators networking produ...

Page 212: ... harmful interference with radio or television reception which can be determined by turning the equipment off and on you are encouraged to try to correct the interference by one or more of the following measures Reorient the receiving antenna Relocate the system with respect to the receiver Move the system away from the receiver Plug the system into a different outlet so that the system and the re...

Page 213: ...hat is protected by U S patents and other intellectual property rights Use of this copyright protection technology must be authorized by Macrovision and is intended for home and other limited viewing uses only unless otherwise authorized by Macrovision Reverse engineering or disassembly is prohibited ...

Page 214: ...214 Appendix ...

Page 215: ...video circuitry and the computer memory AHCI Advanced Host Controller Interface An interface for a SATA hard drive Host Controller which allows the storage driver to enable technologies such as Native Command Queuing NCQ and hot plug ALS ambient light sensor A feature that helps to control display brightness antivirus software A program designed to identify quarantine and or delete viruses from yo...

Page 216: ...o start your computer In case your hard drive is damaged or your computer has a virus ensure that you always have a bootable CD or floppy disk available bps bits per second The standard unit for measuring data transmission speed BTU British thermal unit A measurement of heat output bus A communication pathway between the components in your computer bus speed The speed given in MHz that indicates h...

Page 217: ...thenticity The Windows alpha numeric code located on a sticker on your computer Also referred to as the Product Key or Product ID Consumer IR A port that allows you to transfer data between the computer and infrared compatible devices without using a cable connection Control Panel A Windows utility that allows you to modify operating system and hardware settings such as display settings controller...

Page 218: ...ecific group of users A user logs on to the domain to gain access to the resources DRAM dynamic random access memory Memory that stores information in integrated circuits containing capacitors driver Software that allows the operating system to control a device such as a printer Many devices do not work properly if the correct driver is not installed in the computer DSL Digital Subscriber Line A t...

Page 219: ...ectrostatic discharge A rapid discharge of static electricity ESD can damage integrated circuits found in computer and communications equipment expansion card A circuit board that installs in an expansion slot on the system board in some computers expanding the capabilities of the computer Examples include video modem and sound cards expansion slot A connector on the system board in some computers...

Page 220: ...or disk for file storage When a drive or disk is formatted the existing information on it is lost FSB front side bus The data path and physical interface between the processor and RAM FTP file transfer protocol A standard Internet protocol used to exchange files between computers connected to the Internet G G gravity A measurement of weight and force GB gigabyte A measurement of data storage that ...

Page 221: ...hertz MHz gigahertz GHz or terahertz THz I IC integrated circuit A semiconductor wafer or chip on which thousands or millions of tiny electronic components are fabricated for use in computer audio and video equipment IDE integrated device electronics An interface for mass storage devices in which the controller is integrated into the hard drive or CD drive IEEE 1394 Institute of Electrical and Ele...

Page 222: ...ement of the capacity of memory integrated circuits KB kilobyte A unit of data that equals 1024 bytes but is often referred to as 1000 bytes key combination A command requiring you to press multiple keys at the same time kHz kilohertz A measurement of frequency that equals 1000 Hz L LAN local area network A computer network covering a small area A LAN usually is confined to a building or a few nea...

Page 223: ...d in RAM memory mapping The process by which the computer assigns memory addresses to physical locations at start up Devices and software can then identify information that the processor can access memory module A small circuit board containing memory chips which connects to the system board MHz megahertz A measure of frequency that equals 1 million cycles per second The speeds for computer proces...

Page 224: ...that contains icons for providing quick access to programs and computer functions such as the clock volume control and print status Also referred to as system tray ns nanosecond A measure of time that equals one billionth of a second NVRAM nonvolatile random access memory A type of memory that stores data when the computer is turned off or loses its external power source NVRAM is used for maintain...

Page 225: ...solution such as 800 x 600 is expressed as the number of pixels across by the number of pixels up and down Plug and Play The ability of the computer to automatically configure devices Plug and Play provides automatic installation configuration and compatibility with existing hardware if the BIOS operating system and all devices are Plug and Play compliant POST power on self test Diagnostics progra...

Page 226: ...layed on a monitor The higher the resolution the sharper the image RFI radio frequency interference Interference that is generated at typical radio frequencies in the range of 10 kHz to 100 000 MHz Radio frequencies are at the lower end of the electromagnetic frequency spectrum and are more likely to have interference than the higher frequency radiations such as infrared and light ROM read only me...

Page 227: ...shortcut on your Windows desktop and double click the icon you can open its corresponding folder or file without having to find it first Shortcut icons do not change the location of files If you delete a shortcut the original file is not affected Also you can rename a shortcut icon SIM Subscriber Identity Module A SIM card contains a microchip that encrypts voice and data transmissions SIM cards c...

Page 228: ...Also known as the motherboard system setup A utility that serves as an interface between the computer hardware and the operating system System setup allows you to configure user selectable options in the BIOS such as date and time or system password Unless you understand what effect the settings have on the computer do not change the settings for this program T TAPI telephony application programmi...

Page 229: ...puter is turned on and they can also be daisy chained together UTP unshielded twisted pair Describes a type of cable used in most telephone networks and some computer networks Pairs of unshielded wires are twisted to protect against electromagnetic interference rather than relying on a metal sheath around each pair of wires to protect against interference UXGA ultra extended graphics array A video...

Page 230: ...rical power One W is 1 ampere of current flowing at 1 volt WHr watt hour A unit of measure commonly used to indicate the approximate capacity of a battery For example a 66 WHr battery can supply 66 W of power for 1 hour or 33 W for 2 hours wallpaper The background pattern or picture on the Windows desktop Change your wallpaper through the Windows Control Panel You can also scan in your favorite pi...

Page 231: ...o stress applied to either the chip or its socket Zip A popular data compression format Files that have been compressed with the Zip format are called Zip files and usually have a filename extension of zip A special kind of zipped file is a self extracting file which has a filename extension of exe You can unzip a self extracting file by double clicking it Zip drive A high capacity floppy drive de...

Page 232: ...232 Glossary ...

Page 233: ... ExpressCards 85 89 removing 87 90 Bluetooth wireless technology card device status light 25 installing 181 boot sequence 206 brightness adjusting 45 C carnet 188 CD about 62 CD RW drive problems 114 drive problems 113 Check Disk 114 cleaning display 208 keyboard 208 media 210 mouse 209 touch pad 209 coin cell battery replacing 182 computer crashes 125 126 restore to previous operating state 148 s...

Page 234: ... device latch release description 34 device status lights description 24 diagnostics Dell 105 display adjusting brightness 45 adjusting the size of icons 185 adjusting the size of toolbars 185 description 23 resolution 45 switching the video image 45 documentation End User License Agreement 15 ergonomics 15 online 17 Product Information Guide 15 regulatory 15 safety 15 User s Guide 16 warranty 15 ...

Page 235: ...oblems 114 replacing 155 returning to Dell 158 hardware Dell Diagnostics 105 Hardware Troubleshooter 141 hinge cover removing 159 I icons adjusting the size 185 IEEE 1394 connector description 30 problems 123 installing 171 Internet connection about 35 options 35 setting up 36 K keyboard numeric keypad 47 problems 123 removing 161 shortcuts 47 keyboard status lights description 26 keypad numeric 4...

Page 236: ...roadband network connections 96 See also wireless switch Mobile Broadband WWAN problems 128 modem connector description 31 monitor See display N network installing WLAN Mini Card 170 Mobile Broadband WWAN 128 problems 128 QuickSet 185 network connector description 30 O operating system reinstalling Windows Vista 148 P PC Restore 149 power line conditioners 43 problems 129 protection devices 43 sur...

Page 237: ...ht conditions 129 printer 131 program crashes repeatedly 125 program stops responding 125 programs and Windows compatibility 126 restore computer to previous operating state 148 scanner 132 slow computer performance 116 127 software 125 127 problems continued sound and speakers 133 speakers 133 spyware 116 127 Product Information Guide 15 Q QuickSet 185 QuickSet Help 18 R RAM See memory regulatory...

Page 238: ...ystem Restore 148 system setup program commonly used options 206 screens 206 viewing 206 T taskbar Dell Mobile Broadband Card Utility 129 QuickSet icon 185 Safely Remove Hardware 122 toolbars adjusting the size 185 touch pad 49 cleaning 209 customizing 50 touch pad buttons description 25 track stick touch pad buttons description 25 transferring information to a new computer 37 traveling with the c...

Page 239: ...133 W warranty information 15 Windows Easy Transfer wizard 37 Windows Vista Device Driver Rollback 138 Program Compatibility wizard 126 reinstalling 148 System Restore 148 Windows Easy Transfer wizard 37 Windows XP Device Driver Rollback 139 PC Restore 149 wireless turning activity on and off 185 wizards Program Compatibility wizard 126 Windows Easy Transfer 37 WLAN 171 installing Mini Card 170 WP...

Page 240: ...240 Index ...

Reviews: