background image


Summary of Contents for 5000 Series

Page 1: ......

Page 2: ...s used in this text D Link and the D LINK logo are trademarks of D Link Corporation Microsoft and Windows are registered trademarks of Microsoft Corporation Other trademarks and trade names may be used in this document to refer to either the entities claiming the marks and names or their products D Link Corporation disclaims any proprietary interest in trademarks and trade names other than its own...

Page 3: ...the physical CLI command used when explaining a topic Courier New Font This font is used to indicate CLI command examples used in this document Initial capital letter The use of initial capital letters indicates that a referral to a specific name was made This will be seen a lot when referring to protocols standards and keyboard keys For example Press Enter Menu Name Menu Option This convention in...

Page 4: ... AC powered option intended for your system purchase a power cable that is approved for use in your country The power cable must be rated for the product and for the voltage and current marked on the product s electrical ratings label The voltage and current rating of the cable should be greater than the ratings marked on the product To help prevent electric shock plug the system and peripheral po...

Page 5: ...the rack from the bottom up and load the heaviest item in the rack first Make sure that the rack is level and stable before extending a component from the rack Use caution when pressing the component rail release latches and sliding a component into or out of a rack the slide rails can pinch your fingers After a component is inserted into the rack carefully extend the rail into a locking position ...

Page 6: ...rial until ready to install the component in the system Just before unwrapping the antistatic packaging be sure to discharge static electricity from your body When transporting a sensitive component first place it in an antistatic container or packaging Handle all sensitive components in a static safe area If possible use antistatic floor pads workbench pads and an antistatic grounding strap ...

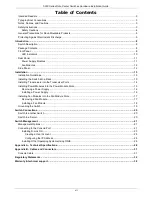
Page 7: ...k 13 Installing Transceivers into the Transceiver Ports 14 Installing Power Modules into the Power Module Slots 15 Removing a Power Supply 16 Installing a Power Supply 16 Installing Fan Modules into the Fan Module Slots 17 Removing a Fan Module 17 Installing a Fan Module 18 Grounding the Switch 19 Switch Connections 20 Switch to another Switch 20 Switch to a Server 20 Switch Management 21 Manageme...

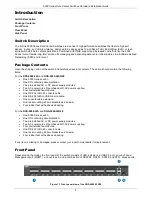
Page 8: ...ntaining documentation Two preinstalled AC or DC power supply modules Two AC power cords if purchased with AC power supplies Four preinstalled fan modules One RS 232 to RJ 45 console cable One RS 232 to Mini USB console cable One console cable extension One rack mounting kit two brackets and screws Four rubber feet with adhesive backing For the DQS 5000 32S and DQS 5000 32Q28 One 5000 Series switc...

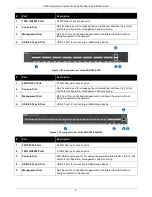
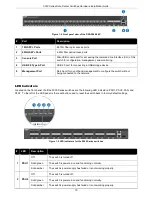
Page 9: ...le port for accessing the command line interface CLI of this switch for configuration management and monitoring 3 Management Port RJ 45 port for out of band management to configure the switch without being connected to the network 4 USB 2 0 Type A Port USB 2 0 port for connecting a USB storage device Figure 1 3 Front panel view of the DQS 5000 54SQ28 Port Description 1 25G SFP28 Ports 48 25G fiber...

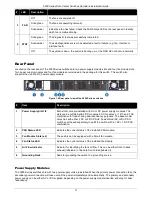
Page 10: ... the switch without being connected to the network LED Indicators Located on the front panel of all the 5000 Series switches are the following LED indicators PSU1 PSU2 FAN and STAT To the left of the LED panel is the reset button used to reset the switch back to factory default settings Figure 1 5 LED indicators for the 5000 Series switches LED Description 1 PSU1 Off The switch is turned off Solid...

Page 11: ...d with AC or DC power supply modules The slots can be outfitted with 2 DC modules 2 AC modules or 1 DC and 1 AC combination for load sharing and redundancy purposes The base model only ships with either 2 AC or 2 DC PSUs An additional AC or DC PSU must be purchased separately to outfit the switch with a 1 AC 1 DC PSU combination 2 PSU Status LED Indicates the current status of the installed PSU mo...

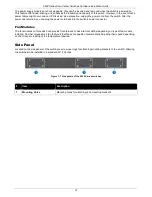
Page 12: ...ck into the switch s power connector Fan Modules The fan modules on this switch can provide front to back or back to front airflow depending on type of fan module installed Another unique smart fan feature is that fans are capable of automatically adjusting their speed depending on the IC sensor reading of the temperature required Side Panel Located on the side panels of the switch are screw openi...

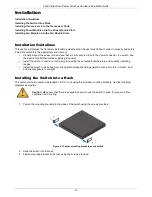
Page 13: ...cal outlet that will be supplying the power Install the switch in a fairly cool and dry place within the acceptable temperature and humidity operating ranges Install the switch in a site free from strong electromagnetic field generators such as motors vibration dust and direct exposure to sunlight Installing the Switch into a Rack The switch can be mounted in a standard 19 1U rack using the provid...

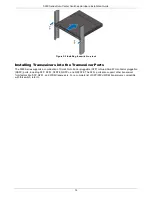
Page 14: ...iver Ports The 5000 Series supports a combination of Small Form Factor pluggable SFP or Quad Small Form Factor pluggable QSFP ports including SFP SFP SFP28 QSFP and QSFP28 The SFP ports also support other transceiver form factors like SFP SFP and WDM transceivers For a complete list of SFP SFP WDM transceivers compatible with this switch refer to ...

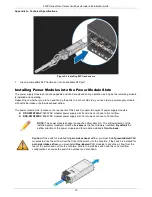
Page 15: ...50W AC modular power supply with front to back or back to front airflow DXS PWR800DC 800W DC modular power supply with front to back or back to front airflow NOTE The power modules support a specific airflow direction This airflow direction of the installed power module s must be the same as the fan module s installed By default the airflow direction of the power module and fan module installed is...

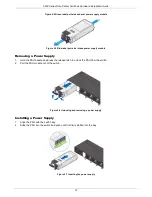
Page 16: ...ule Removing a Power Supply 1 Hold the PSU handle and press the release latch to unlock the PSU from the switch 2 Pull the PSU module out of the switch Figure 2 6 Unlocking and removing a power supply Installing a Power Supply 1 Align the PSU with the switch bay 2 Slide the PSU into the switch and push until it is firmly slotted into the bay Figure 2 7 Inserting the power supply ...

Page 17: ...s installed By default the airflow direction of the power module and fan module installed is front to back Caution If the switch is installed for port side exhaust airflow you must install fan modules labeled I to drive the air flow from the front of the switch into the hot aisle If the switch is installed for port side intake airflow you must install fan modules labeled E to drive the air flow fr...

Page 18: ...uide 18 Figure 2 10 Removing a fan module Installing a Fan Module 1 Align the fan module with the switch bay 2 Slide the fan module into the switch and push until it is firmly slotted into the bay 3 Secure the captive screw Figure 2 11 Inserting a fan module ...

Page 19: ...d ground conductor Contact the appropriate electrical inspection authority or an electrician if you are uncertain that suitable grounding is available Warning Ensure the rack is properly grounded and in compliance with local regulatory guidelines Ensure that a good electrical connection to the grounding point exists Remove any paint or material that may prevent good contact Figure 2 12 Grounding t...

Page 20: ...erver Switch to another Switch Two or more switches can also be interlinked using fiber optic cables or direct attached cables via the switch s SFP SFP28 QSFP and QSFP28 access ports Switch to a Server Servers can be connected to the network using fiber optic cables via the switch s SFP SFP28 QSFP and QSFP28 access ports ...

Page 21: ...m The switch supports SNMP v1 SNMPv2c and SNMPv3 The SNMP agent decodes the incoming SNMP messages and responds to requests with MIB objects stored in the database The SNMP agent updates the MIB objects to generate statistics and counters Connecting to the Console Port The front panel of the switch provides a console port that enables a connection to a computer monitoring and configuring the switc...

Page 22: ...parity Set flow control to none Figure 4 1 COM1 Properties Port Settings Under Properties select VT100 for Emulation mode Select Terminal keys for Function Arrow and Ctrl keys Figure 4 2 COM1 Properties General Settings 3 After correctly configuring the terminal plug the power cable into the power connector on the back of the switch You will be presented with an option to select an operating syste...

Page 23: ... Link OS and all third party operating systems must be activated first Refer to the OS license activation information for more details on how to activate the OS 1 In the OS selection window do not press any key The system will automatically boot the Linux based D Link OS after a few seconds Figure 4 4 D Link OS Boot Screen ...

Page 24: ...gging into D Link OS enter the command sudo license install activation code to activate the operating system Refer to the license activation information for the required information The switch will need to be rebooted to continue Once rebooted repeat steps 1 and 2 to continue Figure 4 6 D Link OS Activation 4 Enter the command sudo icos cli to enter the D Link OS command interface Figure 4 7 D Lin...

Page 25: ...Passwords are case sensitive Usernames should be between 1 to 64 characters in length Passwords should be between 8 to 64 characters in length Configuring the IP Address Each switch must be assigned its own IP address which is used for communication with an SNMP network manager or other TCP IP applications The switch s VLAN1 default IP address is 10 90 90 90 8 and the management port default IP ad...

Page 26: ...on instructions visit www pluribusnetworks com Use the following procedure for installing upgrading the switch to install the OS on the switch Below is an example of installing D Link OS over TFTP 1 In the OS selection select ONIE and press Enter 2 From the ONIE interface window select ONIE Install OS and press Enter CAUTION Choosing the ONIE Install OS option will automatically remove any previou...

Page 27: ...S installation is successful the switch will automatically reboot The newly installed OS will now appear in the OS selection menu ONIE onie discovery stop discover ONIE embed mode detected Stopping discover done ONIE install_url tftp 192 168 3 15 onie installer x86_64 nc2x_rangely 1 0 3 rc DLink DXS 5000 54S ...

Page 28: ...Mpps 2 380 Bpps Packet Buffer Memory 12 MB 12 MB 16 MB 16 MB MAC Address Table 288K 288K 40K 40K Physical Power Input 1 1 redundant power supply design Input 100 to 240 V AC 50 60 Hz Maximum Power Consumption 295 W 406 W 420 W 395 W Heat Dissipation Max 1006 58 BTU hr 1385 27 BTU hr 1433 04 BTU hr 1347 74 BTU hr Fans 4 x fans 4 x fans 4 x fans 4 x fans Acoustics Max 74 dB Min 62 dB Max 69 8 dB Min...

Page 29: ...node license DV 700 N500 LIC D View 7 500 node license DV 700 N1000 LIC D View 7 1000 node license DV 700 P5 LIC D View 7 5 probe license DV 700 P10 LIC D View 7 10 probe license DV 700 P25 LIC D View 7 25 probe license DV 700 P50 LIC D View 7 50 probe license DV 700 P100 LIC D View 7 100 probe license Optional 10G SFP Transceivers DEM 431XT 10GBASE SR multi mode OM1 33 m OM2 82 m OM3 300 m withou...

Page 30: ...0GBASE LR single mode 20 km TX 1270 nm RX 1330 nm without DDM Optional 40G QSFP Transceivers DEM QX01Q SR4 40GBASE SR4 multi mode OM3 100 m OM4 150 m DEM QX10Q SR4 40GBASE LR4 single mode 10 km Optional 10G SFP Direct Attach Cables DEM CB100S 10G SFP to SFP 1 m Direct Attach Cable DEM CB300S 10G SFP to SFP 3 m Direct Attach Cable DEM CB700S 10G SFP to SFP 7 m Direct Attach Cable DEM CB100QXS 4XS 4...

Page 31: ...llowing diagrams and tables show the standard RS 232 to RJ 45 Mini USB receptacle connector and their pin assignments DB9 RS 232 to RJ 45 Pin Assignment Contact Console DB9 RS232 RJ 45 1 NC Not Used 2 TX Not Used 3 RX UART TX 4 NC GND 5 GND shared GND 6 NC UART RX 7 NC Not Used 8 NC Not Used 9 NC X DB9 RS 232 to Mini USB Pin Assignment Contact Console DB9 RS232 Mini USB 1 NC NC 2 TX RX 3 RX TX 4 N...

Page 32: ...f used batteries according to the instructions ATTENTION Risque d explosion si la batterie est remplacée par un type incorrect Jetezles piles usagées selon les instructions 警告使用者 此為甲類的資訊技術設備 在居住環境中使用時 可能會造成射頻擾動 在這種情況下 使用者會 被要求採取某些適當的對策 Warning This is a class A product In a domestic environment this product may cause radio interference in which case the user may be required to take adequate measur...

Page 33: ...duit et ne le démontez jamais Pour certains produits contenant une batterie remplaçable par l utilisateur veuillez lire et suivre les consignes contenues dans le manuel d utilisation Ne renversez pas d aliments ou de liquide sur le produit et n insérez jamais d objets dans les orifices N utilisez pas ce produit à proximité d un point d eau de zones très humides ou de condensation sauf si le produi...

Page 34: ...gare sempre il prodotto dalla presa elettrica prima di pulirlo e usare solo un panno asciutto che non lasci filacce VEILIGHEIDSINFORMATIE De volgende algemene veiligheidsinformatie werd verstrekt om uw eigen persoonlijke veiligheid te waarborgen en uw product te beschermen tegen mogelijke schade Denk eraan om de gebruikersinstructies van het product te raadplegen voor meer informatie Statische ele...

Page 35: ...die Umwelt zu schonen und die menschliche Gesundheit zu schützen D Link und die Umwelt D Link ist sich den möglichen Auswirkungen seiner Geschäftstätigkeiten und seiner Produkte auf die Umwelt bewusst und fühlt sich verpflichtet diese entsprechend zu mindern Zu diesem Zweck entwickelt und stellt D Link seine Produkte mit dem Ziel größtmöglicher Umweltfreundlichkeit her und verwendet wiederverwertb...

Page 36: ...ito all indirizzo www dlinkgreen com NEDERLANDS NL Dit symbool op het product of de verpakking betekent dat dit product volgens de plaatselijke wetgeving niet mag worden weggegooid met het huishoudelijk afval maar voor recyclage moeten worden ingeleverd Zodra het product het einde van de levensduur heeft bereikt dient u het naar een inzamelpunt te brengen dat hiertoe werd aangeduid door uw plaatse...

Page 37: ...somagolásainkról további információkat a www dlinkgreen com weboldalon tudhat meg NORSK NO Dette symbolet på produktet eller forpakningen betyr at dette produktet ifølge lokale lover og forskrifter ikke skal kastes sammen med husholdningsavfall men leveres inn til gjenvinning Vennligst ta det til et innsamlingssted anvist av lokale myndigheter når det er kommet til slutten av levetiden Noen steder...

Page 38: ... bevara miljön och skydda människors hälsa D Link och miljön På D Link förstår vi och är fast beslutna att minska den påverkan våra verksamheter och produkter kan ha på miljön För att minska denna påverkan utformar och bygger D Link sina produkter för att de ska vara så miljövänliga som möjligt genom att använda återvinningsbara material med låg gifthalt i både produkter och förpackningar D Link r...

Page 39: ...ill be refunded by D Link provided that the non conforming Software and all copies thereof is first returned to D Link The license granted respecting any Software for which a refund is given automatically terminates Non Applicability of Warranty The Limited Warranty provided hereunder for Hardware and Software portions of D Link s products will not be applied to and does not cover any refurbished ...

Page 40: ... be governed by the laws of the State of California Some states do not allow exclusion or limitation of incidental or consequential damages or limitations on how long an implied warranty lasts so the foregoing limitations and exclusions may not apply This Limited Warranty provides specific legal rights and you may also have other rights which vary from state to state Trademarks D Link is a registe...

Page 41: ...e Installation Guide 41 Product Registration Register your D Link product online at http support dlink com register Product registration is entirely voluntary and failure to complete or return this form will not diminish your warranty rights ...

Page 42: ...This guide is only for initial configuration Please refer to the user manual to learn more or visit http www mydlink com for more information Also feel free to contact us U S and Canadian customers can contact D Link Technical Support through our website USA http support dlink com Canada http support dlink ca ...

Page 43: ...RSTÜTZUNG ASSISTANCE TECHNIQUE ASISTENCIA TÉCNICA SUPPORTO TECNICO TECHNISCHE ONDERSTEUNING POMOC TECHNICZNA TECHNICKÁ PODPORA TECHNICKÁ PODPORA TECHNIKAI TÁMOGATÁS TEKNISK SUPPORT TEKNISK SUPPORT TEKNISK STØTTE TEKNINEN TUKI ASSISTÊNCIA TÉCNICA ΤΕΧΝΙΚΉ ΥΠΟΣΤΉΡΙΞΗ TEHNIČKA PODRŠKA TEHNIČNA PODPORA SUPORT TEHNIC ТЕХНИЧЕСКА ПОДДРЪЖКА ...

Page 44: ... in dlink com Singapore Thailand Indonesia Malaysia Philippines Vietnam customers Singapore www dlink com sg Thailand www dlink co th Indonesia www dlink co id Malaysia www dlink com my Philippines www dlink com ph Vietnam www dlink com vn Korea customers Tel 82 2 2028 1810 Monday to Friday 9 00am to 6 00pm Web http d link co kr E mail g2b d link co kr New Zealandcustomers Tel 0800 900 900 24 7 Te...

Page 45: ...224 Dubai U A E Tel 971 4 8809022 Fax 971 4 8809066 8809069 Technical Support 971 4 8809033 General Inquiries info me me dlink com Tech Support support me me dlink com Egypt customers 1 Makram Ebeid Street City Light Building floor 5 Nasrcity Cairo Egypt Tel 2 02 23521593 2 02 23520852 Technical Support 2 02 26738470 General Inquiries info eg me dlink com Tech Support support eg me dlink com Kingd...

Page 46: ...399 Karachi Office D 147 1 KDA Scheme 1 Opposite Mudassir Park Karsaz Road Karachi Pakistan Phone 92 21 34548158 34326649 Fax 92 21 4375727 Technical Support 92 21 34548310 34305069 General Inquiries info pk me dlink com Tech Support support pk me dlink com Iran customers Unit 1 1st Floor Plot No 3 Pazhoheshgah 2 Alley Ahmad Ghasir Bokharest St Shahid Beheshti Abbas Abad St Tehran Iran Postal Code...

Page 47: ...eau N 312 ET 337 Casablanca Maroc Phone 212 663 72 73 24 Email support na me dlink com Lebanon RMA center customers Dbayeh Lebanon PO Box 901589 Tel 961 4 54 49 71 Ext 14 Fax 961 4 54 49 71 Ext 12 Email taoun me dlink com Bahrain customers Technical Support 973 1 3332904 Kuwait customers Technical Support 965 22453939 965 22453949 ...

Page 48: ...держки D Link по телефону или через Интернет Техническая поддержка компании D Link работает в круглосуточном режиме ежедневно кроме официальных праздничных дней Звонок бесплатный по всей России Техническая поддержка D Link 8 800 700 5465 Техническая поддержка через Интернет http www dlink ru e mail support dlink ru Изготовитель Д Линк Корпорейшн 114 Тайвань Тайпей Нэйху Дистрикт Шинху 3 Роуд 289 У...

Page 49: ...8 13 65 E mail support dlink by Қазақстан Алматы Құрманғазы к cі 143 үй Тел 7 727 378 55 90 E mail almaty dlink ru Հայաստան Երևան Դավթաշեն 3 րդ թաղամաս 23 5 Հեռ 374 10 39 86 67 Էլ փոստ info dlink am Latvija Rīga Lielirbes iela 27 Tel 371 6 761 87 03 E mail info dlink lv Lietuva Vilnius Žirmūnų 139 303 Tel 370 5 236 36 29 E mail info dlink lt Eesti E mail info dlink ee Türkiye Uphill Towers Residen...

Page 50: ...Usuarios En Latino America Por favor revise el número telefónico del Call Center de su país en http www dlinkla com soporte call center Soporte Técnico de D Link a través de Internet Horario de atención Soporte Técnico en www dlinkla com e mail soporte dlinkla com consultas dlinkla com ...

Page 51: ...Series Data Center Switches Hardware Installation Guide 51 Clientes de Brasil Caso tenha dúvidas na instalação do produto entre em contato com o Suporte Técnico D Link Acesse o site www dlink com br suporte ...

Page 52: ...服務時間 週一至週五 9 00 21 00 週六日及國定假日 不含農曆春節 10 00 19 00 台灣網站 http www dlink com tw 台灣電子郵件 dssqa_service dlink com tw 產品保固期限 台灣區維修據點查詢 請參考http www dlink com tw網頁說明 香港 澳門D Link技術諮詢專線 香港技術諮詢服務專線 852 8100 8892 香港服務時間 週一至週五9 00AM 1 00PM及2 00PM 6 00PM 週六 9 00AM 1 00PM 香港網站 http www dlink com hk 香港電子郵件 service cn synnex grp com 香港 澳門維修據點查詢請參考http www dlink com hk contact html 網頁說明 如果您是其他地區的用戶 請參考D Link網站www dl...

Page 53: ...0800 14014 97 Layanan Bebas Pulsa Dukungan Teknis D Link melalui Internet Pertanyaan Umum sales id dlink com Bantuan Teknis support id dlink com Website http www dlink co id 日本のお客様 この度は弊社製品をお買い上げいただき 誠にありがとうございま す 製品に同梱されている保証書の購入元にお問い合わせください 中國客戶 技術支持中心電話 400 629 6688 家用産品熱線 4006 828 828 企業産品熱線 技術支持中心郵箱 dlink400 cn dlink com 各地維修中心地址請登錄官方網站查詢 網址 http www dlink com cn 400電話工作時間 工作日9 00 19 00 節假日9 ...

Page 54: ... site 1 employee 2 9 10 49 50 99 100 499 500 999 1000 or more 3 What network protocol s does your organization use XNS IPX TCP IP DECnet Others_____________________________ 4 What network operating system s does your organization use D Link LANsmart Novell NetWare NetWare Lite SCO Unix Xenix PC NFS 3Com 3 Open Cisco Network Banyan Vines DECnet Pathwork Windows NT Windows 98 Windows 2000 ME Windows...

Page 55: ......

Reviews: