Summary of Contents for 917.203930
Page 71: ...71 ...
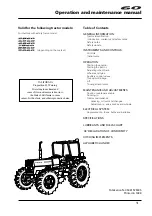
The Craftsman 917.203930 Operator's Manual is a comprehensive guide for users of this top-notch product. Discover essential instructions, tips, and maintenance procedures to ensure optimal performance. Easily download this manual for free from our website, manualshive.com, to get the most out of your Craftsman 917.203930.
Page 71: ...71 ...