


Ball bearing slides
Friction slides
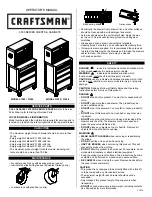
OPERATOR’S MANUAL
3000 SERiES ChESTS & CABiNETS
capacities
service parts
safety
• The maximum weight for each drawer should be no more than
50 lbs.
• Empty weight of Model # 31293 is 55 lbs.
• Empty weight of Model # 31295 is 96 lbs.
• Empty weight of Model # 31292 is 58 lbs.
• Empty weight of Model # 31294 is 114 lbs.
• The maximum product weight for both models, including con-
tents, should be no more than 700 lbs.
F1874
DaNGer
is used to indicate a hazardous situation which,
if not avoided, will result in serious injury or death.
WarNiNG
indicates a hazardous situation which,
if not avoided, could result in serious injury or death.
cautioN
is used to indicate a hazardous situation which, if not
avoided, may result in minor injury, moderate injury, or property
damage.
cautioN:
Read and follow all Safety Rules and Operating
instructions before first use of this product.
DaNGer
•
Do Not
stand on this product. You may fall or cause product
to tip.
•
Do Not
open more than one drawer. The product may be-
come unstable and tip.
•
Do Not
step in the drawers. You may fall or cause product to
tip.
•
Do Not
mount this product on a truck bed or any other mov-
ing object.
•
Do Not
move the product prior to closing and locking all the
drawers and chest lid. The drawers could come open and
make the product unstable and tip.
•
Do Not
place any objects on top of chest lid. Remove all
objects from chest lid before opening.
• For casters, use high quality bearing grease, (yearly).
• Lubricate the slides with grease or equivalent,(twice yearly.)
maiNteNaNce
LocatiNG moDeL # iNformatioN
Model numbers and other information required for service parts is
located on a label on the interior right side of the top most drawer.
• Lubricate lock with graphite, (yearly).
• Periodically the drawer fronts, drawer trim, and other surfaces
should be cleaned with a mild detergent and water.
• Auto wax will preserve the unit’s luster finish. Apply the wax
as to a car. The wax will also help protect the unit against
scratches.
• Grease and oil can be removed with most standard
cleaning fluids. For safety, use a nonflammable cleaning fluid.
• if drawer liners are supplied, it is recommended they are used
to protect the finish inside the drawers and to make the drawers
easier to clean. The drawer liners may be cleaned
with soap and water.
caLL 1-800-366-7278 for service parts.
Refer to Service
Parts Drawing for full listing of Service Parts.
moDeL 31293 / 31295
moDeL 31292 / 31294
WarNiNG
•
Wear safety GLasses
when removing or repositioning
the slides.
•
Do Not
pull the unit, push it when moving
•
use tHe BraKes
when not moving this product. This will
prevent the product from rolling.
•
Do Not
alter this product in any manner. For example, do not
weld external lockbars or attach electrical equipment.
• Keep the product on level surfaces. The product may become
unstable and tip if stored or moved on an uneven surface.
•
Be carefuL
when closing the cover. Remove hands before
the cover closes completely.
cautioN
•
This product is not designed to be directly lifted with a fork lift,
or to be towed with any mechanical devices.
• The maximum weight for each drawer should never be
exceeded.
• Only transport this product empty. Properly secure when
transporting.
•
Do Not
exceed maximum product weight, including contents.
See Capacities for more information.