background image

Summary of Contents for 113.206933

Page 1: ...ber may be found on a plate attached to your base You should record both model and serial number in a safe place for future use CAUTION Read GENERAL and ADDITIONAL SAFETY iNSTRUCTiONS carefully 6 1 8 iNCH JOINTER PLANER assembly operating e repair parts Sold by SEARS ROEBUCK AND CO Chicago IL 60684 U SoA Part No 67096 Prir_ted Lr_ U_S ...

Page 2: ...ply with ANSI Z87 1 at all times Everyday eyeglasses only have impact resistant lenses they are NO1 safety glasses Also use face or dust mask if cutting operation is dusty and ear protectors plugs or muffs during extended periods of operation 13 SECURE WORK Use clam ps or a v_seto hold work when practical it s safer than using your hand frees both hands to operate tool 14 DON T OVERREACH Keep prop...

Page 3: ...cked back toward you d Always use the hold down push block when j ointing or beveling wood narrower than 3 in but never joint or bevel wood narrower than 3 4 in or less than t 4 inch thick e Always use the hold down push blocks when planing wood thinner than 3 in but never piane wood thinner than 1 2 in under any circumstances f Avoid awkward hand positions where a sudden slip could cause a hand t...

Page 4: ...KE A JOINTING OR PLANING CUT DEEPER THAN 1 8 INCH 4 ALWAYS USE HOLD DOWN PUSH BLOCKS FOR JOINTING MATERIAL NARROWER THAN 3 INCP_ES OR PLANING MATERIAL THINNER THAN 3 INCHES WEAR YOUR The operation of any power tool can result in foreign objects being thrown into the eyes which can result in severe eye damage Always wear safety gogg les complying with ANSI Z87 1 shown on Package before commencing p...

Page 5: ...wer tool is of the two prong type DO NOT REMOVE OR ALTER THE GROUNDING PRONG tN ANY MANNER Use an adapter as shown and always connect the g rounding lug to known ground It is recommended that you have a qualified electrician replace the TWO prong outlet with a property grounded THREE prong outlet A temporary adapter as shown betow is available for connecting plugs to 2 prong receptacles The green ...

Page 6: ...wax to the table Wipe all parts thoroughly with a clean dry cloth WARNING FOR YOUR OWN SAFETY NEVER CONNECT PLUG TO POWER SOURCE OUTLET UNTIL ALL ASSEMBLY STEPS ARE COMPLETE AND YOU HAVE READAND UNDERSTAND THESAFETY AND OPERA T ONAL INSTRUCTION S B V Bett_ 1 2 x 52 1 C 5 32 Setscrew Wrench 1 D 1 8 Setscrew Wrench 1 E Motor Pulley 2 1 2 Dia 1 F Sliding Guard Knob 1 G Concave Plastic Washer 2 H Slid...

Page 7: ...20 x 5 8 40 Lockwashers 1 4 External 40 Hex Nuts 4 20 8 Hex Nuts t 2 13 4 Leveling Feet 1 Assemble two 2 Side Stiffeners together Using four 4 1 4 20 Truss head screws tockwasher and nuts Make two 2 Side Stiffener assemblies I The End Stiffeners are placed on top and at each end of Side Stiffener assemblies as shown Align holes letter coded B see page 8 in Side Stiffeners and _ End Stiffeners and ...

Page 8: ...flat washer a tock washer and a nut on each screw from underneath the stand and tighten 5 Place handwheet on shaft aligning flat surfaces on shaft with flat surfaces on handwheel attach with 1 1 4 in screw _1_ JOINTER PLANER HEX HEAD SCREW 1 HEXNOTff _ Jl FENCE LOCK KNOB 4Carriage Bolts 5 16 18 x 3 4 3 Hex Head Screws 5 16 18 x 2 _ 4 _0 TRUSS HEAD SCREW SIDE STIFFENER MOTOR SUPPORT AT THIS END 11 ...

Page 9: ...bolts through holes in motor base and then through holes marked X in motor mounting bracket DO NOT TIGHTEN BOLTS AT THiS TIME The L bracket which holds the guard support must be slid between the motor base and the motor mounting CARRIAGE BOLT 5 16 18 x 3 4 MOTOR ti VtEW FROM BACK OF JOINTER BOLTS GO THRU HOLES MARKED X bracket somotor rn u st be loosely assembled to bracket at this time iii IH i i...

Page 10: ... i INSTALLING SLIDING GUARD OPEN END i i PARTS NEEDED 1 Sliding Guard 1 Sliding Guard Knob I Sliding Guard Rod 2 Sliding Guard Washers one side of washer is concave 2 Hex Hd Screws 1 4 20x 1 2 PULLEYS AND V B ELT j_MUST BE STRAIGHT IN LINE _AT 90 WITH RELATIONSHIP C_____ TO THE FLOOR t V BELT GUARDS REMOVED FOR PICTURE CLARITY i t STRAIGHT LNE _ UP DOWN 90 iJ _ ill 2 Hex Nuts 1 4 20 1 Hex Nut 1 2 ...

Page 11: ...LI H i i getting to know your jointer planer WARNING FOR YOUR OWN SAFETYTURN SWITCH OFF AND REMOVE PLUG FROM POWER SOURCE OUTLET BEFORE MAKING ANY ADJUSTMENTS FENCE TILT SCALE BEHIND FENCE FENCE LOCK KNOB FENCE OUTFEE TABLE 2 SLIDING GUARD F KNOB BACK OF JOINTER INFEED TABLE SLIDE BRACKET FRONT OF JOINTER 4 CUTTER GUARD 6 ON OFF DEPTH OF CUT SWITCH 1 HANDWHEEL 1NFEED DEPTH OF CUT 41 TABLE DEPTH OF...

Page 12: ...ob and sliding lock knob and pull the stop out Tilt to desired angle and tighten both knobs d To set fence at g0 to tables loosen the two knobs tilt fence so the stop springs back into place Tilt fence back so the stop rests on the table and tighten both knobs e 45 Fence Stop positions the fence at 45 to the tables f To tilt fence to 45 loosen the two knobs pull 90 stop out t It fence so the 45 st...

Page 13: ...ToP LOCKSCREW TiLT SCALE gO _ STOP LOCKSCREW SCALE AD3USTING SCREW BRACKET INFEED TABLE CUTTER GUARD AUXILIARY FENCE Some on edge and other jointing operations require a higher and or Ionge rfence than you r tool provides Select a piece of smooth straight wood of the height and length required for proper support and bolt it to the tool fence as shown for these operations 1 4 20 FLAT HEAD SCREW COL...

Page 14: ...le First along one side than along theother C Raise infeed table until it touches straightedge d Sight between tabte and straightedge to determine high or ow condition of end of infeed table ll i l w y PENCIL TABLE _ _ _ J__ it iseasier to adjust the infeed table while the Jointer is setting on your workbench Do not turn the3ointer on its side or upside down to adjust it WARNING Attach a strip of ...

Page 15: ...ARTS IDENTIFICATION Turning the LEVELING STUDS will RAISE or LOWER the infeed table SCREWING in the studs will RAISE the table UNSCREWING them wilt LOWER the table a With a 3 4 in wrench turn leveling studs until infeed table is parallel with straightedge b While holding studs with wrench TIGHTEN all four LOCKSCREWS tighten each screw a little bit at a time until alt four screws are tight c Rechec...

Page 16: ...er and pull end Of switch out NOTE Key is made of vellow plastic i i c To turn machine OFF PUSH lever in Never leave machine unattended until it has come to a complete step d TO lock switch in OFF position hold switch IN with onehand REMOVE key with other hand WARNING FOR YOUR OWN SAFETY ALWAYS LOCK THE SWITCH OFF WHEN MACHINE IS NOT IN USE REMOVE KEY AND KEEP tT IN A SAFE PLACE ALSO IN THE EVENT ...

Page 17: ...both tables and AGAINST the fence keep fingers close together Feed the boa rd at a continuous even rate of speed u ntil the cut is made along the entire length of the board Any hesitation or stopping could cause a step to be cut on the edge of the board which would cause the board to ride up on the outfeed table resulting in a crooked edge on the board i1 1 iiil irl JOINTING WOOD THAT IS WIDER THA...

Page 18: ...ing or slipping on the top face of workpiece when advancing workpiece over cutter head Use a hand over hand motion of the hold down push blocks being careful to maintain control over the workpiece at all times This means that once the workpiece has been fed past cutter head onto outfeed table one hold down push block must always maintain contact of work piece with ouffeed table WARNING If the HOLD...

Page 19: ...IDER THAN 3 INCHES CHAMFER BEVEL BEVELING BOARD NARROWER THAN 3 iNCHES NOTE Rabbeting on a Jointer is considered to be a dangerous operation because it requires removal of the cutter guard and increases the potential of kickback because of excessive depth of cut NEVER ATTEMPTTO PERFORM A RABBETING OPERA TION ON THIS JOINTER DO NOT OPERATE JOtNTER PLANER WITH CUTTERHEAD OR BELT GUARDS REMOVED Rabbe...

Page 20: ...y with one hand gentlypry up each Wedge using a screwdriver remove wedges and blades SMALL SCREWDRIVER 7 Remove the six lifter screws Two under each blade 8 Clean cutterhead weoges and screws thoroughly with Craftsman Gum and Pitch Remover also remove the oil from new blades 9 Replace the six lifter screws and screw them in all the way but do not tighten Mark each slot 1 2 and 3 This witl help you...

Page 21: ...thickness of an average piece of paper NOTE Sears has a knife setting gauge for this purpose Cat 9 2647 HEAD OF SQUARE OUTFEED_ LIFTER SCREW ii lllllr i iN llll ii iii i 13 Now install both locking setscrews and tighten with the 5 32 setscrew wrench alternately a little at atime Tighten both screws securely Recheck the blade to make sure it did not change position 14 Install other two blades the s...

Page 22: ...T EXCESSIVE TENSION ON SPRING WHICH COULD WEAKEN OR BREAK IT Check operation of GUARD and SPRING 1 With fence in MAXIMUM WIDTH OF CUT position pass a piece of 1 4 in thick wood on edge jointing position over cutterhead 2 The guard should return automatically to its REST position against the fence when free of the wood 3 If guard does not return to its REST position remove cotter pin from pivot pin...

Page 23: ...iner should reach above the top of the motor Do not allow pitch to accumulate on the tables the fence the cutter g uard the cutter head or the knives Clean them with Craftsman Gum and Pitch Remover Apply a thin coat of paste type wax to the tables and fence so that the wood slides easily while feeding Do not atlow chips to accumulate on the underside of the jointer planer Frequently biow out any d...

Page 24: ...PLUG FROM POWER SOURCE OUTLET BEFORE TROUBLE SHOOTING YOUR JOINTERPLANER TROUBLE SHOOTING CHART TROUBLE PROBABLE CAUSE REMEDY 1 Defective On Off switch 1 Replace defective parts before using machine again Defective switch cord Defective switch box receptacle 2 Motor protector open only 2 Consult Sears Service Any attempt to repair this motor if your motor is equipped may create a HAZARD unless rep...

Page 25: ... motor due to sawdust accumulating inside of motor 1 Burned switch contacts due to extended hold in periods caused by low line voltage etc 2 Shorted capacitor 3 Loose or broken connections 1 Starting switch not operating 2 Voltage too tow to permit motor to reach operating speed 3 Fuses or circuit breakers do not have sufficient capacity 1 Motor overloaded 2 Fuses or circuit breakers do not have s...

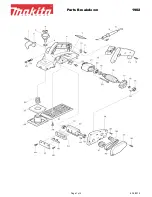
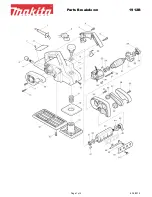
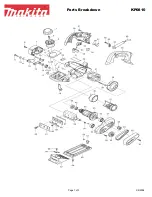
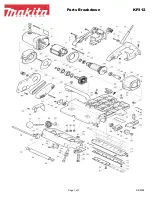
Page 26: ...repair paris 26 Li ...
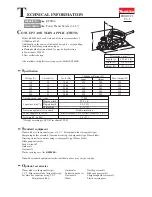
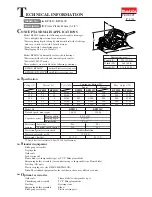
Page 27: ... I_ _z_ m _ Z h n o d 0 o 0 co nt _ _ 0 _ _ _ _ 0 _ _ x O _ l _ O_ Z_ oE _ oxo _r _ 0_ mm0 r nO 00 _ _0 _0 m 0 _ 0 o_ _ o z o_ ____o__ 0 o _ 0 0 r 0 0 o F_ _r_ 0 _o _ _ _ m m _ x _00_ r_ _ 0 _ 0 0 00_ 0 0 0 E c o tG _ oO z Eb5 27 ...

Page 28: ... Hex 1 4 20 67032 Stiffener Side 62614 Leg 62204 Clip Cord 67034 Support Motor STD541250 e Nut Hex Hd 1 2 13 803835 D Foot Leveling 67035 Bag of Loose Parts Not Iltus HARDWARE FOR MOUNTING TOOL AND MOTOR STD532507 e Bolt Carriage 5 16 18 x 3 4 STD551231 e Lockwasher 5 16 External STD551031 s Washer 1 32 x 11 16 x 1 t6 STD523120 t Screw Hex Hd 5 16 16 x 2 e Nut Hex 5116 8 oSupptied in Loose Parts B...

Page 29: ...n Hd 10 32 x 7 8 Lockwasher No 10 Washer No 10 Spring Guard Plate Support Bushing Screw Cap 1 4 20 x 2 Hex Hd Washer Plain 17 64 Plate Tension Key Part No No 13 21422 14 21219 15 21218 16 STD551131 17 i21635 18 STD523112 19 20 21 22 23 STD551031 21204 STD54 025 STD551125 STD5225t0 Description Spacer Dovetail Dovetail Male Dovetail Female Lockwasher 5 16 Screw Spl Screw Cap 5 16 18 x t_1 4 Hex Hd W...

Page 30: ...tted Body Fence Key Part No No 10 STD551210 11 STD511102 12 67009 13 STD533725 14 21738 15 STD551037 16 47624 17 62331 Description Lockwasher Ext 10 Screw Mach No 10 32 x t 4 Pn Hd Slotted Guard Cutter Bolt Carriage 3 8 t6 x 2 1 2 Round Head Retainer Bolt Washer 13 32 x 13 16 x 16 Spacer Knob Assembly Lock Standard Hardware Item May BePurchased Locally FIGURE 5 ON OFF POWER OUTLET 60381 FIGURE 5 6...

Page 31: ...he GREEN wire of power cord with Iockwasher between terminal and motor frame See llus_ 3 Reinsert GREEN SCREW in the threaded hole Tighten securely 4 Insert terminal end of WHITE wire on spade terminal marked T4 on the motor Push terminal firmly until seated 5 Insert terminal end of BLACK wire on spade termina_ marked T1 on the motor Push terminal firmly until seated 6 Close motor connector box be...

Page 32: ...it The model number of your 6 1 8 inch jointer planer wil be found on a plate attached to your base WHEN ORDERING REPAIR PARTS ALWAYS GIVE THE FOLLOWING INFORMATION PART NUMBER PART DESCRIPTION MODEL NUMBER NAME OF ITEM 113 206933 6 1 8 INCH JOtNTER PLANER All parts listed may be ordered from any Sears Service Center and most Sears stores If the parts you need are not stocked locally your order wi...

Reviews: