background image

Summary of Contents for 113.170250

Page 1: ...he side of the detachable blower You should record both model and serial numbers in a safe place for future use FOR YOUR SAFETY READ ALL INSTRUCTIONS CAREFULLY _ J CRRFTSMRN 16 GALLON WET DRY VAC WITH DETACHABLE BLOWER assembly operating repair parts k j Sears Roebuck and Co Hoffman Estates IL 60179 U S A Part No SP6464 Printed in U S A ...

Page 2: ...y Read and understand this owner s manual and all labels on the Wet Dry Vac before operating Use only as described in this man ual To reduce the risk of personal injury or damage to Wet Dry Vac use only Sears Craftsman recommended accessories Sparks inside the motor can ignite flam mable vapors or dust To reduce the risk of fire or explosion Do not vacuum or use this Wet Dry Vac near flammable or ...

Page 3: ...es electric shock could occur Direct air discharge only at work area Do not direct air at bystanders Keep children away when blowing Do not use blower for any job except blowing dirt and debris Observe the following warnings that appear on the motor housing of your Wet Dry Vac _ OUBLE INSULATED GROUNDING NOTREQUIRED WHEN SERVICING USE ONLY IDENTICALREPLACEMENTPARTS WARNING To reduce the risk of el...

Page 4: ... 5 Operation 9 Maintenance 13 Repair Parts 16 Unpacking and Checking Carton Contents m Remove entire contents of carton Check each item against the Carton Contents List Some units may include accessories not shown Notify your Sears Store immedi ately if any parts are damaged or missing Carton Contents List Key Description Qty A 16 Gallon Wet Dry Vac 1 B Hose 1 C Blower Adapter 1 D Diffuser 1 E Blo...

Page 5: ...e tab lock located at the rear of the caddy will latch into the recessed area at the rear of the vac drum Accessory Dove Caddy Tail z _ _ Drain Cap to a To Install the WheelslCasters 1 Locate the two 5 1 4 wheel assemblies and the single wheel casters 2 Insert the single wheel casters into the bottom of the accessory caddy as shown 2 places 3 Push on the caster until the end of the caster stem is ...

Page 6: ...towards lid laying face down over the hole See illustration WARNING To reduce the risk of personal injury or damage to vac be sure to keep hands fingers or any other foreign objects out of the cen ter opening when assembling the float 4 Line up the filter cage tabs as shown with the slots in the center ring of the lid assembly Push on the filter cage until the tabs snap into the slots for a secure...

Page 7: ...plate filter cage or the filter NOTE Your filter has a red stripe that matches an in store disptayer When you visit your local Sears store just remember the color of your stripe for the correct size filter Vac Assembly 1 Locate the lid assembly and the drum caddy assemblies assembled earlier 2 Position the lid assembly with the inlet of the unit located in line with the drain cap and the drum labe...

Page 8: ...until the travel of the unit stops 4 Lightly press down on the carry handle of the detachable blower until the power head latch engages the blower The detachable blower is now latched to the lid assembly Power Head Latch Your new wet dry vac is ready for use With the wet dry vac completely assem bled and ready for use insert the push but ton end of the hose assembly into the inlet of the vac The h...

Page 9: ... reverse the plug If it still does not fit contact a quali fied electrician to install the proper outlet Do not change the plug in any way NOTE When using the unit in the vacu uming mode always insert the air diffuser in the exhaust port on the detachable blower This breaks up the direct flow of air and diffuses it Vacuuming Dry Materials 1 The filter must be in correct position at all times to re...

Page 10: ...t and rear of the dust drum and lift the lid assembly up and off the dust drum and set to the side NOTE Do not pick up the lid assembly by lifting on the handle to the detach able blower Lift the lid assembly by the latches This will ensure that the detachable blower and the lid will not separate during removal of the lid assembly 2 Lay the lid assembly upside down on a clean dry area while emptyi...

Page 11: ...orage areas at the front of the storage caddy Conveniently store accessory nozzles and extension wands on the rear of the caddy and use the front storage for hose storage and or male to male and air diffuser storage Cord Wrap When vacuuming is complete unplug the cord and wrap it around the lid assembly in the area provided between the inlet and the raised letter area marked Cord Wrap Cord Wrap Ar...

Page 12: ... them clear of blowing debris 1 Familiarize yourself with the detachable blower portion of your wet dry vac 2 Remove the detachable blower of your vac by pressing down on the latch under the handle of the detachable blower This latch holds the detachable blower to the lid assembly 3 Lift the detachable blower up by raising the handle upward and pulling the unit away from the nested position of the...

Page 13: ... Check to see if the intake to the blower has debris stuck to the plastic vents and foam pad To clean the foam pad under the intake shield of the detachable blower 1 Remove the three screws holding the intake shield 2 Lift the intake shield off and set aside 3 Lift the foam pad away from the detached blower the foam pad holder will also lift away from the blower 4 Remove the foam pad from the foam...

Page 14: ...st clean the outside with a cloth dampened with warm water and mild soap To clean the drum 1 Dump debris out 2 Wash drum thoroughly Dry Filter 1 Some removal of dry debris can be accomplished without removing the filter from the vac by slapping your hand on top of the lid while the vac is turned off 2 For best results of cleaning due to accumulated dust clean the filter in an open area Cleaning SH...

Page 15: ...d inlet opening is facing away from you Make sure the squeegee stays on the insert pins 3 Press down with each thumb below the latching tabs until you see and hear the Nozzle ody removable insert snap into the nozzle body Snap the latches over the locking tabs into their original position 2 Using both hands position each thumb on the removable insert below the latches and two fingers of each hand ...

Page 16: ...12 13 14 15 16 17 18 19 2O 509238 9 17816 9 16937 9 16938 826286 73185 822479 826285 73102 826387 826386 822442 1 826388 820563 7 826383 826411 826389 822467 10 826382 823871 Cage Filter Float 1 Filter Red Stripe 1 Filter Plate 1 Filter Nut Drum Drain Cap Wheel Accessory Caddy Caster Drum Latch Lid Gasket Lid Power Head Latch Screw Pan Hd Ty AB 10 x 3 4 Intake Shield Foam Pad Foam Pad Holder Cord ...

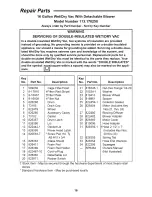
Page 17: ...Repair Parts 32 34 17 ...

Page 18: ...Power and Hand Tool Catalog 17820 2 1 2 x7 Hose 16964 Extension Wands 16922 Utility Nozzle 16978 Car Nozzle 16991 Noise Muffler 17817 Wet Nozzle 16925 Dry Nozzle 16933 Blower Nozzle 16902 Crevice Tool 16915 Multipurpose 16926 14 Floor 16901 Dusting Floor Tool Brush Brush 16947 16948 17816 Paper Pleated 17916 High Efficiency Inflator Nozzle Filter Filter NOTE Most Accessories Are Available In 2 1 2...

Page 19: ...6917 Hose 16930 Hose Lock Connector 16935 Gutter Nozzle Sawdust Collection Series Whole shop Sawdust Manifold Type Collection System 29964 Radial Arm Saw Dust Collection Kit 29963 Table Saw Dust Collection Kit 29962 19 ...

Page 20: ... of a Sears Parts and Repair Center in your area Call 24 hours a day 7 days a week 1 800 488 1222 For information on purchasing a Sears Maintenance Agreement or to inquire about an existing Agreement Call 9 am 5 pm Monday Saturday 1 800 827 6655 SWARS The model and serial numbers will be found on the handle When requesting service or ordering parts always provide the following information Product ...

Reviews: