background image

MT10 Installation Guide - Temperature and Humidity

Overview

The Cisco Meraki MT10 is a cloud-managed temperature and humidity sensor that is exceptionally simple to configure and deploy due to its integration with the
Meraki dashboard and the use of Bluetooth Low Energy technology. The MT family eliminates the complex and costly setup required by traditional solutions by
removing the limitations of placement of these sensors.

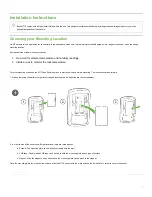
Pre-Installation Preparation

You should complete the following steps before going on-site to perform an installation:

Configure Your Network in the Dashboard

The following is a brief overview of the steps required to add an MT10 to your network. For detailed instructions about creating, configuring, and managing
Meraki sensor networks, refer to the

MT-Sensors

online documentation.

1. Log in to

http://dashboard.meraki.com

. If this is your first time, create a new account.

2. Find the network to which you plan to add your sensor, or create a new network.

3. Add the sensors to your network. You will need your Meraki order number (found on your invoice) or the serial

number of each sensor, which looks like Qxxx-xxxx-xxxx, and can be found on the back of the unit or included in
the box.

4. Add the gateway (MV or MR) to the

same network

as the sensor.

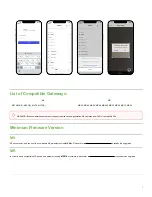
Quickly Scan and Claim Multiple Devices through the Meraki Mobile App

If you have to claim multiple devices, the quickest way is by scanning their barcode using the Meraki app.

1. Log in to your Meraki

iOS

or

Android

app with your Meraki dashboard account.

Create a new account

if you do not

have one.

2. Navigate to the correct

network

through left-side bar.

3. Go to the

Devices

tab from the bottom navigation bar.

4. Select the

+

icon on the top right of the screen and pick

Scan new device barcode

.

5. Point your phone camera toward the hardware barcode to claim the device.

6. Enter device information and then select

Done

. Press

Add another

to claim a new device.

NOTE: Make sure the gateway is in the same network and is online and operational.
Click here for

MV setup instructions

and

MR setup instructions

.

1

Summary of Contents for Meraki MT10

Page 1: ... to add your sensor or create a new network 3 Add the sensors to your network You will need your Meraki order number found on your invoice or the serial number of each sensor which looks like Qxxx xxxx xxxx and can be found on the back of the unit or included in the box 4 Add the gateway MV or MR to the same network as the sensor Quickly Scan and Claim Multiple Devices through the Meraki Mobile Ap...

Page 2: ... to a compatible MV gateway running MV 4 8 Please refer to Managing Firmware Upgrades to schedule an upgrade MR In order to use a compatible MR device as a gateway running MR27 6 firmware please refer to Managing Firmware Upgrades to schedule an upgrade WARNING Environmental sensors are only supported with second generation MV cameras and Wi Fi 6 compatible APs 2 ...

Page 3: ... battery compartment cap and inserting two AA batteries into the compartment 2 In order to mount the sensor on different locations there are three options a Screws The mounting plate can be directly screwed onto the wall b VHB tape Double sided VHB tape can be used to stick the mounting plate on any type of surface c Magnet Stick the magnet on any surface and the mounting plate can be stuck to the...

Page 4: ...amber for three seconds MT could not find a gateway to connect The RSSI value will still be reported on the dashboard All connections 85dBm will be rejected Please relocate the sensor closer to the gateway for better connection quality Product Overview Physical Specifications Dimensions 117 1x65 7x23 3mm LxWxH Power 2xAA alkaline battery Permanent DC power 5V 0 1A USB C sold separately When the se...

Page 5: ...ds connected to a gateway Solid amber for three seconds MT could not find a gateway to connect Flashing green MT is upgrading its firmware Flashing amber MT is running on a low battery General Purpose Button The MT10 has a general purpose button on the top which allows you to wake up the sensor and test if it is able to connect to a gateway This will also upload the latest sensor data to the gatew...

Page 6: ... deleting all configuration information stored on the unit USB C Port The MT10 sensors have a USB C port on the bottom that can be used to provide an alternate source of power using a compatible accessory Package Contents Unit MT10 HW Guides Quick Installation Guide Battery 2xAA batteries Mounting equipment Wall mount backplate 2x Torx mounting screws Torx driver not included 1x Torx security scre...

Page 7: ...with device installation or if additional help is required contact Meraki Support by logging in and opening a case via the Get Help section For additional information on Meraki hardware and for other installation guides please refer to documentation meraki com 7 ...

Reviews: