background image

Americas Headquarters:
Cisco Systems, Inc., 170 West Tasman Drive, San Jose, CA 95134-1706 USA

Network Analysis Module Memory Upgrade 
Installation Note

Product number: MEM-C6KNAM-2GB=

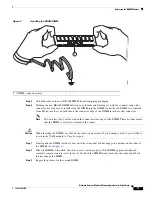
This publication describes how to upgrade the dynamic random-access memory (DRAM) dual inline 
memory module (DIMM) on the Network Analysis Module (NAM-1 and NAM-2), product numbers 
WS-SVC-NAM-1 and WS-SVC-NAM-2.

Note

The memory upgrade is intended for the NAM-1 module (product number WS-SVC-NAM-1) and the 
NAM-2 module (product number WS-SVC-NAM-2) only. The memory upgrade is not intended to be 
used on product numbers WS-SVC-NAM-1-250S or WS-SVC-NAM-2-250S. Both modules are shipped 
from the factory with upgraded memory.

Contents 

This publication consists of these sections:

Safety Overview, page 2

Required Tools, page 6

Upgrading the NAM Software, page 6

Removing the NAM, page 7

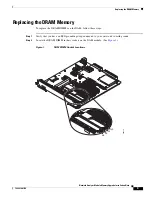
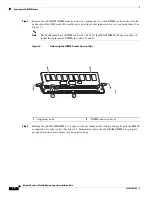
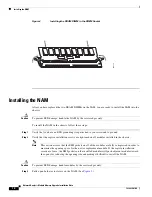
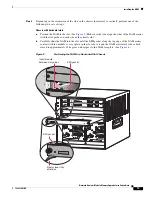
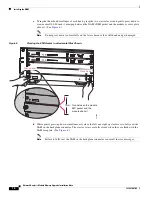
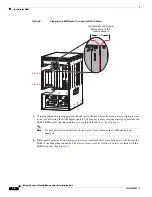
Replacing the DRAM Memory, page 9

Installing the NAM, page 12

Checking NAM Memory, page 18

Obtaining Documentation and Submitting a Service Request, page 18

Summary of Contents for MEM-C6KNAM-2GB

Page 1: ...upgrade is intended for the NAM 1 module product number WS SVC NAM 1 and the NAM 2 module product number WS SVC NAM 2 only The memory upgrade is not intended to be used on product numbers WS SVC NAM 1 250S or WS SVC NAM 2 250S Both modules are shipped from the factory with upgraded memory Contents This publication consists of these sections Safety Overview page 2 Required Tools page 6 Upgrading th...

Page 2: ...roorzaken Voordat u aan enige apparatuur gaat werken dient u zich bewust te zijn van de bij elektrische schakelingen betrokken risico s en dient u op de hoogte te zijn van de standaard praktijken om ongelukken te voorkomen Voor een vertaling van de waarschuwingen die in deze publicatie verschijnen dient u de vertaalde veiligheidswaarschuwingen te raadplegen die bij dit apparaat worden geleverd Opm...

Page 3: ...auch in Verbindung mit dem Installationshandbuch für Ihr Gerät bestimmt das dem Gerät beiliegt Entnehmen Sie bitte alle weiteren Informationen dem Handbuch Installations oder Konfigurationshandbuch o Ä für Ihr spezifisches Gerät Figyelem FONTOS BIZTONSÁGI ELÕÍRÁSOK Ez a figyelmezetõ jel veszélyre utal Sérülésveszélyt rejtõ helyzetben van Mielõtt bármely berendezésen munkát végezte legyen figyelemm...

Page 4: ...o destina se a ser utilizada em conjunto com o manual de instalação incluído com o produto específico Consulte o manual de instalação o manual de configuração ou outra documentação adicional inclusa para obter mais informações Advertencia INSTRUCCIONES IMPORTANTES DE SEGURIDAD Este símbolo de aviso indica peligro Existe riesgo para su integridad física Antes de manipular cualquier equipo considere...

Page 5: ...5 Network Analysis Module Memory Upgrade Installation Note 78 18630 01B0 Safety Overview ...

Page 6: ...covers and rear covers are in place Statement 1029 Warning Hazardous voltage or energy is present on the backplane when the system is operating Use caution when servicing Statement 1034 Warning Only trained and qualified personnel should be allowed to install replace or service this equipment Statement 1030 Upgrading the NAM Software Before you upgrade the NAM memory you must first upgrade the NAM...

Page 7: ...d shutdown command When this command is used you will have to enter the hw mod module mod reset command in order to restart the NAM Note When the switch is rebooted the NAM will reboot If the NAM does not respond to any commands from the NAM prompt or the supervisor engine use a small pointed object to access the recessed SHUTDOWN button located on the NAM faceplate If you are using Catalyst OS so...

Page 8: ...stalled modules will push the modules toward the open slot reducing the opening size and making it difficult to install the NAM Step 4 Loosen the two captive installation screws on the NAM Step 5 Depending on the orientation of the slots in the chassis horizontal or vertical perform one of the following sets of steps Horizontal slots a Place your thumbs on the left and right ejector levers and sim...

Page 9: ...lacing the DRAM Memory To replace the DRAM DIMMs on the NAM follow these steps Step 1 Verify that you have an ESD grounding strap connected to your wrist and to earth ground Step 2 Locate the DRAM DIMM in their sockets on the NAM module See Figure 1 Figure 1 NAM DIMM Socket Locations J3 J4 J5 J6 188115 ...

Page 10: ... See Figure 2 Note The NAM module uses DIMM sockets J3 and J5 for the DRAM DIMMs Make sure that you install the replacement DIMMs in sockets J3 and J5 Figure 2 Releasing the DIMM Socket Spring Clips Step 4 Holding the old DRAM DIMM by its edges with your thumb and forefinger and gently pull the DIMM completely out of the socket See Figure 3 Immediately place the old DRAM DIMM on a properly grounde...

Page 11: ...s are located on the connector trace edge of the DIMM These notches ensure that the DIMM is correctly oriented in the socket Caution When inserting the DIMM use firm but not excessive pressure If you damage a socket you will have to return the NAM module to Cisco for repair Step 7 Gently push the DIMM into the socket until the two socket latches engage the notches on the sides of the DIMM See Figu...

Page 12: ...attached to your wrist and to ground Step 2 Verify that the captive installation screws are tightened on all modules installed in the chassis Note This action assures that the EMI gaskets on all of the modules are fully compressed in order to maximize the opening space for the new or replacement module If the captive installation screws are loose the EMI gaskets on the installed modules will push ...

Page 13: ... it and the NAM ejector levers have both closed to approximately 45 degrees with respect to the NAM faceplate See Figure 6 Figure 5 Positioning the NAM in a Horizontal Slot Chassis 187447 INPUT OK FAN OK OUTPUT FAIL o INPUT OK FAN OK OUTPUT FAIL o 1 2 3 FAN STATUS 4 5 6 SUPERVISOR2 WS X6K SUP2 2GE ST AT US SY ST EM CO NS OL E PW R M GM T RE SE T CONSOLE CONSOLE PORT MODE PCMCIA EJECT PORT 1 PORT 2...

Page 14: ...eat the NAM in the backplane connector The ejector levers are fully closed when they are flush with the NAM faceplate See Figure 6 Note Failure to fully seat the NAM in the backplane connector can result in error messages 1 2 3 FAN STATUS 4 5 6 SUPERVISOR2 WS X6K SUP2 2GE STA TUS SYSTEM CO NSO LE PW R M G M T RESET CONSOLE CONSOLE PORT MODE PCMCIA EJECT PORT 1 PORT 2 Switch Load 100 1 LI NK LI NK ...

Page 15: ...the top and bottom of the chassis slot b Carefully slide the NAM into the slot until the EMI gasket along the right edge of the NAM makes contact with the module or cover plate in the slot adjacent to it and the NAM ejector levers have both closed to approximately 45 degrees with respect to the module faceplate See Figure 8 Figure 7 Positioning the NAM in a Vertical Slot Chassis INPUT OK FAN OK OU...

Page 16: ... on the ejector levers simultaneously close both levers to fully seat the NAM in the backplane connector The ejector levers are fully closed when they are flush with the NAM faceplate See Figure 9 INPUT OK FAN OK OUTPUT FAIL o INPUT OK FAN OK OUTPUT FAIL o FAN STATUS SUPERVISOR2 WS X6K SUP2 2GE STA TUS SYS TEM CO NS OLE PW R MG MT RE SET CONSOLE CONSOLE PORT MODE PCMCIA EJECT PORT 1 PORT 2 Switch ...

Page 17: ...the NAM root account and configure the NAM parameters before you can use the NAM for network analysis Refer to the Catalyst 6500 Series Network Analysis Module Installation and Configuration Note for parameter configuration information FAN STATUS SUPERVISOR2 WS X6K SUP2 2GE ST AT US SY ST EM CO NS O LE PW R M G M T RE SE T CONSOLE CONSOLE PORT MODE PCMCIA EJECT PORT 1 PORT 2 Switch Load 100 1 SUPE...

Page 18: ...er Card Micro code version 1 34 1 28 NAM PID WS SVC NAM 2 Memory size 2048MB Disk size 40GB Installed patches No patches are installed on this system root nam_machine cisco com The amount of installed memory should show approximately 2048 MB after you complete the memory upgrade Note The amount of installed memory that is displayed can vary slightly Obtaining Documentation and Submitting a Service...

Page 19: ...19 Network Analysis Module Memory Upgrade Installation Note 78 18630 01B0 Obtaining Documentation and Submitting a Service Request ...

Page 20: ...out Limitation EtherFast EtherSwitch Event Center Fast Step Follow Me Browsing FormShare GigaDrive HomeLink Internet Quotient IOS iPhone iQ Expertise the iQ logo iQ Net Readiness Scorecard iQuick Study IronPort the IronPort logo LightStream Linksys MediaTone MeetingPlace MeetingPlace Chime Sound MGX Networkers Networking Academy Network Registrar PCNow PIX PowerPanels ProConnect ScriptShare Sender...

Reviews: