Cisco 575 LRE CPE, Installation Manual
The Cisco 575 LRE CPE is a high-performance device designed for seamless connectivity and network expansion. Ensure a hassle-free installation process by accessing our comprehensive Installation Manual, available for free download at manualshive.com. Get the most out of your Cisco 575 LRE CPE with our user-friendly manual.
Share
Download


Reviews:
No comments
Related manuals for 575 LRE CPE

8820
Brand: Paradyne Pages: 86

2888
Brand: Patton electronics Pages: 8

7610
Brand: Paradyne Pages: 2

COMSPHERE 6800 Series
Brand: Paradyne Pages: 44

COMSPHERE 6800 Series
Brand: Paradyne Pages: 155

COMSPHERE 6800 Series
Brand: Paradyne Pages: 7

ipRocketLink 3086FR
Brand: Patton electronics Pages: 6

VIP-814
Brand: Valcom Pages: 4

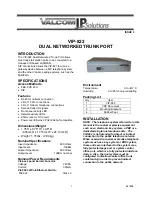
VIP-822
Brand: Valcom Pages: 3

NCA-1526
Brand: Lanner Pages: 78

TERMBOX-1200
Brand: Vaisala Pages: 32
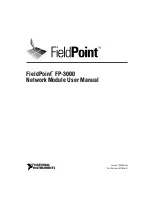
FieldPoint FP-3000
Brand: National Instruments Pages: 118

RNN5
Brand: QUNDIS Pages: 42

ipRocketLink 3086FR
Brand: Patton electronics Pages: 12
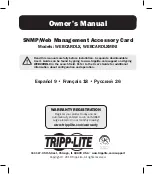
WEBCARDLX
Brand: Tripp Lite Pages: 34

SHD1110
Brand: ZyXEL Communications Pages: 12

ETHX-2214-DS3
Brand: Zhone Pages: 28
VIP-822
Brand: Valcom Pages: 4


