background image

Operation Manual

Embroidery Machine

Product Code:882-T51

Be sure to read this document before using the machine.
We recommend that you keep this document nearby for future reference.

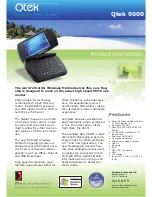
Summary of Contents for 882-T51

Page 1: ...Operation Manual Embroidery Machine Product Code 882 T51 Be sure to read this document before using the machine We recommend that you keep this document nearby for future reference ...

Page 2: ......

Page 3: ...nected to an AC power source within the range indicated on the rating label Do not connect it to a DC power source or inverter If you are not sure what kind of power source you have contact a qualified electrician This machine is approved for use in the country of purchase only 4Never operate this machine if it has a damaged cord or plug if it is not working properly if it has been dropped or dama...

Page 4: ...se injuries may result Switch the machine to the symbol O position to turn it off when making any adjustments in the needle area such as changing the needle Do not use a damaged or incorrect needle plate as it could cause the needle to break 7This machine is not a toy Your close attention is necessary when the machine is used by or near children This machine is not intended for use by young childr...

Page 5: ...nded for use by persons including children with reduced physical sensory or mental capabilities or lack of experience and knowledge unless they have been given supervision or instruction concerning use of the appliance by a person responsible for their safety Children should be supervised to ensure that they do not play with the appliance FOR USERS IN EUROPEAN COUNTRIES This appliance can be used ...

Page 6: ...s uses and can radiate radio frequency energy and if not installed and used in accordance with the instructions may cause harmful interference to radio communications However there is no guarantee that interference will not occur in a particular installation If this equipment does cause harmful interference to radio or television reception which can be determined by turning the equipment off and o...

Page 7: ... indirect incidental special exemplary or consequential damages including but not limited to procurement of substitute goods or services loss of use data or profits or business interruption however caused and on any theory of liability whether in contract strict liability or tort including negligence or otherwise arising in any way out of the use of this software even if advised of the possibility...

Page 8: ... The following warning labels are on the machine Be sure to observe the precautions described in the labels 1 2 Warning Labels Label locations Please put a drop of oil onto the hook once a day before use ...

Page 9: ...r by using the thread color sorting function the thread color order will be rearranged to embroider the same color at one time allowing you to embroider while replacing the thread spool a minimal number of times The thread color sorting function cannot be used with overlapping patterns Insert line feeds in character patterns While entering character embroidery patterns touch the line feed key to a...

Page 10: ...e can easily be threaded Available embroidery area Designs with a maximum size of 200 mm H 200 mm W 7 7 8 inches H 7 7 8 inches W can be embroidered When the optional sized frames are used you may select from many additional styles and sizes of embroidery projects Various built in patterns In addition to the many built in character patterns embroidery patterns and frame patterns using optional emb...

Page 11: ... the machines operation keys Details on changing the basic embroidery machine settings and viewing operations on the LCD will be provided Chapter 7 Appendix This chapter provides descriptions of techniques for various embroidering operations pointers for creating beautiful embroidery and details on maintenance procedures and corrective measures that should be taken when a problem occurs Searching ...

Page 12: ...broidering 54 Starting embroidering 54 Stopping embroidering 55 12 Checking the Thread Tension 57 13 Removing the Embroidery Frame and Fabric 58 Removing the embroidery frame 58 Removing the fabric 58 14 Turning OFF the Machine 59 Screen Quick Reference Guide 60 Key displays 60 Understanding the pattern type selection screen 61 Understanding the pattern list screen 62 Understanding the pattern edi...

Page 13: ...reen 142 Saving a settings screen image to USB media 144 Changing the display guides 144 Changing the thread color information 145 Changing the units of measurements 146 Changing the embroidery basting distance 146 Changing the background colors of the embroidery patterns or thumbnails 146 Specifying the thumbnail size 147 Specifying thread sensor 147 Changing the speaker volume 147 Selecting the ...

Page 14: ...12 ...

Page 15: ...rations required before starting to embroider are described in this chapter Names of Machine Parts and Their Functions 14 Front view 14 Right side rear view 15 Operation panel 15 Accessories 16 Included accessories 16 Optional accessories 17 Setting Up the Machine 18 Setup and transporting precautions 18 Setup location 19 Setting up the machine 20 Preparing the thread guide assembly 21 Attaching t...

Page 16: ...read guide Pass the thread through when threading the machine p 48 0 Bobbin winder seat Set the bobbin when bobbin winding p 34 A Bobbin winding switch Set to the left to start bobbin winding p 34 B Upper thread guide pretension knob Adjust the tension of the thread p 57 C Thread tension knob Adjust the tension of the thread p 57 D Upper thread guide Pass the thread through when threading the mach...

Page 17: ...dwheel toward the operation panel counterclockwise 8 Air vent The air vent allows the air surrounding the motor to circulate Do not cover the air vent while the embroidery machine is being used Operation panel 1 Start Stop button Press the Start Stop button to start or stop the machine The lighting status and color of the button changes depending on the operation condition of the machine 2 Needle ...

Page 18: ... 051 21 Weight L XC5974 151 22 Weight S XC6631 051 23 USB cable XD1851 051 24 Embroidery frame extra large 200 mm H 200 mm W 7 7 8 inches H 7 7 8 inches W PRSTH200 Americas VRTF200 XG3182 001 Other area 25 Embroidery frame medium 100 mm H 100 mm W 4 inches H 4 inches W PRH100 Americas PRH100 XC6286 052 Other area 26 Compact frame 70 41 mm H 70 mm W 1 5 8 inches H 2 3 4 inches W PRSH70 Americas VRS...

Page 19: ... 8 inches H 7 1 8 inches W PRH180 Americas PRH180 XC6285 052 Other area 8 Embroidery frame small 40 mm H 60 mm W 1 1 2 inches H 2 3 8 inches W PRH60 Americas PRH60 XC6287 052 Other area 9 Embroidery card reader SAECR1 10 Embroidery card 11 Wide table PRSWT1 Americas VRWT1 XG3193 001 Other area 12 Border frame set 100 mm H 180 mm W 4 inches H 7 inches W Embroidery frame holder b PRSBH1 Americas VRB...

Page 20: ...ne is level The machine weight is approximately 31 kg 68 lb The transporting or setting up of the embroidery machine should be performed by two people When transporting the machine be sure to lift it from the bottom at the indicated positions by two people Lifting the machine from any other area may damage the machine or result in the machine falling which could cause injuries When lightning occur...

Page 21: ...an 50 mm 2 inches 587 mm 23 7 64 inches More than 350 mm 13 3 4 inches More than 150 mm 5 29 32 inches 511 mm 20 15 128 inches More than 150 mm 5 29 32 inches CAUTION In order to prevent malfunctions or damage do not set up the machine in a location exposed to the following conditions Liquids such as water Extreme dust Direct sunlight Blocked ventilation slots Insufficient space An unstable surfac...

Page 22: ...Use the included wrench to turn the adjustable foot nut on the foot Turning the nut in direction 1 lengthens the leg turning the nut in direction 2 shortens the leg 1 Adjustable foot nut Adjust all four legs so that they securely contact the desk or table e After adjusting the legs to the desired length use the included wrench to tighten the nuts 1 Lock nut f Press down on each corner of the embro...

Page 23: ...ery frame holder to the carriage a Use the embroidery frame holder appropriate for the embroidery frame that you are using Refer to Embroidery frame types and applications on page 74 b Remove the two thumb screws of the embroidery frame holder 1 Thumb screws 2 Corner covers c Align the holes in the embroidery frame holder with the pins on the frame mounting plate of the carriage 1 Pins on the fram...

Page 24: ...4 b Remove the two thumb screws of the embroidery frame holder 1 Thumb screws c Insert the pins on the frame mounting plate of the carriage into the holes on both sides of the mounting plate of embroidery frame holder e 1 Pins on the frame mounting plate of the carriage 2 Holes in the mounting plate of embroidery frame holder e d Install and tighten the two thumb screws removed in step b Note Usin...

Page 25: ...Attaching the Embroidery Frame to the Machine 44 Attaching the embroidery frame 44 9 Checking the Embroidery Area 46 10 Upper Threading 47 Changing the display of thread information 47 Upper threading 48 Threading the needle 51 Using the spool net 53 Easily changing the thread spools 53 11 Starting Embroidering 54 Locking mechanism 54 Starting embroidering 54 Continuing embroidering 55 Stopping em...

Page 26: ... a fire or an electric shock may result Do not plug in or unplug the power supply cord with wet hands otherwise an electric shock may result When unplugging the power supply cord be sure to first turn off the machine and then grasp the plug when unplugging the cord Pulling on the cord may damage it or result in a fire or an electric shock Do not allow the power supply cord to be cut damaged modifi...

Page 27: ...edle is broken replace the needle with a new one Refer to Changing the Needle on page 72 CAUTION Your machine is designed to use household embroidery needles The factory recommended needle is HAX 130 EBBR Organ Schmetz needles 130 705 H E may be used as a substitute Use of any other needles may break the needle or thread or damage the needle threading mechanism or result in injuries Never use bent...

Page 28: ...orrect Note It is recommended that rayon or polyester embroidery thread be used 120 den 2 135 dtex 2 40 weight in Americas and Europe 50 in Japan Note Your machine can embroider fabric that is up to 1 mm 1 16 inch thick If thicker fabric is sewn the needle may bend or break When embroidering overlapping stitches it is difficult for the needle to penetrate the fabric possibly resulting in the needl...

Page 29: ... provided on pages 24 to 26 These precautions must be strictly observed in order for the machine to function properly Make sure to read these precautions Basic Procedures Step Operation Tutorial Reference Page Operating Procedure Reference Page 1 Turn on the machine p 28 p 24 26 2 Install the bobbin p 32 p 26 3 Select an embroidery pattern p 37 4 Edit the embroidery pattern p 39 5 Specify the embr...

Page 30: ...re on the screen to display the message below e Touch The pattern type selection screen appears and the Start Stop button lights up in red f The carriage moves to its initial position 1 Turning ON the Machine CAUTION Make sure to keep your hands and other items away from the carriage in order to prevent any injuries Memo If the machine is turned off in the middle of embroidering the machine will a...

Page 31: ...onfirming if you want to set time date appears To set the time date press to cancel the setting press The screen to set time date appears 1 Press to display the time on the screen 2 Set the year YYYY month MM and date DD 3 Select whether 24h or 12h setting to display 4 Set the current time d Touch to start using your machine 2 1 3 4 Note The time date you set may be cleared if you don t turn on th...

Page 32: ...ve appear and can be used in most of the screens described later in this manual No Display Key Name Function Reference Page 1 Clock key Touch this key to set the clock to your local time p 29 2 Settings key Touch this key to change the embroidery machine settings p 142 3 Machine operations guide key Touch this key to check a machine operation p 150 4 Home key Touch this key to cancel all operation...

Page 33: ...the pattern editing screen In the pattern editing screen edit the pattern Refer to page 39 63 1 Touch this key to return to the pattern type selection screen and add another pattern 2 Touch this key to continue to the embroidering settings screen In the embroidering screen if it is a combined pattern edit the entire pattern specify the embroidering settings and check the embroidery area And then c...

Page 34: ...y oil to the machine The race should be oiled For details on oiling the machine refer to Oiling the machine on page 168 2 Installing the Bobbin Note The machine does not indicate how much bobbin thread is remaining Before starting to embroider make sure that there is enough bobbin thread for the pattern Make sure to clean the bobbin case every time the bobbin is changed For details on cleaning the...

Page 35: ...out 50 mm 2 inches Installing the bobbin case a Insert the bobbin case into the hook Insert the bobbin case while aligning the tab on the bobbin case with the notch in the hook as shown in the illustration 1 Tab 2 Notch b Fully insert the bobbin case until it snaps into place c Close the hook cover Note Check that the thread winds off the bobbin clockwise as shown in the illustration If the bobbin...

Page 36: ...r the first or second spool pin on the left side Push the spool cap onto the spool pin as far as possible to secure the thread spool 1 Spool cap 2 Thread spool 3 Spool pin d Pass the thread through the hole in the thread guide just above the spool from the back to the front 1 Hole in the thread guide above the spool Note Use the included metal bobbin when winding the bobbin with the machine Circle...

Page 37: ...or 5 times as shown in the illustration i Pass the end of the thread through the guide slit on the bobbin winder seat and pull the thread The cutter will cut the thread 1 Guide slit with built in cutter 2 Bobbin winder seat j Push the bobbin winding switch to the left until it clicks into place The bobbin winding window will be displayed on the LCD screen 1 Bobbin winding switch 1 Note Be sure to ...

Page 38: ...ay the bobbin winding window again Note When removing the bobbin do not pull on the bobbin winder seat Doing so could loosen or remove the bobbin winder seat and could result in damage to the machine CAUTION Check that the bobbin thread has been wound correctly otherwise the needle may break or the thread tension will be incorrect Be sure to clean the bobbin case each time that the bobbin is chang...

Page 39: ...r to page 61 1 Pattern type keys In the pattern list screen search for the desired pattern and then touch the key for the pattern Pattern list screen For details on the keys and other information on the screen refer to page 62 1 Displays a preview image 2 Pattern keys Checking a preview image from the pattern list screen Touch to preview the image prior to selecting Touch to return to the pattern ...

Page 40: ...rn display area After a pattern is selected the following appear 1 Vertical length of the pattern 2 Horizontal width of the pattern 3 Thread information Colors Embroidering time and the keys indicated by 4 which can be used to change the pattern size or get the mirror image of the pattern The functions that can be used differ depending on the type of pattern that is selected Refer to Changing the ...

Page 41: ...idery pattern The top value shows the height and the bottom value shows the width 4 Touch to edit the pattern 5 Touch this key to delete the pattern for example if the wrong pattern was selected No pattern is selected and the pattern type selection screen appears 6 Displays a preview image 7 Touch to switch the thread information between the thread colors and embroidering time 8 Continues to the n...

Page 42: ...d 4 Displays a preview image 5 Touch to switch the thread information between the thread colors and embroidering time 6 Touch to check the embroidering area 7 Touch or to change the embroidery speed 8 Touch to store the pattern in memory 9 Returns to the pattern editing screen In this example we will not specify any of the embroidering settings Continue with the next operation Embroidery positioni...

Page 43: ...embroidery frame so that it fills the screen If you find out the type of embroidery frame holder and size of embroidery frame which are best for your embroidery select the display guides in the settings screen for your better embroidery editing Refer to Embroidery frame types and applications on page 74 and Changing the display guides on page 144 Touch again to display the pattern with the embroid...

Page 44: ...r Follow the procedure described below to firmly stretch the fabric in the embroidery frame so that the fabric is not loose In addition be sure to work on a level surface when putting the fabric in the embroidery frame Memo If the embroidery frame holder is not attached to the machine the embroidering area will not display the correct frame size Refer to Attaching the embroidery frame on page 44 I...

Page 45: ...ogether the inner and outer frames so that the bottom of the inner frame is lower than the bottom of the outer frame 1 Inner frame 2 Outer frame 3 Bottom of inner frame Using the included screwdriver large firmly tighten the screw 1 Screwdriver large The amount that the fabric is stretched and the use of stabilizer material differ depending on the type of fabric being embroidered Try various metho...

Page 46: ... holder If the screw is too tight please use the included disc shaped screwdriver 1 Left arm 2 Thumb screws The left arm of the embroidery frame holder can be moved Only loosen the thumb screws a maximum of 2 turns counterclockwise Do not remove the screw 8 Attaching the Embroidery Frame to the Machine CAUTION If the embroidery frame is not correctly attached it may hit the presser foot and damage...

Page 47: ...o be attached c Hold the embroidery frame level and then simultaneously align both the left and right mounts with the embroidery frame holder clips The inner frame should be on top d Insert the embroidery frame until it snaps into place 1 Make sure that the pins on the left and right arms of the embroidery frame holder fit into the positioning slot and hole on the embroidery frame Note Please firm...

Page 48: ...sition that you want to check 1 Selected position The needle will move to the selected position on the pattern c Touch to see the entire embroidering area The presser foot is lowered and the embroidery frame moves to show the embroidery area d The corners of the octagon showing the embroidery area for the pattern are indicated by changing direction Carefully watch the movement of the embroidery fr...

Page 49: ...and the number of thread color changes 2 Use these keys to specify various editing settings 3 To start the machine touch this key to unlock the machine and then press the Start Stop button 4 Shows the embroidering order for the thread colors or embroidering time of each thread colors CAUTION When unlock key in the embroidering screen is touched the Start Stop button begins flashing in green and th...

Page 50: ...rforming correctly the thread may break or become tangled causing the needle to bend or break Note It is recommended that rayon or polyester embroidery thread be used 120 den 2 135 dtex 2 40 weight in Americas and Europe 50 in Japan Memo The path that the embroidery machine should be threaded is indicated by a line on the machine Be sure to thread the machine as indicated ...

Page 51: ...uded spool mat on the spool pin before placing the spool on the pin 1 Spool mat 2 Small spool 3 Spool cap b Pass the thread from the back to the front through the hole in the thread guide just above the spool 1 Hole in the thread guide above the spool c Pull the thread toward you through the inside of the front hole in the thread guide 1 Front hole in the thread guide d Hold the thread with both h...

Page 52: ...disc 1 Pass around here f Pass the thread through the middle thread guide under the guide plate from the left 1 Guide plate g Pass the thread along the slot to pass it through the thread take up lever hole from the right side 1 Thread take up lever h Drawing it down through the slot in the thread guide then through the hole in the cover 1 Hole in the cover ...

Page 53: ...ot fully inserted the hook of the automatic threading mechanism will not pass through the eye of the needle during automatic needle threading and the hook may bend or the needle cannot be threaded If the hook of the automatic threading mechanism is bent or damaged contact your authorized Brother dealer While the hook of the automatic threading mechanism is passed through the eye of the needle do n...

Page 54: ...moves back away from the needle The thread is pulled through the needle eye The wiper comes out and catches the thread between the needle and the threader The threader goes back to the original home position This completes the upper threading Note When catching the thread with the hook be careful that the thread does not become loose Note If the thread is not correctly passed through the groove in...

Page 55: ...d spool whose thread is correctly threaded through the machine a Cut the thread between the thread spool and the thread guide 1 Thread cutter b Change the thread spool c Tie the end of the thread on the new spool with the end of the thread remaining from the previous color d Pull out the old thread just after the needle bar thread guide Continue pulling the thread until the knot is above the needl...

Page 56: ... can be started If the Start Stop button is not pressed within 10 seconds after unlocking the embroidery machine the machine becomes locked again b Press the Start Stop button Press the Start Stop button while it is flashing in green If the Start Stop button returns to being lit in red perform this procedure again from step a The Start Stop button lights up in green and begins embroidering the fir...

Page 57: ...r thread is taut touch the unlock key and then press the Start Stop button Resume embroidering after the machine was turned off a Press the Start Stop button The embroidery machine stops and the Start Stop button lights up in red The thread is not trimmed b Touch to unlock the embroidery machine c Press the thread trimming button The bobbin and upper threads are trimmed Before turning off the embr...

Page 58: ... overlap the stitching For details refer to Resume Embroidering After Turning Off the Machine on page 89 If the thread breaks while embroidering If a problem occurs while embroidering such as if the thread breaks the machine stops automatically Re thread the broken thread back up several stitches and then continue embroidering For details refer to If the Thread Breaks or the Bobbin Thread Runs Out...

Page 59: ... Wrong side Loosen the thread tension knob or the upper thread guide pretension knob by turning counterclockwise The tension of the upper thread is too loose resulting in a loose upper thread loose thread locks or loops appearing on the right side of the fabric 1 Right side 2 Wrong side Tighten the thread tension knob or the upper thread guide pretension knob by turning clockwise For details on ad...

Page 60: ...er frame screw If the screw was tightened using a screwdriver large use the included screwdriver large to loosen it b Remove the outer frame and then remove the fabric 13 Removing the Embroidery Frame and Fabric CAUTION When removing the embroidery frame make sure that the Start Stop button is lit in red If the Start Stop button is flashing in green the machine may start embroidering If the machin...

Page 61: ...ply cord in a safe place 14 Turning OFF the Machine Note If a power outage occurs while the embroidery machine is being operated turn off the embroidery machine and unplug the power supply cord When restarting the embroidery machine follow the necessary procedure to correctly operate the machine Refer to 1 Turning ON the Machine on page 28 Memo If the machine is turned off while it is embroidering...

Page 62: ...are provided in the tables below Key displays The appearances of the keys have the following meanings Screen Quick Reference Guide Normal color display This key is not selected but can be selected Dark colored display This key is selected Gray display This key cannot be selected ...

Page 63: ...bers symbols and accented characters from 20 fonts can be selected in small medium and large sizes p 108 Alphabet key 6 14 stitch types can be combined with 10 frame shapes such as a circle and a square p 107 Frame pattern key 0 4 1 2 8 3 7 6 5 9 7 Recalls patterns stored in the machine s memory p 115 Embroidery patterns stored in the machine memory key 8 Recall patterns from USB media p 116 USB m...

Page 64: ... screen p 144 4 An image of the pattern appears on the key Touch the image to select the pattern p 106 Pattern keys 5 Displays an image of the pattern that is to be embroidered so it can be previewed p 41 Preview key 6 Shows the number of the currently displayed page and the total number of pages Page A 0 6 1 4 7 B 8 9 5 2 3 7 Touch this key to display the previous page p 106 Previous page key 8 T...

Page 65: ...s the rotation angle that the pattern being edited is rotated p 123 Rotation angle 2 D 3 A 8 1 7 0 4 5 6 C 9 B 7 Deletes the pattern If touched the pattern being edited is deleted p 136 Delete key 8 Adds a pattern If touched the pattern group selection screen appears p 119 Add key 9 Displays an image of the pattern so that it can be previewed p 41 Preview key 0 Shows the vertical distance that the...

Page 66: ...ensity of the pattern that is being edited can only be used if an alphabet or frame pattern is selected p 126 Density key 7 Enables the thread color of each character in an alphabet pattern to be changed can only be used when an alphabet is selected p 126 Multi Color key 8 Changes the orientation of the characters in the alphabet pattern that is being edited p 124 Array key 7 1 5 8 2 9 0 6 4 3 9 C...

Page 67: ...olor sequence display Region display 6 Change the thread color sequence display to embroidering time of each thread colors p 47 Thread information color time 1 9 F 3 A 2 4 5 6 J 7 8 B 0 C E D I H G 7 Shows the order for the thread color changes During embroidering this display scrolls so that the color of the thread currently being sewn appears at the top Thread color sequence display 8 Moves the ...

Page 68: ... can be checked p 46 Trial sewing key G Specifies the maximum embroidering speed p 99 Maximum embroidering speed key 1 9 F 3 A 2 4 5 6 J 7 8 B 0 C E D I H G H Unlocks the machine so it can start embroidering within 10 seconds When this key is touched the Start Stop button flashes in green p 54 Unlock key I Touch this key to quit embroidering and return to the embroidering edit screen Return key J ...

Page 69: ...by the machine EMBROIDERING Customize the embroidery colors Use the thread color function by selecting either 64 colors or 300 colors or by setting the custom thread color table on the pattern editing screen For more details refer to Creating a custom thread table on page 132 and Choosing a color from the custom thread table on page 135 Resume an unfinished pattern from the last time the machine w...

Page 70: ...he USB port If you have purchased the PE DESIGN Ver5 or later PE DESIGN NEXT PE DESIGN Lite or PED BASIC you can plug the included USB card writer module into the machine as an embroidery card reader and recall patterns 1 USB port 2 Embroidery card Reader USB card writer module or USB media Note The processing speed may vary by port selection and quantity of data Do not insert anything other than ...

Page 71: ...or computer 2 USB cable connector Note The connectors on the USB cable can only be inserted into a port in one direction If it is difficult to insert the connector do not insert it with force Check the orientation of the connector For details on the position of the USB port on the computer or USB hub refer to the instruction manual for the corresponding equipment ...

Page 72: ...70 ...

Page 73: ...bric 80 Embroidering narrow pieces of fabric such as ribbon 80 Embroidery Frame Position and Movement 81 Embroidery frames that cannot be used for embroidering 81 Moving to the correct position 81 Changing the Embroidering Position 83 Adjusting the angle 83 If the Thread Breaks or the Bobbin Thread Runs Out While Embroidering 85 If the upper thread breaks 85 If the bobbin thread breaks or runs out...

Page 74: ...xtreme force when loosening or tightening the needle set screw otherwise the machine may be damaged c With the flat side of the needle toward the back of the machine insert the needle all the way up until it touches the needle bar stopper Pass the needle through the hole in the presser foot and then use the needle changing tool to lift up the needle 1 Needle bar stopper 2 Needle 3 Flat side of nee...

Page 75: ... Use the Allen screw driver to turn the needle set screw clockwise CAUTION Be sure to insert the needle all the way up until it touches the needle bar stopper and securely tighten the needle set screw with the Allen screw driver otherwise the needle may break or the machine may be damaged If the needle is not fully inserted the hook of the automatic threading mechanism will not pass through the ey...

Page 76: ...ping the Fabric on page 77 Use when embroidering patterns with a size less than 200 mm H 200 mm W 7 7 8 inches H 7 7 8 inches W Medium embroidery frame 100 mm H 100 mm W 4 inches H 4 inches W Refer to 7 Hooping the Fabric in the Embroidery Frame on page 42 Use when embroidering medium sized patterns Border frame optional 100 mm H 180 mm W 4 inches H 7 1 8 inches W Visit your nearest authorized Bro...

Page 77: ...embroidering caps Baseball golf caps tulip hats and bucket hats can be embroidered with these frames These frames cannot be used with hats having a front area of 50 mm 2 inches or less such as sun visors and children s hats In addition these cannot be used with hats that have a brim longer than 80 mm 3 1 8 inches Cylinder frame optional 80 mm H 90 mm W 3 inches H 3 1 2 inches W Visit your nearest ...

Page 78: ... stabilizer backing for embroidering If iron on stabilizer backing is not used while embroidering the needle may bend or break or the pattern may become misaligned Note Use a piece of iron on stabilizer backing that is larger than the embroidery frame When framing the fabric in the embroidery frame be sure that the stabilizer backing is clamped on all edges in order to prevent wrinkles in the fabr...

Page 79: ...abric is taut insert the inner frame at corner B In the same way lightly pull the fabric in the direction indicated by arrow C and insert corner C and then lightly pull the fabric in the direction indicated by arrow D and insert corner D Be sure that there are no wrinkles in the fabric after it is stretched in the embroidery frame d While stretching the fabric even more securely tighten the screw ...

Page 80: ... Be sure that there are no wrinkles in the fabric after it is stretched in the embroidery frame d Securely tighten the screw and then check that the fabric is taut Using the included screwdriver large firmly tighten the screw 1 Screwdriver large e Use both hands to grasp the frame hooped with the item and then attach it to embroidery frame holder e f Insert the pins on embroidery frame holder e in...

Page 81: ...e guidelines on the embroidery sheet to accurately stretch the fabric in the frame a With a fabric marker mark the area of the fabric you want to embroider b Place the embroidery sheet on the inner frame Align the guidelines on the embroidery sheet with the marks that you drew on the fabric 1 Guidelines 2 Inner frame c Gently stretch the fabric so that there are no folds or wrinkles d Press the in...

Page 82: ...ric adhesive to attach the fabric to stabilizer backing hooped in the embroidery frame With fabrics where you do not wish to use spray adhesive baste the fabric to the stabilizer backing 1 Fabric 2 Stabilizer backing Embroidering the corner of fabric When embroidering the corner of a piece of fabric use spray fabric adhesive to attach the corner of the fabric to stabilizer backing and then hoop th...

Page 83: ... frame holder Therefore the embroidery frame size is determined by the position of the left arm even if the embroidery frame is not actually installed Moving to the correct position If the center of the embroidery frame is at the needle drop point in the embroidering area the embroidery frame is correctly positioned in other words at the starting position before embroidering If the embroidery fram...

Page 84: ...uched The embroidery frame will move Since the embroidery frame is moved to the correct position and paused touch the desired key again If the pattern extends out of the embroidering area for the frame after the frame is moved a message appears indicating that the embroidery frame should be replaced Either replace the embroidery frame or return to the pattern editing screen and adjust the pattern ...

Page 85: ...ings screen For details on the settings screen refer to Using the Settings Key on page 142 The embroidery frame moves in the opposite direction of the arrow The pattern in the pattern display area moves in the same direction of the arrow 1 Shows the vertical distance moved 2 Shows the horizontal distance moved Touch to move the embroidery frame back to its original position where the center of the...

Page 86: ...ates 1 degree to the left 7 Moves the pattern in the direction of the arrow on the key 8 Touch this key to close this screen 9 Touch this key to return the pattern to its original angle 1 Memo With this operation fine adjustments can be made to the angle also this operation is particularly useful when embroidering items such as bags and tubular items that have limitations to being hooped in the em...

Page 87: ...n sewn The red pointer light indicates the needle drop point when you set the LED pointer to ON in the settings screen For details on the settings screen refer to Using the Settings Key on page 142 If the needle bar is moved back too far through the stitching touch or to go forward through the stitching 1 Each touch of this key moves one stitch forward through the stitching 2 Each touch of this ke...

Page 88: ...ter replacing the bobbin re attach the embroidery frame Refer to page 44 d Go back through the stitching in the same way as that described in step b of If the upper thread breaks on page 85 and then continue embroidering Note If the embroidery frame is removed before embroidering of the pattern is finished be careful of the following otherwise the pattern may become misaligned Do not apply extreme...

Page 89: ...stitching at any position of the pattern a Press the Start Stop button to stop the machine If necessary change the fabric framed in the embroidery frame or trim and remove the stitches b Touch The stitch navigating screen appears To start embroidering from the beginning c Touch 1 Touch this key to return to the beginning of the first color The embroidery frame moves to the starting position Embroi...

Page 90: ...Each touch of this key moves five hundred stitches back through the stitching 8 Touch this key once to return to the beginning of the stitching for the color being sewn Afterward each touch of this key returns to the beginning of sewing for the previous thread color 9 Each touch of this key advances to the beginning of embroidering the next thread color 0 Each touch of this key moves five hundred ...

Page 91: ...s turned on again however some of the stitches that were already sewn may be sewn again a Set the main power switch to I to turn on the machine b When the machine is turned on the opening movie is played Touch anywhere on the screen to display the message below c Touch A message appears asking if you wish to continue embroidering or start a new operation d Touch 1 Touch to continue embroidering 2 ...

Page 92: ...op point where stitches have already been done g Touch The embroidering screen appears again h Touch and then press the Start Stop button to continue embroidering Memo The machine can be stopped at any time even while it is embroidering however if the machine is stopped when the thread color is changed it is not necessary to go back through the stitching when embroidering is continued 1 ...

Page 93: ...djusting screw 2 Tighter 3 Looser d After making the adjustments try embroidering to check the thread tension Adjusting the Thread Tension Note Be sure to check the tension of the bobbin thread each time that the bobbin is changed Depending on the bobbin thread type and whether a prewound bobbin is used the tension of the bobbin thread may differ For example when replacing an empty prewound bobbin...

Page 94: ... thread tension according to the situation Upper thread is too tight The tension of the upper thread is too tight resulting in the bobbin thread being visible from the right side of the fabric 1 Right side 2 Wrong side Turn the knob in the direction of the arrow to decrease the tension of the upper thread 1 Red line If the red line is visible the thread tension cannot be decreased any further Incr...

Page 95: ...tension of the upper thread is too loose resulting in a loose upper thread loose thread locks or loops appearing on the right side of the fabric 1 Right side 2 Wrong side Turn the knob in the direction of the arrow to increase the tension of the bobbin thread ...

Page 96: ...94 ...

Page 97: ...oidering linked characters 97 Maximum Embroidering Speed Setting 99 Embroidery Color Management 100 Uninterrupted embroidering monochrome using a single color 100 Thread color sorting 100 Thread Trimming Adjustment 101 Using the automatic thread cutting function End Color Trim 101 Using the thread trimming function Jump Stitch Trim 101 Selecting the length of jump stitch not to trim 102 ...

Page 98: ...ded to the beginning of the embroidering order e Touch and then press the Start Stop button to begin embroidering f When embroidering is finished remove the basting stitching Basting Embroidery Note It is recommended to finish combining and editing the pattern before selecting the basting setting If the pattern is edited after selecting the basting setting the basting and pattern may become misali...

Page 99: ...ting position setting The highlighted key shows the currently selected setting Example When a starting position is selected the ending position is automatically set to the same position The embroidery frame moves to the starting position c After selecting the desired settings touch The embroidering screen appears again Embroidering linked characters Follow the procedure described below to embroide...

Page 100: ... of the embroidering g As in step a select the character patterns for DEF h In the embroidering screen touch i Touch The needle bar is positioned in the lower left corner of the pattern The embroidery frame moves so that the needle is positioned correctly j Touch k Use to align the needle with the end of embroidering for the previous pattern l Touch and then press the Start Stop button to begin em...

Page 101: ...an option a To increase the embroidering speed touch To decrease the embroidering speed touch The value beside and changes Maximum Embroidering Speed Setting Embroidery frame Flat frame Cap frame Cylinder frame 1 1000 1 600 2 900 2 550 3 800 3 500 4 700 4 450 5 600 5 400 6 500 7 400 Memo Decrease the embroidering speed when embroidering on thin thick or heavy fabrics In addition the machine embroi...

Page 102: ... will be grayed out Thread color sorting You can embroider while replacing the thread spool a minimal number of times Before starting to embroider touch to rearrange the embroidery order and sort it by thread colors Touch to cancel the color sorting and embroider with the embroidery color order The embroidery color order is rearranged and sorted by thread colors Embroidery Color Management Memo Ev...

Page 103: ...e color thread is embroidered the machine will stop without cutting the thread Using the thread trimming function Jump Stitch Trim The thread trimming function will automatically trim any excess thread jumps within the color This function is initially turned on To turn this function off touch and then This function can be turned on or off during embroidering Your customized setting remains after t...

Page 104: ... mm in 5 mm increments Your customized setting remains after turning the machine off and on Touch or to select the length of jump stitch For example Touch to select 25 mm 1 inch and the machine will not trim a jump stitch of 25 mm or less before moving to the next stitching Note If pattern has many trims it is recommended to select a higher jump stitch trim setting in order to reduce the amount of...

Page 105: ... computer 114 Retrieving patterns from the machine s memory 115 Recalling from USB media 116 Recalling from the computer 117 Editing the Embroidery Pattern Pattern Editing Screen 119 Combining patterns 119 Selecting the pattern to be edited 120 Displaying the enlarged pattern image 120 Moving a pattern 121 Flipping a pattern horizontally 121 Changing the size of a pattern 122 Rotating a pattern 12...

Page 106: ...puter equipped with a USB port as standard equipment Compatible operating systems Microsoft Windows XP Windows Vista Windows 7 Windows 8 Using the Memory Function CAUTION When using embroidery data other than our original patterns the thread or needle may break when sewing with a stitch density that is too fine or when sewing three or more overlapping stitches In that case use one of our original ...

Page 107: ...store embroidery cards in locations exposed to vibrations or impacts direct sunlight extreme dust or lint high temperatures high humidity severe temperature fluctuations or strong magnetic forces such as from speakers To use optional embroidery cards to recall embroidery patterns connect the embroidery card reader USB card writer module to this machine Store embroidery cards in their protective ca...

Page 108: ... Frame patterns 7 Embroidery patterns stored in the machine s memory 8 USB media 9 Computer USB b In the pattern list screen which appears next touch the desired pattern to select it Pattern list screen 1 Pattern keys Touch a pattern to display the following information of the pattern 2 Vertical length of the pattern 3 Horizontal width of the pattern 4 Page up 5 Page down If there is more than one...

Page 109: ... pattern The list of embroidery patterns appears c Select an embroidery pattern Touch the desired pattern The selected pattern appears in the pattern display area If the wrong pattern was selected or you wish to select a different pattern touch the desired pattern d Touch This confirms the pattern selection The pattern editing screen appears Frame patterns a Touch The list of frame patterns appear...

Page 110: ...in the pattern display area If the wrong pattern was selected or you wish to select a different pattern touch the desired pattern d Touch This confirms the pattern selection The pattern editing screen appears Alphabet patterns There are 20 built in character fonts Example Entering Lucky Color a Touch The font selection screen appears b Select a character font Touch the desired character font Touch...

Page 111: ...ize of the character 1 Touch this key to change the size The next characters that are selected will have the new character size The character size of all entered characters cannot be changed after the characters are combined The size of the entire pattern can be changed from the pattern editing screen f Touch and enter ucky 1 If the wrong character was selected or you wish to select a different ch...

Page 112: ...lor j If the text is small and difficult to read on the screen touch to check the text k After checking the text touch to return to the text input screen l After entering all of the text as desired touch This confirms the pattern selection The pattern editing screen appears ...

Page 113: ...ext is arranged on a curve each touch of this key decreases the bend of the curve makes it flatter 8 If text is arranged on a curve each touch of this key increases the bend of the curve makes it more curved If the text is arranged using one of the text arrangements on this screen even more characters can be entered Changing the text alignment Touch to change the alignment of the text When the key...

Page 114: ...t 2 Embroidery card reader USB card writer module If you have purchased the PE DESIGN Ver5 or later PE DESIGN NEXT PE DESIGN Lite or PED BASIC you can plug the included USB card writer module into the machine as an embroidery card reader and recall patterns When connecting the USB card reader writer to the machine s USB port be sure to secure the cable with the two hooks on the back panel If the c...

Page 115: ...rn you want to save is in the embroidering screen b Touch Touch to return to the original screen without saving The Saving screen is displayed When the pattern is saved the display returns to the original screen automatically If the memory is full If the screen below displays either the maximum number of patterns have been saved or the pattern you want to save takes a lot of memory and the machine...

Page 116: ...patterns can be saved in the Removable Disk but the saved embroidery patterns are deleted when the machine is turned OFF For Computers and Operating Systems refer to Recalling from the computer on page 117 Memo USB media is commercially available but some USB media may not be usable with this machine Please visit our website http support brother com for more details Depending on the type of USB me...

Page 117: ... embroidering screen d Touch Touch to return to the original screen without saving The pattern will be temporarily saved to Removable Disk under Computer My Computer e Select the pattern s phc file in Removable Disk and copy the file to the computer Retrieving patterns from the machine s memory a Press The machine displays the patterns currently in the memory Note The connectors on the USB cable c...

Page 118: ... machine 1 USB port 2 USB media b Touch Embroidery patterns and a folder in a top folder are displayed c Touch when there is a subfolder to sort two or more stitch patterns to USB media the embroidery pattern in the subfolder is displayed 1 Folder name 2 Embroidery patterns in USB media 3 Path The path to show the current folder at the top of the list Embroidery patterns and subfolders within a fo...

Page 119: ...ector into the corresponding USB ports for the computer and for the machine Refer to Saving embroidery patterns to USB media on page 114 b On the computer open Computer My Computer then go to Removable Disk c Move copy the pattern data to Removable Disk Pattern data in Removable Disk is written to the machine d Press The patterns in the computer are displayed on the selection screen Note While dat...

Page 120: ...118 e Touch the key of the pattern you want to recall f Touch Touch to delete the pattern from the computer The Embroidery Edit screen is displayed ...

Page 121: ...appears again 1 Touch this key to quit trying to combine patterns The pattern editing screen appears b Select an embroidery pattern Select the pattern to be added as described on page 106 to 117 When another pattern is selected it is normally added at the center of the pattern display area c Repeat steps a and b until all patterns to be combined are selected Editing the Embroidery Pattern Pattern ...

Page 122: ...that they were added to the pattern 1 Red frame indicating the pattern to be edited Displaying the enlarged pattern image When selecting the small pattern display the enlarged pattern image to check in detail a Touch The pattern image is displayed with 200 enlarged b Move the pattern image to check when all the pattern image is not displayed Touch to return to the normal pattern image Memo If mult...

Page 123: ...o return the pattern to its position before it was moved center of the embroidery frame touch The pattern can also be moved by dragging it The pattern can also be dragged by selecting it directly in the screen with your finger or the touch pen Flipping a pattern horizontally a Touch so that it changes to The pattern is flipped horizontally Each touch of the key turns the setting either on or off N...

Page 124: ... the desired changes touch The pattern editing screen appears again Example Original size 1 Reduces only in the vertical direction 2 Enlarges without changing the height to width proportion 3 Reduces without changing the height to width proportion 4 Enlarges only in the vertical direction 5 Touch this key to return the pattern to its original size 6 Moves the pattern in the direction of the arrow ...

Page 125: ...s to the right 3 Rotates 90 degrees to the left 4 Rotates 10 degrees to the left 5 Touch this key to return the pattern to its original angle 6 Moves the pattern in the direction of the arrow on the key 7 Rotates 1 degree to the right 8 Rotates 1 degree to the left 9 Touch this key to close this screen 0 Touch this key to select the pattern to edit 1 6 9 0 4 5 3 7 8 2 CAUTION After changing the an...

Page 126: ...selecting the desired text arrangement the bend of the curve can be adjusted If necessary touch and to adjust the bend of the curve d If necessary touch the arrow keys to adjust the position of the pattern For more details refer to Moving a pattern on page 121 e After making the desired changes touch The pattern editing screen appears again Changing the character spacing The spacing between the ch...

Page 127: ...ge 121 d After making the desired changes touch Separating combined character patterns Combined character patterns can be separated to adjust the character spacing or to separately edit the patterns after all character have been entered a Touch b Touch The key appears as c Use to select where the pattern is to be separated and then touch to separate it For this example the pattern will be separate...

Page 128: ...the original thread density standard select 100 c After making the desired changes touch The pattern editing screen appears again Specifying multi color text The alphabet pattern characters selected on page 108 are set to black The color of the characters can be changed using the change thread color key however to change the color of individual characters touch the Multi Color key to turn it on an...

Page 129: ... will be changed not just those of the pattern being edited a Touch The 64 embroidery threads table screen appears 1 The part of the pattern in the color at the top of the thread color sequence display is the part whose color is being changed 2 Selects the next color in the thread color sequence display 3 Selects the previous color in the thread color sequence display 4 Color thread table Select a...

Page 130: ...ouch The color change is confirmed The pattern editing screen appears again Designing repeated patterns Embroidering repeated patterns Using the border function you can create repeated patterns You can also adjust the spacing of the patterns within a repeated pattern stitch a Touch Memo The color thread table can be changed to a custom thread table that you create to reflect the thread colors that...

Page 131: ...ted pattern To widen spacing touch To tighten spacing touch 1 Touch to change a repeated pattern back to one single pattern e Complete repeated patterns by repeating steps b through d f After making the desired changes touch The pattern editing screen appears again 3 5 1 2 4 5 Memo You can only adjust the spacing of patterns included in the red frame Memo When there are two or more patterns all pa...

Page 132: ...ed patterns a Choose the direction in which the repeated pattern will be cut Touch to cut horizontally Touch to cut vertically The pattern direction indicator will change depending on the direction selected b Use and to select the cut line The cut line will move c Touch The repeated pattern will be divided into separate elements d Touch e Use and to select the element to repeat f Repeat the select...

Page 133: ...ning the following patterns to be embroidered a Touch b Touch c Touch to select the thread mark to be sewn 1 Touch to cancel thread mark setting d Touch Note Once you have cut a repeated pattern into separate elements you cannot return to the original repeated pattern Each element can be edited separately in the edit screen Refer to Selecting the pattern to be edited on page 120 Memo When repeated...

Page 134: ...You can scroll through 100 colors at a time using and on the custom thread table 1 Custom thread table 2 Touch to download the clear and restore programs from the website c Use to select one of the thread brands in the machine d Use to enter a color s 4 digit number If you make a mistake touch to erase the entered number and then enter the correct number 1 Entered thread color number 2 Thread bran...

Page 135: ...fied color from the palette press f Touch to return to the original screen Saving the Custom Thread Table to USB media Since you can only have one Custom Thread chart in the machine at a time you are reminded to save the chart that you have just created to USB media a Press and then press b Set your desired colors in the custom thread table according to the procedure in Creating a custom thread ta...

Page 136: ...ort 2 USB media b Press and then press c Press The Saving screen is displayed When the data is loaded to the machine the display returns to the original screen automatically d The recalled custom thread table is displayed on the screen Note Do not insert or remove USB media while Saving screen is displayed You will lose some or all of the data you are saving Note Do not store two or more pcp data ...

Page 137: ... table screen will appear d Touch to choose a new color from the custom thread table Use and to scroll through the custom thread table Touch to return to the original color You can choose colors from the custom thread 300 embroidery threads table by directly touching the screen with the touch pen 1 Color thread table Select a color from this table 2 Use these arrows to navigate the color selection...

Page 138: ... The screen shown below appears b Touch The pattern is deleted To quit deleting the pattern touch Note If multiple patterns are displayed in the screen only the pattern selected using and is duplicated Move and edit each duplicated pattern individually 1 Note If multiple patterns are displayed only the pattern selected will be deleted ...

Page 139: ...ire pattern can be rotated a Touch The screen shown below appears 1 Enables the entire pattern to be rotated 2 Enables the embroidery frame to be moved 3 Touch this key to close this screen without making changes b Touch the keys to adjust the pattern to the desired angle For more details refer to Rotating a pattern on page 123 c If necessary touch the arrow keys to adjust the position of the embr...

Page 140: ...hich we will then edit Example a Touch b Touch c Select This pattern will be positioned at the center of the embroidery area d To select the pattern touch The pattern editing screen appears e Touch The pattern type selection screen appears again Editing a Combined Pattern ...

Page 141: ...esired text arrangement i Type Luck After touching L touch the tab for lowercase letters to display the lowercase letters input screen and then touch u c then k The selected letters appear under the previously typed letterns To change the text alignment touch j After selecting the characters touch The pattern editing screen appears k Touch and adjust the position of the letters so that they are we...

Page 142: ...hen touch to preview the pattern Touch to return to the previous screen n After finishing all editing touch The embroidering screen appears To return to the pattern editing screen and continue editing the pattern touch ...

Page 143: ...dia 144 Changing the display guides 144 Changing the thread color information 145 Sample displays 145 Changing the units of measurements 146 Changing the embroidery basting distance 146 Changing the background colors of the embroidery patterns or thumbnails 146 Specifying the thumbnail size 147 Specifying thread sensor 147 Changing the speaker volume 147 Selecting the Eco Mode or Shutoff Support M...

Page 144: ...s of Measure Enables the units of measurements that appear in the screens to be changed Refer to page 145 5 Basting Distance Specify the distance between the pattern and the basting stitching Refer to page 96 6 Touch to quit specifying settings The settings are confirmed and the screen that was displayed before the settings key was touched appears again Page 2 7 Embroidery Background Color Thumbna...

Page 145: ... G The Total Count counter shows the total number of stitches sewn and the Service Count counter show the number of stitches that have been sewn since the machine s last maintenance H The Total Time counter shows the total amount of time that the machine has been used and the Trip Time counter shows the amount of time that the machine has been used since its last maintenance Use counters G and H a...

Page 146: ...S99 Changing the display guides The guides in the pattern display area can be set for the attached embroidery frame The guide settings can be specified from page 1 of the settings screen 1 How the guides will appear with the specified settings can be previewed here The centerpoint is indicated with a red plus sign When the embroidery machine is purchased the centerpoint marker and grid lines are n...

Page 147: ... select from six embroidery thread brands pictured next Sample displays 123 Thread color number 123 Embroidery Polyester Country Cotton Madeira Poly Polyester Madeira Rayon Rayon Sulky Rayon Robison Anton Polyester Depending on the country or area cotton like polyester thread is sold Thread color name Name of Color Memo The thread colors in the thread color sequence display and in the patterns in ...

Page 148: ...1 of the settings screen a Use and to specify the distance from the pattern to the basting stitching Changing the background colors of the embroidery patterns or thumbnails The background colors of the pattern display area and pattern thumbnails Depending on the pattern color select the desired background color from the 66 settings available Different background colors can be selected for the patt...

Page 149: ...d from page 3 of the settings screen a Touch or to select the desired setting Changing the speaker volume The volume of operation sounds can be changed The speaker volume can be set to OFF or a setting between 1 and 5 When OFF is selected no sound is produced from the speaker When the embroidery machine is purchased 3 is selected The speaker setting can be specified from page 3 of the settings scr...

Page 150: ...the machine is turned on The initial pattern type selection screen appears after touching the screen If you set the Opening Screen to OFF the initial pattern type selection screen appears when the machine is turned on When the embroidery machine is purchased ON is selected The opening screen setting can be set from page 3 of the settings screen a Touch or to select the desired setting Changing the...

Page 151: ...is purchased 4 is selected The Screen display brightness setting can be specified from page 4 of the settings screen a Touch and to select the desired screen brightness Setting the LED pointer You can set the LED pointer to ON or OFF The LED pointer shows the needle drop position in the embroidering screen when ON is selected When OFF is selected the LED pointer is lit off in any screen Refer to E...

Page 152: ...ategories Principal Parts Displays and explains principal parts of the machine and their functions Basic Operation Illustrates basic threading and hooping instruction Troubleshooting Basic guide for problems solving Maintenance Instruction for maintaining your machine Example To learn how to thread the upper thread a Touch The machine operations guide screen appears b Touch The list of basic opera...

Page 153: ...INGS AND HELP FEATURE 151 6 c Touch The procedure for threading the upper thread appears d Read the instruction Press to view the next page Press to view the previous page e Touch to return to the original screen ...

Page 154: ...152 ...

Page 155: ...160 Threads 160 Stabilizers backing 161 Hooping techniques 162 Frame Basics 162 Fabric stabilizer compatibility chart 163 Maintenance 164 Cleaning the LCD 164 Cleaning the machine surface 164 Cleaning the hook 164 Cleaning around the needle plate 165 Cleaning the bobbin case 166 Cleaning the thread paths of the upper threads 166 Cleaning the thread guides 166 Disassembling and cleaning the tension...

Page 156: ...the appliqué fabric from the embroidery frame and then carefully cut along the embroidered cutline If the appliqué is cut out along the inside of the embroidered cutline the appliqué may not be correctly attached to the fabric Therefore carefully cut out the appliqué along the embroidered cutline If this step is not performed carefully the appliqué will not be cleanly finished In addition carefull...

Page 157: ...r embroidered with satin stitches a Select a frame pattern sewn with straight stitches to embroider onto the fabric for the appliqué Carefully cut outside of the stitching b Embroider the same pattern on the base fabric c Lightly apply fabric glue or spray adhesive to the back of the appliqué piece that was cut out in step a and then attach the appliqué piece to the base fabric d Select the satin ...

Page 158: ...econd time over the appliqué fabric using the same frame pattern in a straight stitch Be sure to stop the machine before the cross at the center is embroidered d Remove the embroidery frame from the machine and then cut off the excess appliqué fabric along the outside of the stitching e Select the satin stitched frame pattern with the same shape f Attach the embroidery frame removed in step d and ...

Page 159: ...d embroider it a Connect to the machine the media containing the created split embroidery pattern and then select the split embroidery pattern to be embroidered For details on recalling patterns refer to Embroidery cards optional on page 112 Recalling from USB media on page 116 or Recalling from the computer on page 117 A screen appears so that a section of the split embroidery pattern can be sele...

Page 160: ...ction h When embroidering is finished the following screen appears Touch A screen appears so that a section of the split embroidery pattern can be selected i Repeat steps b through h to embroider the remaining sections of the pattern Memo The pattern can be rotated 90 to either the left or right when is touched ...

Page 161: ...embroidered thread colors Create color thread tables from the colors of threads that you have and use them to display the patterns in your own thread colors Remember to save your Custom Thread Table before you create a new one Refer to Creating a custom thread table on page 132 and Choosing a color from the custom thread table on page 135 for the change thread color function Normal thread color di...

Page 162: ... windows should be diffused The best type of lighting for embroidery thread is tungsten filament or fluorescent tubes It is important to remember that prolonged exposure to these harmful sources may also cause the colors of cardboard boxes and other objects to fade Temperature and humidity also pose a threat to embroidery threads The ideal conditions are between 59 F and 77 F or 15 C and 25 C Humi...

Page 163: ...ook as good as the outside Black stabilizer is very useful on similarly colored garments of lightweight fabrics The black backing is less likely to show through as compared to white backing 3 Self adhesive peel and stick backing is used on those difficult to hoop fabrics This backing is applied with sticky side up to the underside of the frame enabling your fabric to stick on the exposed surface i...

Page 164: ...specialized embroidery frames hoops designed to hold caps for embroidering They are available in a variety of styles for various machines with two basic styles one that allows sewing a flattened cap for use on a flat machine or one that allows sewing the cap in its natural curved shape for use on a tubular machine Hooping fabric The framed fabric and backing should be perfectly flat and free of wr...

Page 165: ...nd also for pique knits Canton fleece 1 tear away Optional Use a topping if the garment has a textured surface such as a basketweave or pronounced twill Canvas 1 tear away None Frame tightly Corduroy 1 tear away 1 water soluble A higher stitch density or more understitches as well as a topping may be necessary to prevent stitches from sinking into the fabric Lingerie or silk 1 or 2 lightweight tea...

Page 166: ...riodically remove lint and dust for better performance from hook race area Use the included cleaning brush a Turn off the embroidery machine b Open the hook cover and remove the bobbin case Refer to page 32 c Use the included cleaning brush to remove any lint and dust from the hook and its surrounding area d After cleaning is finished insert the bobbin case into the hook and then close the hook co...

Page 167: ...h a Turn off the embroidery machine b Remove the needle plate With an offset screwdriver loosen the screws and then remove the needle plate 1 Needle plate c Use the included cleaning brush to remove any lint and dust from the moving knife the fixed knife the thread retaining plate and their surrounding areas 1 Remove all lint in this area d After cleaning is finished attach the needle plate in the...

Page 168: ...om inside the bobbin case d After cleaning is finished insert the bobbin into the bobbin case and the bobbin case into the hook and then close the hook cover Refer to page 33 Cleaning the thread paths of the upper threads If dust or lint has accumulated in the thread guides or tension unit in the paths of the upper threads the thread may break while embroidery is being sewn Periodically clean the ...

Page 169: ...1 Tension dial 2 Nylon shoulder washer 3 Tension spring 4 Tension base spring 5 Felt washer top 6 Tension disc 7 Felt washer bottom c Reassembling the tension unit Note When reassembling the tension unit be sure not to install the tension disc upside down There is a magnet on the bottom Bottom Top 1 Magnet When reassembling the tension unit be careful not to lose any parts or install any parts in ...

Page 170: ...f the embroidery machine b Open the hook cover and remove the bobbin case Refer to page 33 c Rotate the handwheel to a position U on the machine 1 Handwheel Be sure to rotate the handwheel toward the LCD panel counterclockwise d Put a drop of oil onto the hook 1 Punch a small hole in oil bottle 2 Apply oil here Use a pointed object to punch a small hole in the tip of the included oiler before usin...

Page 171: ...ke the time to arrange the maintenance your machine requires once this message appears Such steps will help to ensure you receive continued uninterrupted hours of machine operation for the future Note Put a drop of oil onto the hook once a day before use Apply one drop of oil on the lower needle bar above the felt washer every 40 50 hours of embroider time Apply only sewing machine oil Use of any ...

Page 172: ...bent or blunt Replace the needle with a new one p 25 72 The area around the embroidery foot hole is damaged 1 Scratches or Burrs Replace the presser foot Consult your nearest authorized Brother dealer The bobbin or bobbin case are not correctly installed Remove and reinstall bobbin and bobbin case p 32 33 The upper thread is not threaded correctly The upper thread is catching somewhere Pull the up...

Page 173: ...nsity of the embroidery data is too fine Three or more overlapping stitches are being sewn Using a data design system correct the thread density and overstitching settings in the embroidery data p 104 Spool cap is set incorrectly Check the method for attaching the spool cap then reattach the spool cap p 49 Bobbin thread is incorrectly wound Use a correctly wound bobbin p 26 The upper thread breaks...

Page 174: ...he hook clean the hook p 164 The play between the hook and the race is too much Consult your nearest authorized Brother dealer The hook does not rotate smoothly Remove lint clean and apply oil p 164 168 The space between the hook stopper and the hook cannot be adjusted Consult your nearest authorized Brother dealer The upper thread is not threaded correctly Pull the upper thread by hand from below...

Page 175: ...r thread correctly p 48 The needle is bent or blunt Replace the needle with a new one p 25 72 The needle is not installed correctly Correctly install the needle p 72 Dust has accumulated under the needle plate or in the hook Clean the hook and the needle plate p 164 165 The needle and the hook are not correctly passing each other Consult your nearest authorized Brother dealer The thread twist is e...

Page 176: ... the embroidery frame Attach the stabilizer correctly p 76 There are loops in the upper thread The upper thread tension is low After passing the upper thread through the hole in the presser foot pull the thread by hand to check the thread tension p 92 The thread tension does not correspond to the amount that the thread tension knob or the upper thread guide pretension knob was tightened If the thr...

Page 177: ...ment The needle is dull Replace the needle Dull needles have a difficult time passing through the garment causing fabrics to tear p 25 72 The fabric is too delicate The simple penetration of the needle could damage delicate fabrics Use stabilizer on top of fabric p 163 There is puckering in the fabric The thread tension is too tight Adjust the tension according to the type of fabric and thread bei...

Page 178: ... according to the thickness of the fabric p 83 With fabric having a very uneven surface the position is not correctly aligned The pointer indication should be used only as a reference CAUTION This machine is equipped with a thread detecting mechanism If the machine is not threaded with the upper thread the machine will not operate correctly even if the Start Stop button is pressed after unlocking ...

Page 179: ...eck the pattern data The pattern data is damaged You tried to recall data created using another manufacturer s data design system Refer to page 104 Turn the machine off then on again to return it to its normal condition The installed embroidery frame is too small Check which embroidery frames can be used and then install a larger embroidery frame Refer to page 42 The upper thread broke the thread ...

Page 180: ...ading button and then perform the other operation after the needle is threaded Refer to page 51 Too many patterns are being combined for the amount of memory available Delete some patterns from the combined pattern The pattern could not be saved because the memory is full Delete some patterns This message is displayed when the memory is full and the stitch or pattern cannot be saved The memory cap...

Page 181: ...rn is being rotated in the embroidering settings screen This message is displayed when the character pattern combination is too large to fit in the embroidery frame This message is displayed when the character pattern combination is too large to fit in the embroidery frame Change the character pattern size or layout the patterns to fit the embroidery frame This message appears when the embroidery ...

Page 182: ... memory You tried to use an editing function while the pattern is not completely within the red outline Move the pattern so it is completely within the outline An unusable embroidery card is inserted Remove the embroidery card The file format is incompatible with this machine Check the list of compatible file formats Refer to page 67 The file size exceeds the data capacity of the machine Confirm t...

Page 183: ...is message is displayed when you try to use incompatible USB media For a list of compatible USB media visit http support brother com The USB media is transmitting Dust may have accumulated within the moving cutter Clean the moving cutter Refer to page 165 You tried to recall or save a pattern while no USB media is loaded Load USB media An error has occurred with the upper threading Consult your ne...

Page 184: ...e with the touch of each numbered cross to show variables If the buzzer sounds when cross number 5 is touched an error occurred during setting and ERROR appears on the screen Touch the crosses again starting from 1 to 5 c After making the necessary touch panel adjustment SUCCESS will show on the screen d Turn the machine off and on again CAUTION Be sure to use the included touch pen to adjust the ...

Page 185: ...7 D 747 H mm 20 15 128 W 23 7 64 D 29 13 32 H inches Embroidering speed Speed range Max 1 000 spm Min 400 spm Hook Type Vertical rotary hook Hook size Normal size Type L Needle HA130EBBR 11 Thread tension Manual Thread trimming Upper and lower thread Thread breakage sensor Yes Upper thread and bobbin thread Automatic needle threader Yes Communication with PC USB port Data storage USB media ...

Page 186: ... c Insert the USB media into the USB port on the machine The media device should only contain the upgrade file 1 USB port 2 USB media d Touch The upgrade file is loaded Upgrading Your Machine s Software Note When using USB media to upgrade the software check that no data other than the upgrade file is saved on the USB media being used for this upgrade Compatible operating systems Microsoft Windows...

Page 187: ...ing USB ports for the computer and for the machine Removable Disk will appear in Computer My computer d Copy the upgrade file to Removable Disk e Touch The upgrade file is loaded f Unplug the USB cable and turn the machine off and on again Note If an error occurs a red text error message will appear When the load is performed successfully following message will appear Note Do not connect any addit...

Page 188: ...tenance message 169 thread paths 166 Color thread table 159 Combining patterns 119 Computer connecting 104 port 69 Corduroy 163 Cotton sheeting 163 D Decorative alphabet patterns 107 Delete key 63 109 136 Deleting pattern 136 Denim 163 Density key 64 126 Display 26 Display guides 144 Distance from center horizontal 63 Distance from center vertical 63 Dress shirt woven 163 Duplicate key 64 136 Dupl...

Page 189: ...12 from the machine s memory 115 from USB media 116 Return key 62 66 Right side rear view 15 Rotate all key 65 83 137 Rotate key 64 123 Rotation angle 63 S Satin jacket 163 Saving to computer 114 to the machine s memory 113 to USB media 114 Screen 26 30 31 60 Selecting edited pattern 120 embroidery pattern 37 106 Set key 62 Setting up 18 Settings key 142 Sewing the embroidery 54 Shutoff support mo...

Page 190: ...Unlock key 54 66 Upgrading machine s software 184 computer 185 USB media 184 Upper thread guide pretension knob 57 92 Upper threading 47 USB connectivity 68 computer 69 embroidery card Reader USB card writer module 68 USB media 68 V Version 143 W Winding the bobbin 34 Wiper 52 ...

Page 191: ...APPENDIX 189 7 ...

Page 192: ...English 882 T51 Printed in Taiwan XG1496 0011 Please visit us at http support brother com where you can get product support and answers to frequently asked questions FAQs ...

Reviews: