background image

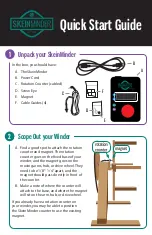
HANDBOOK FOR COMPACT

OVERLOCK MACHINE
MANUAL DE INSTRUCCIONES DE LA

MAQUINA COMPACTA OVERLOCK

English

Español

Product Code: 884-B01

Please visit us at 

http://solutions.brother.com

where you can get product support and answers to
frequently asked questions (FAQs).

Visítenos en 

http://solutions.brother.com

donde hallará consejos para la solución de problemas
así como la lista de preguntas y respuestas más
frecuentes.

Summary of Contents for 4234DT

Page 1: ...pañol Product Code 884 B01 Please visit us at http solutions brother com where you can get product support and answers to frequently asked questions FAQs Visítenos en http solutions brother com donde hallará consejos para la solución de problemas así como la lista de preguntas y respuestas más frecuentes ...

Page 2: ... machine to the symbol O position when making any adjustments in the needle area such as threading needle changing needle or changing presser foot etc 15 Always unplug the sewing machine from the electrical outlet when removing covers lubricating or when making any other user servicing adjustments mentioned in the instruction manual 16 This sewing machine is not intended for use by young children ...

Page 3: ... physical sensory or mental capabilities or lack of experience and knowledge unless they have been given supervision or instruction concerning use of the appliance by a person responsible for their safety Children should be supervised to ensure that they do not playwiththeappliance To give your machine a longer life 1 Do not store this machine in direct sunlight or in high humidity conditions Do n...

Page 4: ...00 stitches per minute for the ordinary sewing machine The bearings in the motor are made of a special sintered oil impregnated alloy mounted in oilsoaked felt to withstand long hours of continuous operation Continuous operation of the sewing machine can cause heat to build in the motor area but not enough to adversely affect its performance It is important to keep fabric and paper away from the a...

Page 5: ...itch 13 Thread for one needle three thread overlock stitch right needle 13 Thread for one needle three thread overlock stitch left needle 13 Thread for one needle two thread overlock stitch right needle 14 Thread for one needle two thread overlock stitch left needle 14 Threading the lower looper 14 Threading the upper looper 16 Threading the left needle 17 Threading the right needle 17 Threading t...

Page 6: ...ored in this compartment See CHAPTER 5 Narrow overlock Rolled hemming stitch E Stitch finger F Stitch finger W Air openings on the back 1 Thread tree 2 Presser foot pressure adjustment screw 3 Spool pin 4 Spool support 5 Thread take up cover 6 Needles 7 Bed extension 8 Presser foot 9 Material plate cover 0 Left needle thread tension dial A Right needle thread tension dial B Upper looper thread ten...

Page 7: ...07001 NTSC XB2014001 PAL A Thread change assembly XB1991001 B Trim trap XB1958001 C Stitch finger W XB1902001 Optional accessory For further information about the following items see CHAPTER 8 D Blind stitch foot X76590002 E Gathering foot SA213 U S A CANADA X77459001 OTHERS LG F Pearl sequence foot SA211 U S A CANADA X76670002 OTHERS LS G Piping foot SA210 U S A CANADA XB0241101 OTHERS LP H Tapin...

Page 8: ...ver It is necessary to open the front cover when threading this machine Slide it to the right 1 and open 2 or close it and slide it to the left CAUTION For your safety make sure that the front cover is closed when operating the machine Always turn off the machine before opening the front cover 1 2 Attaching Removing presser foot 1 Turn off the main power and light switch or disconnect the electric...

Page 9: ...g bed extension Free arm sewing enables tubular pieces to be sewn more easily 1 Remove the bed extension A A NOTE Be careful not to lose the removed bed extension 2 Position the fabric and start sewing See CHAPTER 5 Wide table Using the wide table A makes the large piece sewing easy To install Attach the wide table A by pushing it in the direction of the arrow until the edge line 1 is aligned to t...

Page 10: ...e your hand off from the lever Stitch length The normal stitch length setting is 3 mm To change the stitch length turn the stitch length adjustment dial on the right side of the body 1 2 A 1 Shorten the stitch length to a minimum of 2 mm 5 64 inch 2 Lengthen the stitch to a maximum of 4 mm 5 32 inch A Selection mark Stitch width The normal stitch width setting for regular overlock stitch is 5mm 13...

Page 11: ...y A 1 2 1 Less than 1 0 2 Greater than 1 0 A Selection mark Feed ratio 0 7 1 0 1 0 1 0 2 0 Main feed rear Differential feed front Effect Material is pulled tight Without differential feed Material is gathered or pushed together Application Prevents thin materials from puckering Normal sewing Prevents stretch materials from stretching or puckering An example When stretch material is sewn without us...

Page 12: ...eedle 2 Green marked tension disc is for right needle 3 Pink marked tension disc is for upper looper 4 Blue marked tension disc is for lower looper Tension control Sewing is possible at position 4 for most circumstances Standard SPAN 60 3Z If the stitch quality is insufficient select a different tension setting 4 5 3 A Tension selection mark 1 For heavy tension 4 to 7 2 For light tension 4 to 2 3 ...

Page 13: ...per looper thread is loose Lower looper thread is loose Left needle thread is loose When you adjust the thread tension do it in the following order 1 Left needle thread 2 Right needle thread 3 Upper looper thread 4 Lower looper thread This is the easiest way to obtain the correct thread tension Tighten left needle thread yellow Tighten right needle thread green Loosen left needle thread yellow Loo...

Page 14: ... is loose Tighten needle thread yellow or green Loosen needle thread yellow or green Loosen upper looper thread pink Tighten lower looper thread blue Tighten upper looper thread pink Loosen lower looper thread blue Tighten upper looper thread pink Tighten lower looper thread blue Upper looper thread is loose Lower looper thread is loose Chart of thread tension adjustment One needle Two thread A Re...

Page 15: ... to the line on the machine See CHAPTER 1 Turning direction of hand wheel 3 Loosen the corresponding needle set screw with turning the included hexagonal driver toward 2 in the figure and remove the needle To install 1 Turn the main power and light switch to the OFF position 2 Turn the hand wheel so that the line on the hand wheel is aligned to the line on the machine 3 Hold the needle with its fl...

Page 16: ...llustrated below Make sure that the spool notch is on the bottom 1 Thread spool cap How to use the thread net If you are sewing with loosely spun nylon thread we recommend that you cover the spool with the net supplied to prevent the thread from slipping off the spool Adapt the net to the shape of the spool Before threading 1 Turn off the main power and light switch for safety 2 Raise the presser ...

Page 17: ...edle four thread overlock stitch Thread for one needle three thread overlock stitch right needle Thread for one needle three thread overlock stitch left needle 2 1 3 4 5 6 7 3 4 A left needle right needle 7 2 1 3 4 5 6 7 3 4 A 7 2 1 3 4 5 6 7 3 4 A 7 ...

Page 18: ...the right and guiding the top toward you 2 Pull the thread off the spool and directly up through the thread holder 1 and the thread holder 2 on the thread tree from back to front 3 Pass the thread through the thread guide 3 on the top of machine 4 Pass the thread through the tension disc 4 which is in the channel next to the blue tension adjustment dial Thread for one needle two thread overlock st...

Page 19: ...Forcefully moving the threading lever in any other direction may damage it Before sliding the lower looper threading lever make sure the needle is at its highest position 2 Pass the thread as illustrated 3 Pass the thread through the eye of the lower looper 4 Slowly turn the hand wheel and make sure the lower looper returns to the original position NOTE If the lower looper thread breaks during sew...

Page 20: ...he hand wheel remove the lower looper thread from the upper looper and re thread the upper looper from at least the tension disc Threading the upper looper Run the thread in the sequence illustrated following the pink color and the numbers next to each threading point 2 1 3 4 3 4 5 6 8 9 7 7 6 8 9 1 Open the front cover by sliding to the right and guiding the top toward you 2 Pull the thread off t...

Page 21: ...ter B CAUTION Turn off the machine before threading for safety Turn the hand wheel so that the mark on the hand wheel is aligned to the line on the machine See CHAPTER 1 Turning direction of hand wheel Threading the right needle 1 Slide the change switch A to the right until it is aligned to the R mark on the machine A 2 Run the thread in the sequence illustrated below following the green color an...

Page 22: ...read guide disk 4 all the way NOTE Make sure that the thread passes the notch of the thread guide 3 2 3 4 3 Cut the thread with the thread cutter 5 on the left side of the machine 5 4 Lower the needle threader lever 6 on the left side of the machine as much as possible 6 The thread passes through the eye of the needle 5 Release the needle threader lever 6 6 Carefully pull the loop of the thread th...

Page 23: ...Knits Stitch Overlock stitch Narrow over lock Rolled hemming stitch Overlock stitch Narrow over lock Rolled hemming stitch Overlock stitch Stitch Length mm 2 0 3 0 R 2 0 2 5 3 5 R 2 0 3 0 4 0 Thread Spun 80 90 Cotton 100 Filament 80 100 Needle thread Spun 80 90 Filament 80 100 Looper thread Woolly nylon thread Spun 80 90 Filament 80 100 Spun 60 80 Cotton 60 80 Filament 60 80 Needle thread Spun 60 ...

Page 24: ... Use For overlock stitching on suits blouses slacks etc Ideal for fine to medium materials NOTE Remove the right needle when sewing this overlock stitch Two thread overlock stitch 2 8 mm 7 64 inch Use two threads and the right needle producing 2 8 mm 7 64 inch seams Use For overlock stitching on suits blouses slacks etc Ideal for fine to medium materials NOTE Remove the left needle when sewing thi...

Page 25: ... the machine running at a low speed to obtain chaining off Then cut the stitches 5 cm 2 inches from the work If feeding for chaining off is not enough pull the thread gently 3 Place a piece of scrap material under the presser foot for test sewing NOTE Always lift the presser foot before placing the fabric under it You cannot start sewing by just running the fabric under the foot without lifting th...

Page 26: ... the seam sew one stitch out of the fabric before stopping the machine 2 Raise the presser foot and the needles then reverse the fabric 3 Lower the needles and the presser foot at the same position 4 Serge over the seam taking care not to cut the serged seam with a knife 5 After sewing a few stitches serge off the fabric as illustrated 6 Cut the threads with scissors Method 2 With this method the ...

Page 27: ...hen sewing as they will damage the needles and knives Tosewfinematerials 1 Adjust the presser foot pressure to prevent the material from puckering and to allow sewing of curves See CHAPTER 1 Adjusting the presser foot pressure 2 Loosen the thread tension but remember that if the tension is too loose the thread may break and stitches may be skipped To use the stitch finger W When sewing stretch fab...

Page 28: ...osed as shown below 1 4 While holding the thread change assembly 1 push the hole of the thread change assembly onto the upper end of the OL shaft 2 so that the OL shaft passes through the hole 5 Push the thread change assembly 2 fully downward until the tip 3 of the thread change assembly is put in the eye of the upper looper 4 Setting of the looper has finished Chart of two thread overlock stitch...

Page 29: ...e edge of a fabric This stitch is sewn by removing the left needle and using the 3 thread overlock stitch Instructions for both narrow overlock Rolled hemming stitches CAUTION Turn off the main power and light switch before removing installing a needle 1 Remove the left needle NOTE For the recommended thread and needle see CHAPTER 4 Sewing materials threads and needles comparison chart 2 Thread th...

Page 30: ... CHAPTER 4 Sewing materials threads and needles comparison chart See CHAPTER 4 Sewing materials threads and needles comparison chart R R Removed Forfinematerials 4 3 5 5 4 6 7 6 8 Narrow overlock stitch Underside of material Top of material See CHAPTER 4 Sewing materials threads and needles comparison chart See CHAPTER 4 Sewing materials threads and needles comparison chart See CHAPTER 4 Sewing ma...

Page 31: ... to increase the presser foot pressure See page 7 Replace with new needle See page 11 Install needles correctly See page 11 Do not press or pull material too hard when sewing Thread correctly See pages 13 18 Check spool pin thread holders etc and remove tangled thread Adjust the thread tension See pages 8 10 Install needles correctly See page 11 Use correct needle Schmetz130 705H suggested Seepage...

Page 32: ...Oiling For smooth and silent operation the moving parts indicated with arrows of the machine should be oiled periodically CAUTION Turn off the machine before opening the front cover and oiling NOTE Be sure to oil your sewing machine before use Always clean the lint off your machine before you apply oil Oil the machine once or twice a month for normal use If the machine is used more often oil it on...

Page 33: ...the machine while replacing the presser foot Blind stitch foot Features When using the blind stitch presser foot multi purpose foot you can sew blind stitches and overlock at the same time This is ideal when sewing cuffs trouser bottoms pockets and hemming skirts etc The stitch guide on this foot is also useful when sewing special stitches like flatlock pin tuck and other decorative stitches Blind...

Page 34: ...you sew with the wrong sides together the upper looper thread will decorate the right side when pulled flat If you sew with the right sides together the needle thread ladder will decorate the right side when pulled flat NOTE This method is not suitable for thin fabrics Pin tuck stitching The Pin tuck stitch uses a rolled edge to add shape and decoration to any sewing project Contrasting thread in ...

Page 35: ...e setting type of stitch 2 needle 4 thread overlock 1 needle 3 thread overlock Either needle can be used How to set the elastic tape 1 2 3 4 5 1 Attach the taping foot see CHAPTER 1 Attaching Removing presser foot 2 Lift the presser foot lever 3 Turn the hand wheel so that the line on the hand wheel is aligned to the line on the machine see CHAPTER 1 Turning direction of hand wheel 4 Flip open the...

Page 36: ...e CHAPTER 1 Attaching Removing presser foot 3 Set up the machine for 3 thread overlock stitch with one needle in the left position The right needle should be removed How to adjust the machine 1 Adjust the stitch length according to the length as A or B For example 4mm stitch length means 4mm for A or B A B A B 2 Adjust stitch width 3 to 5mm 3 Adjust thread tension as follows Needle thread slightly...

Page 37: ...fer to CHAPTER 5 Stitch selection 5 6mm 3mm 5 6mm 3mm How to set fabric and piping tape A 1 2 3cm 1 Surface 2 Reverse 1 Put piping tape between the 2 pcs of fabric and adjust both edges of the fabric as illustrated Keep 3cm piping tape over the edge of fabric for steady sewing The surface of fabric should be inside 2 Place fabric with piping tape under presser foot and put the piping tape into the...

Page 38: ...of hand wheel 3 Position the bottom piece of fabric the fabric that will be gathered 1 under the guide 3 just below the needle 4 Position the top piece of fabric 2 between the gathering foot and the guide 3 on top of the bottom fabric 1 5 Lower the presser foot lever Test sewing 1 Set the stitch length to 3mm 2 Set the differential feed ratio to 2 3 Set the stitch width to 5mm 4 Adjust the other s...

Page 39: ...dle bar stroke 25 mm 63 64 inch Presser foot Freepressertype Presser foot lift 5 mm to 6 mm 3 16 to 15 64 inch Needle SCHMETZ130 705H No of needles and threads Two Three Four threads convertible Two needles or single needle Machine net weight 6 kgs Machine dimensions 33 5 cm W x 29 8 cm H x 27 9 cm D Approx 13 2 5 W x 11 24 25 H x 11 4 25 D inches NeedlesetSCHMETZ130 705H 80 2 90 2 SPECIFICATIONS ...

Page 40: ...das 13 No tire del tejido ni lo empuje cuando esté cosiendo Podría desviar la aguja y romperla 14 Cuando vaya a realizar ajustes en la zona de la aguja como enhebrar la aguja cambiarla cambiar el prensatelas etc coloque la máquina de coser en la posición con el símbolo O 15 Desenchufe siempre la máquina de la toma de corriente cuando vaya a quitar alguna tapa lubricar o cuando vaya a realizar cual...

Page 41: ...ial o mental ni por personas sin experiencia o conocimientos técnicos a menos que hayan recibido supervisión o instrucciones relativas al uso del aparato por parte de una persona responsable de su seguridad Es necesario vigilar a los niños para asegurarse de que no juegan con el aparato Para proporcionar una vida útil más larga a la máquina 1 No guarde esta máquina bajo la luz directa del sol ni e...

Page 42: ...uto lo que resulta bastante rápido comparado con la velocidad normal de 300 a 800 puntadas por minuto de las máquinas de coser normales Los cojinetes del motor están hechos de una aleación especial impregnada en aceite sintético y montada en un fieltro impregnado en aceite para poder funcionar continuamente durante muchas horas Un funcionamiento continuo de la máquina puede producir un calentamien...

Page 43: ...3 Enhebrado para puntadas Overlock de una aguja y tres hilos aguja izquierda 13 Enhebrado para puntadas Overlock de una aguja y dos hilos aguja derecha 14 Enhebrado para puntadas Overlock de una aguja y dos hilos aguja izquierda 14 Enhebrado del áncora inferior 14 Enhebrado del áncora superior 16 Enhebrado de la aguja izquierda 17 Enhebrado de la aguja derecha 17 Enhebrado de la aguja utilizando e...

Page 44: ...da E Uñeta de puntadas F Uñeta de puntadas W Aberturas de ventilación de la parte trasera y de los lados en la parte trasera 1 Árbol del hilo 2 Tornillo de ajuste de la presión del prensatelas 3 Portabobinas 4 Soporte de la bobina 5 Tapa de toma de hilo 6 Agujas 7 Suplemento para la mesa 8 Prensatelas 9 Tapa de tejido 0 Disco de tensión del hilo de la aguja izquierda A Disco de tensión del hilo de...

Page 45: ...AL A Conjunto de cambio de hilo XB1991001 B Orificio de corte XB1958001 C Uñeta de puntadas W XB1902001 Accesorios opcionales Para obtener más información sobre los siguientes elementos véase el CAPÍTULO 8 D Prensatelas para puntadas invisibles X76590002 EPrensatelas fruncidor SA213 EE UU CANADÁ X77459001 OTROS LG F Prensatelas para tiras de perlas SA211 EE UU CANADÁ X76670002 OTROS LS G Prensatel...

Page 46: ...cesario abrir la tapa delantera para enhebrar la máquina Deslícela hacia la derecha 1 y ábrala 2 o bien ciérrela y deslícela hacia la izquierda PRECAUCIÓN Por su propia seguridad asegúrese siempre de que la tapa delantera esté bien cerrada antes de hacer funcionar la máquina Apague siempre la máquina antes de abrir la tapa delantera 1 2 Instalación desmontaje del prensatelas 1 Apague el interrupto...

Page 47: ...a costura sin brazo permite coser trozos tubulares de tejido de forma más sencilla 1 Extraiga el suplemento para la mesa A A NOTA Asegúrese de no perder el suplemento para la mesa extraído 2 Coloque el tejido y comience a coser véase el CAPÍTULO 5 Mesa ancha La utilización de la mesa ancha A facilita el cosido de piezas grandes Para instalar Fije la mesa ancha A empujándolo en la dirección de la f...

Page 48: ... retire la mano de la palanca Largo de las puntadas Un ajuste normal para el largo de las puntadas se sitúa en 3 mm Para cambiar el largo de las puntadas gire el disco de ajuste del largo de las puntadas en el lado derecho de la máquina 1 2 A 1 Acorte la longitud de puntada a un mínimo de 2 mm 2 Alargue la puntada a un máximo de 4 mm A Marca de selección Ancho de las puntadas El ajuste normal del ...

Page 49: ...de la máquina A 1 2 1 Menos de 1 0 2 Más de 1 0 A Marca de selección Ejemplo Al coser tejidos extensibles sin utilizar una alimentación con diferencial su borde quedará ondulado Para obtener un acabado liso ajuste la velocidad del alimentador de 1 0 hacia 2 0 la velocidad del alimentador requerida dependerá de la elasticidad del material Cuanto más elástico sea el tejido más hacia 2 0 se debe colo...

Page 50: ...arca verde es para la aguja derecha 3 El disco de tensión con marca rosada es para el áncora superior 4 El disco de tensión con marca azul es para el áncora inferior Control de la tensión Se puede coser en la posición 4 en la mayoría de los casos estándar SPAN 60 3Z Si la calidad de las puntadas resulta insuficiente seleccione un ajuste de tensión distinto 4 5 3 1 2 3 A Marca de selección de tensi...

Page 51: ...rior está suelto El hilo del áncora inferior está suelto El hilo de la aguja izquierda está suelto Al ajustar la tensión de los hilos debe hacerlo en el orden siguiente 1 Hilo de la aguja izquierda 2 Hilo de la aguja derecha 3 Hilo del áncora superior 4 Hilo del áncora inferior Es la mejor forma de lograr una tensión de hilo correcta Tense el hilo de la aguja izquierda amarillo Tense el hilo de la...

Page 52: ...uja amarillo o verde Afloje el hilo de la aguja amarillo o verde Afloje el hilo del áncora superior rosado Tense el hilo del áncora inferior azul Tense el hilo del áncora superior rosado Afloje el hilo del áncora inferior azul Tense el hilo del áncora superior rosado Tense el hilo del áncora inferior azul El hilo del áncora superior está suelto El hilo del áncora inferior está suelto Tabla de ajus...

Page 53: ...queda alineada con la línea de la máquina véase el CAPÍTULO 1 Cambio de la dirección de la ruedecilla 3 Afloje el tornillo de instalación de la aguja correspondiente girando la llave hexagonal incluida hacia 2 en la figura y retire la aguja Para instalar 1 Apague el interruptor de alimentación principal y de luz posición OFF 2 Gire la ruedecilla hasta que la línea de la misma queda alineada con la...

Page 54: ...se tal como se ilustra abajo Asegúrese de que la muesca del carrete quede hacia abajo 1 1 Tope del carrete Cómo utilizar la malla para hilo Si está cosiendo con un hilo de hilvanar le recomendamos cubrir el carrete con la malla provista para que el hilo no se deslice del carrete Adapte la malla a la forma del carrete Antes de enhebrar 1 Apague el interruptor de alimentación principal y de luz por ...

Page 55: ... cuatro hilos Enhebrado para puntadas Overlock de una aguja y tres hilos aguja derecha Enhebrado para puntadas Overlock de una aguja y tres hilos aguja izquierda 2 1 3 4 5 6 7 3 4 A left needle right needle 7 2 1 3 4 5 6 7 3 4 A 7 2 1 3 4 5 6 7 3 4 A 7 aguja izquierda aguja derecha ...

Page 56: ...a derecha y guiando la parte superior hacia usted 2 Saque el hilo del carrete y póngalo directamente a través del portahilos 1 y el portahilos 2 del árbol de enhebrado desde detrás a delante 3 Pase el hilo por la guía de hilo 3 de la parte superior de la máquina 4 Pase el hilo por el disco de tensión 4 que está en el canal situado al lado del disco de ajuste de la tensión azul Enhebrado para punta...

Page 57: ... el canal y pase el hilo por los puntos de enhebrado 5678 situados al lado de las marcas de color azul siguiendo el orden numérico de la ilustración NOTA Asegúrese de enhebrar ambas tomas de hilo 7 Continúe con Proceso simple de enhebrado del áncora inferior Proceso simple de enhebrado del áncora inferior 1 Deslice la palanca de enhebrado del áncora inferior A hacia la derecha El áncora inferior B...

Page 58: ...el áncora superior y vuelva a enhebrar el áncora superior desde el disco de tensión como mínimo Enhebrado del áncora superior Enhebre el hilo según lo ilustrado en la secuencia observando el color rosa y los números inscritos al lado de cada punto de enhebrado 2 1 3 4 3 4 5 6 8 9 7 7 6 8 9 1 Abra la tapa delantera deslizándola hacia la derecha y guiando la parte superior hacia usted 2 Saque el hil...

Page 59: ...tor de cambio A hacia la derecha hasta que quede alineado con la marca R de la máquina A 2 Enhebre el hilo según ilustrado en la secuencia de abajo siguiendo el color verde y los números inscritos al lado de cada punto de enhebrado a Saque el hilo del carrete y póngalo directamente a través del portahilos 1 y el portahilos 2 del árbol de enhebrado desde detrás a delante b Sujete el hilo con sus ma...

Page 60: ...elo completamente en la ranura del disco de guía de hilo 4 NOTA Asegúrese de que el hilo pase la muesca de la guía de hilo 3 2 3 4 3 Corte el hilo con el cortador de hilo 5 del lado izquierdo de la máquina 5 4 Baje lo más posible la palanca del enhebrador de aguja 6 del lado izquierdo de la máquina 6 El hilo pasa a través del ojo de la aguja 5 Suelte la palanca del enhebrador de aguja 6 6 Tire cui...

Page 61: ...verlock Puntada overlock estrecha de dobladillo enrollado Puntada overlock Largo de las puntadas mm 2 0 3 0 R 2 0 2 5 3 5 R 2 0 3 0 4 0 Hilo Hilo de hilvanar n 80 90 Algodón n 100 Filamento n 80 100 Hilo de las agujas Hilo de hilvanar n 80 90 Filamento n 80 100 Hilo de los áncoras Hilo de nilón tipo lana Hilo de hilvanar n 80 90 Filamento n 80 100 Hilo de hilvanar n 60 80 Algodón n 60 80 Filamento...

Page 62: ...lock en trajes blusas pantalones etc Ideal para tejidos finos y medios NOTA Retire la aguja derecha para coser con esta puntada overlock Puntada Overlock de dos hilos 2 8 mm Utilice dos hilos y la aguja derecha para producir costuras de 2 8 mm Uso Para puntadas overlock en trajes blusas pantalones etc Ideal para tejidos finos y medios NOTA Retire la aguja izquierda para coser con esta puntada over...

Page 63: ...ra siga cosiendo a baja velocidad para formar una cadeneta A continuación corte las puntadas a unos 5 cm del trabajo Si la alimentación no resulta suficiente como para crear una cadeneta tire suavemente del hilo 3 Coloque un trozo de tejido debajo del prensatelas para realizar la costura de prueba NOTA Levante siempre el prensatelas antes de colocar el tejido debajo No puede comenzar a coser simpl...

Page 64: ...costura cosa una puntada fuera del tejido antes de detener la máquina 2 Levante el prensatelas y las agujas y dé la vuelta al tejido 3 Baje las agujas y el prensatelas en la misma posición 4 Cosa sobre la costura evitando cortar la costura cosida con una cuchilla 5 Tras coser algunas puntadas remate el tejido como se ilustra 6 Corte los hilos con unas tijeras Método 2 Con este método se puede aseg...

Page 65: ...romper las agujas y cuchillas Para coser tejidos finos 1 Ajuste la presión del prensatelas para que el tejido no se frunza y para permitir la costura de curvas véase el CAPÍTULO 1 Ajuste de la presión del prensatelas 2 Afloje la tensión del hilo pero no olvide que si la tensión queda demasiada floja el hilo se puede romper y algunas puntadas podrían saltarse Para utilizar la uñeta de puntadas W Cu...

Page 66: ... muestra a continuación 1 4 Sujetando el conjunto de cambio de aguja 1 empuje el orificio del conjunto de cambio de aguja en el extremo superior del eje OL 2 de forma que este eje OL pase a través del orificio 5 Empuje completamente hacia abajo el conjunto de cambio de aguja 2 hasta que la punta 3 del conjunto de cambio de aguja se coloque en el ojo del áncora superior 4 El ajuste del áncora ha fi...

Page 67: ...ock de tres hilos usando la aguja derecha 3 Retire la uñeta de puntadas A 1 Levante la palanca del prensatelas 2 Tire de todos los hilos hacia la parte trasera de la máquina 3 Compruebe que el hilo no queda enrollado alrededor de la uñeta de puntadas 4 Abra la tapa delantera 5 Gire la ruedecilla hasta que el áncora superior llegue a su posición más baja 6 Tire de la uñeta de puntadas hacia la dere...

Page 68: ...LO 4 Tabla de relación entre los distintos tejidos hilos y agujas de costura Véase el CAPÍTULO 4 Tabla de relación entre los distintos tejidos hilos y agujas de costura R R Retirada Para tejidos finos 4 3 5 5 4 6 7 6 8 Puntada overlock estrecha Parte inferior del tejido Parte superior del tejido Véase el CAPÍTULO 4 Tabla de relación entre los distintos tejidos hilos y agujas de costura Véase el CA...

Page 69: ... presión del prensatelas Véase página 7 Cambie la aguja por una nueva Véase página 11 Coloque las agujas correctamente Véase página 11 No apriete ni tire del tejido demasiado fuerte al coser Enhebre los hilos correctamente Véanse páginas 13 18 Compruebe el portabobinas los portahilos etc y retire los hilos enredados Ajuste la tensión de los hilos Véanse páginas 8 10 Coloque las agujas correctament...

Page 70: ...ra conseguir un funcionamiento suave y silencioso de la máquina sus partes móviles indicadas con flechas se deberán engrasar periódicamente PRECAUCIÓN Apague la máquina antes de abrir la tapa delantera y engrasar NOTA Asegúrese siempre de engrasar la máquina antes de utilizarla Siempre limpie la pelusa antes de proceder al engrasado Engrase la maquina una o dos veces al mes para un uso normal Si s...

Page 71: ...satelas Prensatelas para puntadas invisibles Características Al utilizar el prensatelas para puntadas invisibles prensatelas multipropósito puede coser puntadas invisibles y overlock al mismo tiempo Es ideal para coser puños bajos de pantalones bolsillos dobladillos de faldas etc La guía de puntadas de este prensatelas también es útil para coser puntadas overlock planas pliegues y otras puntadas d...

Page 72: ...n los reveses juntos el hilo del áncora superior va a decorar el derecho al aplanar el tejido Si cose con los derechos juntos la escalera del hilo de la aguja decorará el derecho al aplanar el tejido NOTA Este método no conviene para tejidos finos Puntadas de pliegues pequeños Las puntadas de pliegues pequeños usan un borde enrollado para agregar cierta forma y decoración a cualquier trabajo de co...

Page 73: ...da overlock de 2 agujas y 4 hilos overlock de 1 aguja y 3 hilos se puede utilizar cualquier aguja Como ajustar la cinta o el elástico 1 2 3 4 5 1 Conecte el prensatelas para cintas véase el CAPÍTULO 1 Instalación desmontaje del prensatelas 2 Levante la palanca del prensatelas 3 Gire la ruedecilla hasta que la línea de la misma quede alineada con la línea de la máquina véase el CAPÍTULO 1 Cambio de...

Page 74: ... de perlas véase el CAPÍTULO 1 Instalación desmontaje del prensatelas 3 Ajuste la máquina para puntada overlock de 3 hilos con una aguja en la posición izquierda La aguja de la derecha se debe quitar Cómo ajustar la máquina 1 Ajuste el largo de las puntadas de acuerdo con la longitud como A o B Por ejemplo un largo de las puntadas de 4 mm indica 4 mm para A o B A B A B 2 Ajuste el ancho de las pun...

Page 75: ...les véase el CAPÍTULO 5 Selección de las distintas puntadas 5 6mm 3mm 5 6mm 3mm Cómo ajustar el tejido y la cinta de ribetear A 1 2 3cm 1 Superficie 2 Revés 1 Coloque la cinta de ribetear entre 2 trozos de tejido y ajuste los dos bordes como se ilustra Mantenga 3 cm de cinta de ribetear sobre el borde del tejido para coser de forma continua La superficie del tejido debe quedar en el interior 2 Col...

Page 76: ... dirección de la ruedecilla 3 Coloque el trozo inferior del tejido el tejido que se va a fruncir 1 bajo la guía 3 justo bajo la aguja 4 Coloque el trozo superior del tejido 2 entre el prensatelas fruncidor y la guía 3 sobre el trozo inferior 1 5 Baje la palanca del prensatelas Costura de prueba 1 Ajuste el largo de las puntadas a 3 mm 2 Ajuste la velocidad del alimentador con diferencial a 2 3 Aju...

Page 77: ... a 4 mm Movimiento de la barra de las agujas 25 mm Prensatelas Tipo de prensatelas libre Elevación del prensatelas 5 mm a 6 mm Aguja SCHMETZ130 705H N de agujas e hilos Convertible en dos tres cuatro hilos Dos agujas o una sola Peso neto de la máquina 6 kg Dimensiones de la máquina 33 5 cm An x 29 8 cm Al x 27 9 cm Pr Juego de agujas SCHMETZ 130 705H nº 80 2 nº 90 2 ESPECIFICACIONES ...

Page 78: ...36 ...

Page 79: ...AJUSTES THREAD TENSION TENSION DE HILO FABRIC TEJIDO THREAD HILO NEEDLE AGUJA NOTE NOTA STITCH TYPE Tipo de puntada left needle aguja izquier da right needle aguja derecha upper looper áncora superior lower looper áncora inferior ...

Page 80: ...XB2006001 Printed in Taiwan ...

Reviews: