background image

Loudspeaker line isolator system

PRAESENSA

en

Installation manual

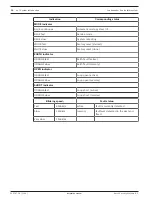
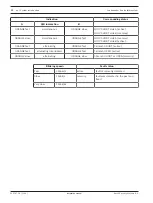
Summary of Contents for F.01U.393.727

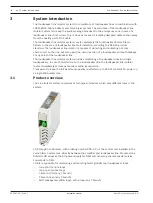
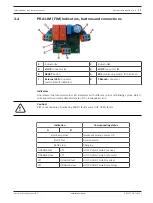
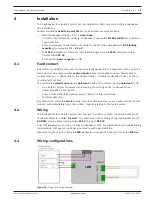
Page 1: ...Loudspeaker line isolator system PRAESENSA en Installation manual ...

Page 2: ......

Page 3: ...4 2 Wiring 13 4 3 Wiring configurations 13 4 4 Installing PRA LID LDB with PRAESENSA 14 4 4 1 Physical installation 15 4 4 2 End Of Line EOL monitoring 15 4 4 3 Powering of the PRA LID LDB 15 4 4 4 PRA LID LDB Enable Amplifier Detection setting 15 4 5 Installing order PRA LID LDB 15 4 6 Installing PRA LIM FIM on a loudspeaker line 16 5 Examples of loudspeaker line isolator system installations 20 ...

Page 4: ... local codes No user serviceable parts inside 1 2 Disposal instructions Old electrical and electronic appliances Electrical or electronic devices that are no longer serviceable must be collected separately and sent for environmentally compatible recycling in accordance with the European Waste Electrical and Electronic Equipment Directive To dispose of old electrical or electronic devices you shoul...

Page 5: ...n put a trademark symbol in every occurrence of a trademark name Bosch Security Systems states that the names are used only in an editorial fashion and to the benefit of the trademark owner with no intention of infringement of the trademark 2 3 Notice of liability While every effort has been taken to ensure the accuracy of this document neither Bosch Security Systems nor any of its official repres...

Page 6: ... loudspeaker and earth leakage at any point of the loudspeaker line The loudspeaker line isolator system provides monitoring of loudspeaker lines and single loudspeakers In case of fatal failure on the loudspeaker line the loudspeaker line isolator reacts immediately and keeps seamless audio transmission Transparent to keep the full band audio quality unaffected up to 800 W constant AC power on a ...

Page 7: ...branch short T branch open 3 2 Main functionality Architecture of the loudspeaker line isolator system allows you to create loudspeaker line in closed loop topology with extra side spurs called T Branches The loop as well as every single T Branch are constantly monitored and searched for any abnormalities in the load and cabling Figure 3 1 Loudspeaker loop monitored by the loudspeaker line isolato...

Page 8: ...e T Branch with EOL resistor enabled earth leakage on the main loop earth leakage of the T Branch with EOL resistor enabled i Notice For the purpose of line monitoring the loudspeaker line isolator system generates DC voltage on the entire loudspeaker line including T Branches therefore each loudspeaker on the line has to be equipped in series with DC blocking capacitor Loudspeakers without a capa...

Page 9: ...connector 4 SERVICE button 9 Power amplifier connector 5 RESET button 10 Loopdrive bus DIN rail connector Indicators Line isolator feature multi color LED indicators with different color and blinking cycles which correspond to currently detected state of the loudspeaker line General principle of LED indications BLUE system OK ORANGE fault detected Fault detection is always indicated by cyclic blin...

Page 10: ...ting WHITE fast Factory reset started WHITE slow Factory reset done EARTH indicator ORANGE fast Earth fault active ORANGE slow Earth fault memory OPEN indicator ORANGE fast Loop open active ORANGE slow Loop open memory SHORT indicator ORANGE fast Loop short active ORANGE slow Loop short memory Blinking speed Fault status Fast 4 blinks s active fault is currently detected Slow 1 blink s memory faul...

Page 11: ...T Branch connector Indicators Line isolator feature multi color LED indicators with different color and blinking cycles which correspond to currently detected state of the loudspeaker line Caution FIM is not capable of indicating EARTH faults and LOOP OPEN faults Indication Corresponding status A B BLUE very slow Quiescent mode system OK BLUE fast Service mode BLUE slow Charging ORANGE fast off LO...

Page 12: ...e B memory ORANGE slow simultaneous ORANGE fast LOOP SHORT side A memory LOOP SHORT side B active ORANGE fast alternating ORANGE fast T Branch SHORT active ORANGE fast alternating interrupted ORANGE fast T Branch OPEN active ORANGE slow alternating ORANGE slow T branch SHORT or OPEN memory Blinking speed Fault status Fast 4 blinks s active fault is currently detected Slow 1 blink s memory fault wa...

Page 13: ...tact closure or depending on the system design multiple loudspeaker lines can share common fault contact The contact is normally open during quiescent mode of the system During quiescent mode Line isolator system is powered and running monitoring entire loudspeaker line Power amplifier is connected Loop is closed and fully working every T Branch is fully operational No faults detected Any other st...

Page 14: ...alling PRA LID LDB with PRAESENSA This section will describe the installation and configuration of the Line Isolator Drive in combination with PRAESENSA to ensure an EN 54 16 compliant installation We strongly recommend to first install and connect LDB to PRAESENSA and the loudspeaker line Having loudspeaker line connected to LDB gives you the DC power on the line which is necessary for correct st...

Page 15: ...The input contact will be configured accordingly in the PRAESENSA system 4 4 3 Powering of the PRA LID LDB The PRA LID LDB needs to be powered from the PRAESENSA Multifunction power supply large PRA MPS3 This to ensure a redundant and certified power source solution according EN 54 One of the three 48 V outputs of the PRA MPS3 device will be used for connecting only PRA LID LDB reaching from one P...

Page 16: ...ifier or have individual power amplifiers from the main system Amplifier sharing allows you to create multiple loops within one zone each with individual surveillance Refer to PRA LID LDB Indicators buttons and connections page 9 4 6 Installing PRA LIM FIM on a loudspeaker line Before you start connecting FIMs on the loop make sure that LDB is connected to the rail and powered See Installing order...

Page 17: ...in open position FACTORY RESET state for FIM is temporary Soon after power up FIM should switch relays to closed position making a click sound confirming correct relay operation Figure 4 5 Side A of FIM connected to PRIMARY side of the loop 8 Connect the outgoing loop cable to the loop connector on the other side of FIM Mind the cable polarity 9 If the cabling is correct FIM will remain in SERVICE...

Page 18: ...L resistor is installed on the end of T Branch line switch the EOL monitoring ON In case of T Branch line open FIM will indicate the problem with interrupted orange alternating blinking See PRA LIM FIM Indicators buttons and connections page 11 12 If the T Branch cabling is correct FIM will remain in SERVICE MODE Figure 4 8 T Branch line with EOL monitoring 13 Proceed with installation of the next...

Page 19: ...DB will stop LDB remains in SERVICE MODE 15 Reset LDB by pushing RESET button LDB will reboot to QUIESCENT MODE Figure 4 9 Complete loudspeaker line isolator system installation diagram Figure 4 10 Complete loudspeaker line isolator system installation with optional GROUND wire loop Refer to Installing order PRA LID LDB page 15 PRA LIM FIM Indicators buttons and connections page 11 ...

Page 20: ...ne isolator system 2021 07 28 V1 00 Installation manual Bosch Security Systems B V 5 Examples of loudspeaker line isolator system installations Figure 5 1 Minimum configuration equivalent to A B line Figure 5 2 Loudspeakers only on the loop Figure 5 3 One FIM per each loudspeaker ...

Page 21: ...tor system Examples of loudspeaker line isolator system installations en 21 Bosch Security Systems B V Installation manual 2021 07 28 V1 00 Figure 5 4 T Branch lines with multiple loudspeakers Figure 5 5 Mixed configuration ...

Page 22: ...RTH fault may be detected and indicated simultaneously and should be investigated individually If fault indications on LDB are in memory state slow blinking simply push RESET button on LDB and after reboot LDB will return to QUIESCENT mode The following chapters relates to situation SHORT fault page 22 OPEN fault page 24 EARTH fault page 25 Wrong cable polarity double twist page 25 6 1 1 SHORT fau...

Page 23: ...rther steps to locate the faulty section Two alternative solutions are available Loopdrive Sniffer PC application is the easiest way to go Use FIM tracking feature for the best result FIM tracking is automated procedure which allows you to find the exact location of the short fault Please go to the Loopdrive Sniffer manual for details See www boschsecurity com Disconnect loudspeaker cable from SEC...

Page 24: ...ng the fault 4 Power amplifier is disconnected Possible solution 1 Check if power amplifier is connected If so continue with the same procedure as for SHORT fault Two alternative solutions are available 2 Loudspeaker line isolator Sniffer PC application is the easiest way to go Use FIM tracking feature for the best result FIM tracking is automated procedure which allows you to find the exact locat...

Page 25: ... use the FIM tracking feature of loudspeaker line isolator Sniffer PC application FIM tracking is automated procedure which allows you to find the exact location of the earth fault Find more details in the Sniffer manual on www boschsecurity com 6 1 4 Wrong cable polarity double twist If there are two or more but even number twists in loop cable polarity some of FIM modules are not powered and the...

Page 26: ...elp you finding the exact location and type of the fault i Notice Multiple faults can be shown on FIM at the same time In this case different fault indications will be superimposed creating combined indication FIM can be reset only if all faults are removed and all indications are in memory state If fault indications on FIM are in memory state slow orange blinking simply push RESET button on FIM o...

Page 27: ...still operational and fed with audio from the healthy side of the loop See PRA LIM FIM Indicators buttons and connections page 11 Short on side A Short on side B Possible solution Remove the short circuit from the loop section When the problem is fixed the fast blinking indication on FIM will turn slow Now you can reset FIM to QUIESCENT mode where both A and B relays are closed To reset FIM 1 Push...

Page 28: ...n in the loop T Branch is isolated from the loop See PRA LIM FIM Indicators buttons and connections page 11 Possible solution Remove the short circuit from the T Branch When the problem is fixed the fast blinking indication on FIM will turn slow Now you can reset FIM to QUIESCENT mode where both A and B relays are closed To reset FIM 1 Push RESET button on the FIM module Or 2 send REMOTE FIM RESET...

Page 29: ...f the FIM are open creating an interruption in the loop T Branch is isolated from the loop See PRA LIM FIM Indicators buttons and connections page 11 Possible solution Reconnect the T Branch line to FIM including 47 kΩ EOL resistor When the problem is fixed the fast blinking indication on FIM will turn slow Now you can reset FIM to QUIESCENT mode where both A and B relays are closed To reset FIM 1...

Page 30: ... open loop fault Disconnect loop cable from PRIMARY or SECONDARY output of LDB Confirm that OPEN indication on LDB appears Confirm that fault contact was activated Connect the loop cable back to LDB Confirm that OPEN indication on LDB disappears 6 Put LDB into QUIESCENT mode 7 Simulate earth leakage fault Make direct connection between L or L wire to ground potential Ground pin of LDB Confirm that...

Page 31: ...tage 30 V DC current max cont 130 mA Wiring 2 wire Max 2 5 mm2 Max Loop length 1000 m Grounding Earth loop through third connection pin Loop relay contact rating max 250 VAC 8 A Dual state type Maximum total loop load 800 W Loudspeaker type only with DC blocking capacitor Maximum number of FIM connected single loop 200 Short detection 90 Ω L to L Open detection 1 8 kΩ PRI to SEC AMP to AMP Ground ...

Page 32: ...very time Loop short 4 s Other faults 0 s no audio interruption Environmental Operating temperature 5 C 40 C Storage temperature 20 C 70 C Relative humidity 15 93 Mechanical Housing Bopla Combinorm Connect DIN rail version IP30 Protection rating IP 30 Dimensions W x H x D 17 5 mm x 114 5 mm x 99 mm Weight 200 g Mounting Quick snap on DIN rail inside rack housing Connections Loopdrive bus DIN rail ...

Page 33: ...OOP Maximum AC load 50 W Wiring 2 wire max 2 5 mm2 loop max length 1 km outer cable diameter max 13 mm Grounding Optional earth loop through third connection pin Loop relay contact rating Max 250 VAC 8 A Dual state type Maximum total loop load 800 W Loudspeaker type Only with DC blocking capacitor Maximum number of FIM s single loop 200 Maximum number of loudspeakers Between FIM s Infinite within ...

Page 34: ...tection time Loop short T branch short 1 s T branch open only with EOL monitoring 5 s Audio recovery time Loop short 4 s Other faults 0 s no audio interruption Environmental Operating temperature 25 C 55 C Storage temperature 20 C 70 C Relative humidity 15 93 Mechanical Housing Plastic body ABS PC V0 with transparent cover PC V0 Protection rating IP 33 Dimensions W x H x D IP 33 housing 110 x 130 ...

Page 35: ... Safety EN 62368 1 EN 62479 Immunity EN 50130 4 EN 55035 Emissions EN 61000 6 3 EN 61000 6 4 EN 55032 Environment EN IEC 63000 Conformity declarations Europe CE PRA LIM FIM Emergency standard certifications Europe EN 54 16 EN 54 17 Regulatory areas Safety EN 62368 1 EN 62479 Immunity EN 50130 4 EN 55035 Emissions EN 61000 6 3 EN 61000 6 4 EN 55032 Environment EN IEC 63000 Conformity declarations E...

Page 36: ...36 Technical data Loudspeaker line isolator system 2021 07 28 V1 00 Installation manual Bosch Security Systems B V ...

Page 37: ......

Page 38: ...Bosch Security Systems B V Torenallee 49 5617 BA Eindhoven Netherlands www boschsecurity com Bosch Security Systems B V 2021 202107280839 ...

Reviews: