TECHNICAL SERVICE BULLETIN
BOSCH, THERMADOR, AND SIEMENS BUILT-IN WALL OVENS
58300000169667 ABZ EN A
NOVEMBER 2012
Page 1/4
Continued next page~
EN OVEN DOOR LATCH SERVICE KIT 751505
Due to a supplier change, the oven door latch now offered as the service replacement for some Bosch, Thermador, and Siemens built-in wall
ovens may have a slightly different design than the original part. Service kit 751505 has been developed to make the new latch compatible with
products originally built with the 644216 Meteor latch. For wall ovens built with the newer HTI latch, the HTI latch in the service kit can be used
as a direct replacement.
This bulletin includes instructions for unlocking a stuck latch and for replacing a latch with some or all components in Latch Service Kit 751505.
K
IT
C
OMPONENTS
O
PENING A
S
TUCK
L
ATCH
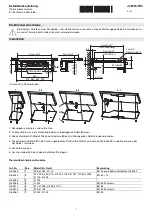
If the oven door latch being serviced is stuck in the locked position, first try to cycle the latch by resetting the power. If that fails, run a thin
wire or a wire coat hanger in between the door and the front face of the oven. Position the wire between the latch hook (1) and the plunger
(2), then slide the wire to the left, pushing the latch hook left and releasing the latch.
The information provided in this document is intended for trained, qualified personnel only. The proper function and the safety of the appliance can be affected by an improper repair, and even serious
threats to life or physical condition may arise. BSH Home Appliances Corporation is not liable for damages caused by improper repairs performed by unauthorized parties. Local codes and standards
apply and must be observed. Contact the Technical Support Team for further assistance.
Position the wire between
the latch hook and the
plunger as shown
(1) HTI Latch
(for all 27“ and 30“ ovens)
(1)
Bottom mounting plate
(for 27“ ovens with Meteor
latch only)
(2) Screws for securing HTC
(for lower ovens in 27“ double ovens with
Meteor latch only)
Original latch in locked position
2
1
New latch in locked position
2
1