

빠른
시작
설명서
Кратко упътване за бърз старт
Greitos darbo pradžios vadovas
Stručná příručka
Īsa pamācība
Quick Start-vejledning
Hurtigstartsveiledning
Snelstartgids
Guia de consulta rápida
Lühijuhend
Instrukcja szybkiej instalacji
Краткое руководство
Guide de démarrage rapide
Ghid de pornire rapidă
Pikakäynnistysopas
Guía de inicio rápida
Schnellstarthilfe
Vodič za brzo korišćenje
Οδηγός γρήγορης έναρξης
Stručný návod na spustenie
Beüzemelési útmutató
Snabbstartsguide
Guida Rapida
Panduan Ringkas
Hızlı Başlatma Kılavuzu
クイックスタートガイド
Höôùng daãn khôûi ñoäng nhanh
Жылдам іске қосу нұсқаулығы
E13186
Quick Start Guide
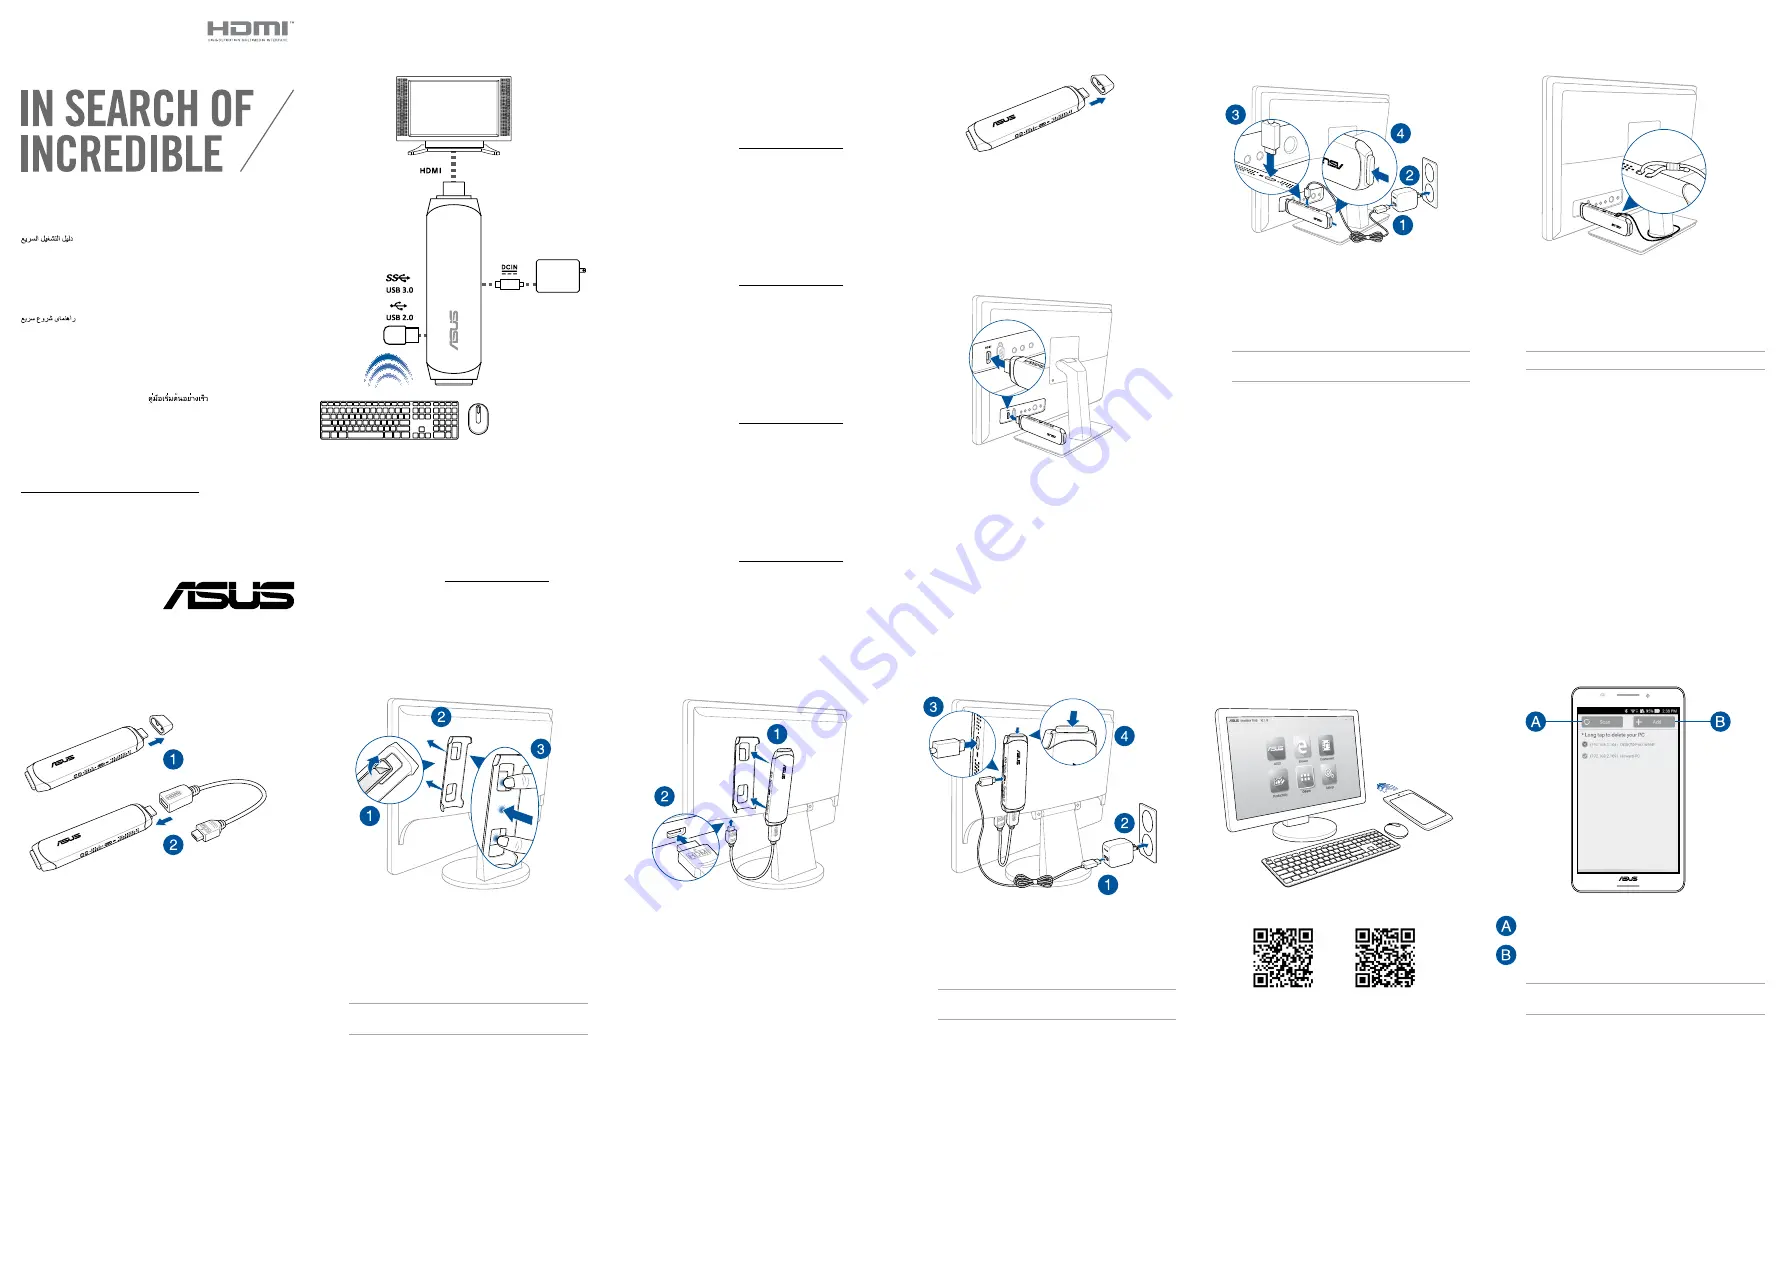
Connecting VivoStick
1. Remove the cap.
2. Plug your VivoStick into an HDMI port.
3. Connect the power into your VivoStick and press the
power button for one (1) second.
NOTE:
Ensure to use the bundled power adapter to
prevent damage to the device.
Getting started
NOTE:
• Ensure that the air vents on your VivoStick are not blocked or else overheating
may occur. Use the VivoStick Holder to prevent blocking the air vents.
• Place your VivoStick or powered USB hub near the side of your monitor to
ensure that wireless signals are not obstructed.
• Use the USB 2.0 port to connect external devices to maintain the quality of your
wireless connections.
• Use a keyboard and mouse to set up the device when using it for the first time.
USB hub, keyboard and mouse are for reference only and not included.
• Any peripheral over 500 mA (USB 2.0) or 900 mA (USB 3.0) current draw should
be connected via a powered USB hub, and not directly to the USB port.
• For best performance, operate at 1°C (33.8˚F) – 35˚C (95˚F).
• Visit our multi-language web site at https://www.asus.com/support/
3. Place your VivoStick into the VivoStick Holder, then
plug your VivoStick into an HDMI port.
Connecting HDMI extension cable
and VivoStick Holder
1. Remove the cap, then connect your HDMI extension
cable.
4. Connect the power into your VivoStick and press the
power button for one (1) second.
NOTE:
Ensure to use the bundled power adapter to
prevent damage to the device.
15060-76010300
For multi-language manuals, please refer to ASUS website:
http://www.asus.com/Stick-PCs/VivoStick-PC-TS10
VivoRemote APP
Scan the QR code, or download the VivoRemote APP from
the
Google Play Store
or
iOS App Store
to use your
mobile device as a remote controller.
Android
iOS
Security Notch
Insert a wire through the security notch and then crimp
the ends together with a cable sleeve.
NOTE:
Security cable loop is not included.
Tap to search for your VivoStick again.
Tap to enter the IP and connect your VivoStick.
NOTE:
Ensure that your VivoStick and mobile device are
on the same Wi-Fi network.
2. Ensure the adhesive is firmly placed on the back of
the VivoStick Holder, then stick your VivoStick Holder
to your monitor and firmly press it in place.
NOTE:
Ensure to wait at least twenty-four (24) hours for
the adhesive to secure in place.


