
Customizing with ROG Armoury
For more lighting effects, and lighting zone configurations, download and install the ROG Armoury from
https://www.asus.com/ROG-Republic-Of-Gamers/ROG-Balteus-Qi/HelpDesk_Download/.
Getting started
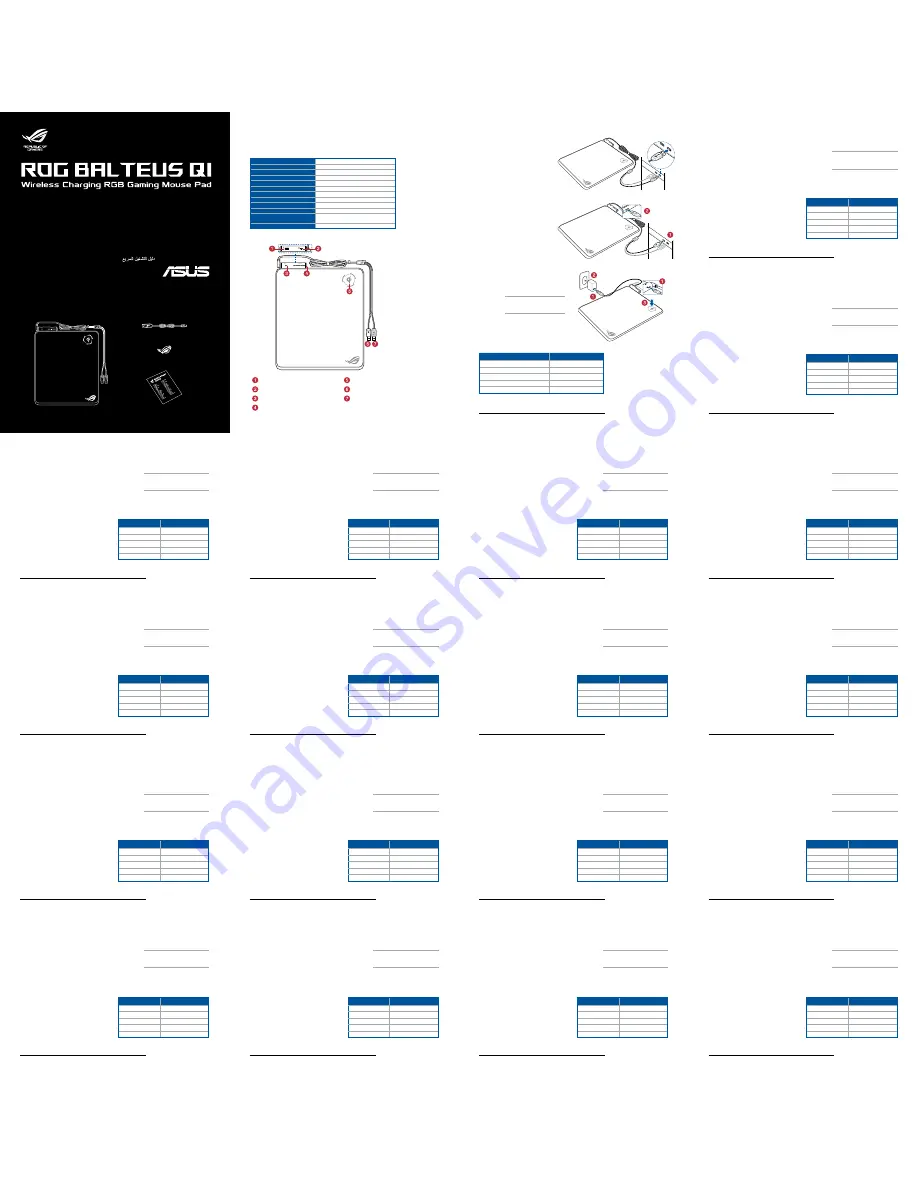
To set up your ROG BALTEUS Qi Wireless
Charging RGB Gaming Mouse Pad:
Connect the USB connector (PAD) to an available
USB port on your device.
Q14354
Connection
USB 2.0
USB Passthrough Port
1 x USB 2.0
Wireless Charging
Qi wireless charging
RGB Lighting Effects
9 lighting effects
Lighting Zone
15 customizable zones
Lighting Mode Button
Toggles between lighting profiles or brightness
Charging Status Indicator
1 x LED indicator
Surface
Micro-textured hard surface
Bottom
Non-slip rubber base
Dimension (L x W x H)
370 x 320 x 7.9mm
Cable
1 x 2-Meter braided USB Y-cable
1 x 1-Meter Qi wireless charging cable
Operating System
Windows
®
10
Specifications
Specifications (F) / Specifications (G) / Specifications (I) / Specifications (S) / Specifications (TR) / Specifications (CZ) / Specifications
(DU) / Specifications (BP) / Specifications (R) / Specifications (FI) / Specifications (HUG) / Specifications (NW) / Specifications (PL)
/ Specifications (SK) / Specifications (SW) / Specifications (UA) / Specifications (ARB) / Specifications (RO) / Specifications (T) /
Specifications (C) / Specifications (J) / Specifications (K)
Package contents
Package contents (F) / Package contents (G) / Package contents (I) / Package contents (S) / Package contents (TR) / Package
contents (CZ) / Package contents (DU) / Package contents (PG) / Package contents (R) / Package contents (FI) / Package contents
(HUG) / Package contents (NW) / Package contents (PL) / Package contents (SK) / Package contents (SW) / Package contents (UA)
/ Package contents (ARB) / Package contents (RO) / Package contents (T) / Package contents (C) / Package contents (J) / Package
contents (K)
1 x ROG BALTEUS Qi wireless charging RGB gaming mouse pad
1 x Qi wireless charging cable
1 x ROG logo sticker
1 x User documentation
Device features
USB 2.0 passthrough port
Qi wireless charging zone
Micro USB DC-in port
USB passthrough connector
Qi wireless charging status indicator
USB connector (PAD)
Lighting mode button
To set up your USB 2.0 passthrough port:
1.
Connect the USB passthrough connector
to an available USB port on your device.
2.
Connect your USB device to the USB 2.0
passthrough port on your mouse pad.
Using the Qi wireless charging
function
1.
Connect the bundled Qi wireless charging cable to
the micro USB DC-in port and an adapter.
NOTE:
We recommend using an
adapter with a minimum of 5V2A power
rating for optimal performance.
2.
Plug the adapter into a 100V~240V power source.
3.
Place your device on the Qi wireless charging
zone. Ensure that the Qi wireless charging zone is
aligned with your device’s Qi charging zone.
LED Status
Description
Blue (slowly blinking)
Fully charged
Blue (blinking)
Charging
Blue (rapidly blinking)
Low charging efficiency
Red (blinking)
Charging failure
Off
Standby
Qi wireless charging status indication
Quick Start Guide
快速使用指南(繁體中
文)
快速使用指南(簡體中文)
クイックスタートガイド
빠른 시작 설명서
Guide de démarrage rapide
Schnellstartanleitung
Guida rapida
Краткое руководство
Guía de inicio rápido
Beknopte handleiding
Hızlı Başlangıç Kılavuzu
Beüzemelési útmutató
Стисле керівництво для початку
експлуатації
Instrukcja szybkiej instalacji
Rychlý průvodce
Ghid de pornire rapidă
Snabbstartsguide
Stručný návod na spustenie
Quick Start-vejledning
Pikaopas
Hurtigstartveiledning
Guia de consulta rápida
F
Customizing with ROG Armoury
For more lighting effects, and lighting zone configurations, download and install the ROG Armoury from
https://www.asus.com/ROG-Republic-Of-Gamers/ROG-Balteus-Qi/HelpDesk_Download/.
Getting started
To set up your ROG BALTEUS Qi Wireless Charging
RGB Gaming Mouse Pad:
Connect the USB connector (PAD) to an available USB port on
your device.
Device features
To set up your USB 2.0 passthrough port:
1.
Connect the USB passthrough connector to an
available USB port on your device.
2.
Connect your USB device to the USB 2.0 passthrough
port on your mouse pad.
1.
USB 2.0 passthrough port
2.
Micro USB DC-in port
3.
Qi wireless charging status indicator
4.
Lighting mode button
5.
Qi wireless charging zone
6.
USB passthrough connector
7.
USB connector (PAD)
Using the Qi wireless charging function
1.
Connect the bundled Qi wireless charging cable to the
micro USB DC-in port and an adapter.
NOTE:
We recommend using an adapter
with a minimum of 5V2A power rating for
optimal performance.
2.
Plug the adapter into a 100V~240V power source.
3.
Place your device on the Qi wireless charging zone.
Ensure that the Qi wireless charging zone is aligned
with your device’s Qi charging zone.
LED Status
Description
Blue (slowly blinking)
Fully charged
Blue (blinking)
Charging
Blue (rapidly blinking)
Low charging efficiency
Red (blinking)
Charging failure
Off
Standby
Qi wireless charging status indication
I
Customizing with ROG Armoury
For more lighting effects, and lighting zone configurations, download and install the ROG Armoury from
https://www.asus.com/ROG-Republic-Of-Gamers/ROG-Balteus-Qi/HelpDesk_Download/.
Getting started
To set up your ROG BALTEUS Qi Wireless Charging
RGB Gaming Mouse Pad:
Connect the USB connector (PAD) to an available USB port on
your device.
Device features
To set up your USB 2.0 passthrough port:
1.
Connect the USB passthrough connector to an
available USB port on your device.
2.
Connect your USB device to the USB 2.0 passthrough
port on your mouse pad.
1.
USB 2.0 passthrough port
2.
Micro USB DC-in port
3.
Qi wireless charging status indicator
4.
Lighting mode button
5.
Qi wireless charging zone
6.
USB passthrough connector
7.
USB connector (PAD)
Using the Qi wireless charging function
1.
Connect the bundled Qi wireless charging cable to the
micro USB DC-in port and an adapter.
NOTE:
We recommend using an adapter
with a minimum of 5V2A power rating for
optimal performance.
2.
Plug the adapter into a 100V~240V power source.
3.
Place your device on the Qi wireless charging zone.
Ensure that the Qi wireless charging zone is aligned
with your device’s Qi charging zone.
LED Status
Description
Blue (slowly blinking)
Fully charged
Blue (blinking)
Charging
Blue (rapidly blinking)
Low charging efficiency
Red (blinking)
Charging failure
Off
Standby
Qi wireless charging status indication
ARB
Customizing with ROG Armoury
For more lighting effects, and lighting zone configurations, download and install the ROG Armoury from
https://www.asus.com/ROG-Republic-Of-Gamers/ROG-Balteus-Qi/HelpDesk_Download/.
Getting started
To set up your ROG BALTEUS Qi Wireless Charging
RGB Gaming Mouse Pad:
Connect the USB connector (PAD) to an available USB port on
your device.
Device features
To set up your USB 2.0 passthrough port:
1.
Connect the USB passthrough connector to an
available USB port on your device.
2.
Connect your USB device to the USB 2.0 passthrough
port on your mouse pad.
1.
USB 2.0 passthrough port
2.
Micro USB DC-in port
3.
Qi wireless charging status indicator
4.
Lighting mode button
5.
Qi wireless charging zone
6.
USB passthrough connector
7.
USB connector (PAD)
Using the Qi wireless charging function
1.
Connect the bundled Qi wireless charging cable to the
micro USB DC-in port and an adapter.
NOTE:
We recommend using an adapter
with a minimum of 5V2A power rating for
optimal performance.
2.
Plug the adapter into a 100V~240V power source.
3.
Place your device on the Qi wireless charging zone.
Ensure that the Qi wireless charging zone is aligned
with your device’s Qi charging zone.
LED Status
Description
Blue (slowly blinking)
Fully charged
Blue (blinking)
Charging
Blue (rapidly blinking)
Low charging efficiency
Red (blinking)
Charging failure
Off
Standby
Qi wireless charging status indication
SW
Customizing with ROG Armoury
For more lighting effects, and lighting zone configurations, download and install the ROG Armoury from
https://www.asus.com/ROG-Republic-Of-Gamers/ROG-Balteus-Qi/HelpDesk_Download/.
Getting started
To set up your ROG BALTEUS Qi Wireless Charging
RGB Gaming Mouse Pad:
Connect the USB connector (PAD) to an available USB port on
your device.
Device features
To set up your USB 2.0 passthrough port:
1.
Connect the USB passthrough connector to an
available USB port on your device.
2.
Connect your USB device to the USB 2.0 passthrough
port on your mouse pad.
1.
USB 2.0 passthrough port
2.
Micro USB DC-in port
3.
Qi wireless charging status indicator
4.
Lighting mode button
5.
Qi wireless charging zone
6.
USB passthrough connector
7.
USB connector (PAD)
Using the Qi wireless charging function
1.
Connect the bundled Qi wireless charging cable to the
micro USB DC-in port and an adapter.
NOTE:
We recommend using an adapter
with a minimum of 5V2A power rating for
optimal performance.
2.
Plug the adapter into a 100V~240V power source.
3.
Place your device on the Qi wireless charging zone.
Ensure that the Qi wireless charging zone is aligned
with your device’s Qi charging zone.
LED Status
Description
Blue (slowly blinking)
Fully charged
Blue (blinking)
Charging
Blue (rapidly blinking)
Low charging efficiency
Red (blinking)
Charging failure
Off
Standby
Qi wireless charging status indication
PL
Customizing with ROG Armoury
For more lighting effects, and lighting zone configurations, download and install the ROG Armoury from
https://www.asus.com/ROG-Republic-Of-Gamers/ROG-Balteus-Qi/HelpDesk_Download/.
Getting started
To set up your ROG BALTEUS Qi Wireless Charging
RGB Gaming Mouse Pad:
Connect the USB connector (PAD) to an available USB port on
your device.
Device features
To set up your USB 2.0 passthrough port:
1.
Connect the USB passthrough connector to an
available USB port on your device.
2.
Connect your USB device to the USB 2.0 passthrough
port on your mouse pad.
1.
USB 2.0 passthrough port
2.
Micro USB DC-in port
3.
Qi wireless charging status indicator
4.
Lighting mode button
5.
Qi wireless charging zone
6.
USB passthrough connector
7.
USB connector (PAD)
Using the Qi wireless charging function
1.
Connect the bundled Qi wireless charging cable to the
micro USB DC-in port and an adapter.
NOTE:
We recommend using an adapter
with a minimum of 5V2A power rating for
optimal performance.
2.
Plug the adapter into a 100V~240V power source.
3.
Place your device on the Qi wireless charging zone.
Ensure that the Qi wireless charging zone is aligned
with your device’s Qi charging zone.
LED Status
Description
Blue (slowly blinking)
Fully charged
Blue (blinking)
Charging
Blue (rapidly blinking)
Low charging efficiency
Red (blinking)
Charging failure
Off
Standby
Qi wireless charging status indication
HUG
Customizing with ROG Armoury
For more lighting effects, and lighting zone configurations, download and install the ROG Armoury from
https://www.asus.com/ROG-Republic-Of-Gamers/ROG-Balteus-Qi/HelpDesk_Download/.
Getting started
To set up your ROG BALTEUS Qi Wireless Charging
RGB Gaming Mouse Pad:
Connect the USB connector (PAD) to an available USB port on
your device.
Device features
To set up your USB 2.0 passthrough port:
1.
Connect the USB passthrough connector to an
available USB port on your device.
2.
Connect your USB device to the USB 2.0 passthrough
port on your mouse pad.
1.
USB 2.0 passthrough port
2.
Micro USB DC-in port
3.
Qi wireless charging status indicator
4.
Lighting mode button
5.
Qi wireless charging zone
6.
USB passthrough connector
7.
USB connector (PAD)
Using the Qi wireless charging function
1.
Connect the bundled Qi wireless charging cable to the
micro USB DC-in port and an adapter.
NOTE:
We recommend using an adapter
with a minimum of 5V2A power rating for
optimal performance.
2.
Plug the adapter into a 100V~240V power source.
3.
Place your device on the Qi wireless charging zone.
Ensure that the Qi wireless charging zone is aligned
with your device’s Qi charging zone.
LED Status
Description
Blue (slowly blinking)
Fully charged
Blue (blinking)
Charging
Blue (rapidly blinking)
Low charging efficiency
Red (blinking)
Charging failure
Off
Standby
Qi wireless charging status indication
R
Customizing with ROG Armoury
For more lighting effects, and lighting zone configurations, download and install the ROG Armoury from
https://www.asus.com/ROG-Republic-Of-Gamers/ROG-Balteus-Qi/HelpDesk_Download/.
Getting started
To set up your ROG BALTEUS Qi Wireless Charging
RGB Gaming Mouse Pad:
Connect the USB connector (PAD) to an available USB port on
your device.
Device features
To set up your USB 2.0 passthrough port:
1.
Connect the USB passthrough connector to an
available USB port on your device.
2.
Connect your USB device to the USB 2.0 passthrough
port on your mouse pad.
1.
USB 2.0 passthrough port
2.
Micro USB DC-in port
3.
Qi wireless charging status indicator
4.
Lighting mode button
5.
Qi wireless charging zone
6.
USB passthrough connector
7.
USB connector (PAD)
Using the Qi wireless charging function
1.
Connect the bundled Qi wireless charging cable to the
micro USB DC-in port and an adapter.
NOTE:
We recommend using an adapter
with a minimum of 5V2A power rating for
optimal performance.
2.
Plug the adapter into a 100V~240V power source.
3.
Place your device on the Qi wireless charging zone.
Ensure that the Qi wireless charging zone is aligned
with your device’s Qi charging zone.
LED Status
Description
Blue (slowly blinking)
Fully charged
Blue (blinking)
Charging
Blue (rapidly blinking)
Low charging efficiency
Red (blinking)
Charging failure
Off
Standby
Qi wireless charging status indication
DU
Customizing with ROG Armoury
For more lighting effects, and lighting zone configurations, download and install the ROG Armoury from
https://www.asus.com/ROG-Republic-Of-Gamers/ROG-Balteus-Qi/HelpDesk_Download/.
Getting started
To set up your ROG BALTEUS Qi Wireless Charging
RGB Gaming Mouse Pad:
Connect the USB connector (PAD) to an available USB port on
your device.
Device features
To set up your USB 2.0 passthrough port:
1.
Connect the USB passthrough connector to an
available USB port on your device.
2.
Connect your USB device to the USB 2.0 passthrough
port on your mouse pad.
1.
USB 2.0 passthrough port
2.
Micro USB DC-in port
3.
Qi wireless charging status indicator
4.
Lighting mode button
5.
Qi wireless charging zone
6.
USB passthrough connector
7.
USB connector (PAD)
Using the Qi wireless charging function
1.
Connect the bundled Qi wireless charging cable to the
micro USB DC-in port and an adapter.
NOTE:
We recommend using an adapter
with a minimum of 5V2A power rating for
optimal performance.
2.
Plug the adapter into a 100V~240V power source.
3.
Place your device on the Qi wireless charging zone.
Ensure that the Qi wireless charging zone is aligned
with your device’s Qi charging zone.
LED Status
Description
Blue (slowly blinking)
Fully charged
Blue (blinking)
Charging
Blue (rapidly blinking)
Low charging efficiency
Red (blinking)
Charging failure
Off
Standby
Qi wireless charging status indication
TR
Customizing with ROG Armoury
For more lighting effects, and lighting zone configurations, download and install the ROG Armoury from
https://www.asus.com/ROG-Republic-Of-Gamers/ROG-Balteus-Qi/HelpDesk_Download/.
Getting started
To set up your ROG BALTEUS Qi Wireless Charging
RGB Gaming Mouse Pad:
Connect the USB connector (PAD) to an available USB port on
your device.
Device features
To set up your USB 2.0 passthrough port:
1.
Connect the USB passthrough connector to an
available USB port on your device.
2.
Connect your USB device to the USB 2.0 passthrough
port on your mouse pad.
1.
USB 2.0 passthrough port
2.
Micro USB DC-in port
3.
Qi wireless charging status indicator
4.
Lighting mode button
5.
Qi wireless charging zone
6.
USB passthrough connector
7.
USB connector (PAD)
Using the Qi wireless charging function
1.
Connect the bundled Qi wireless charging cable to the
micro USB DC-in port and an adapter.
NOTE:
We recommend using an adapter
with a minimum of 5V2A power rating for
optimal performance.
2.
Plug the adapter into a 100V~240V power source.
3.
Place your device on the Qi wireless charging zone.
Ensure that the Qi wireless charging zone is aligned
with your device’s Qi charging zone.
LED Status
Description
Blue (slowly blinking)
Fully charged
Blue (blinking)
Charging
Blue (rapidly blinking)
Low charging efficiency
Red (blinking)
Charging failure
Off
Standby
Qi wireless charging status indication
G
Customizing with ROG Armoury
For more lighting effects, and lighting zone configurations, download and install the ROG Armoury from
https://www.asus.com/ROG-Republic-Of-Gamers/ROG-Balteus-Qi/HelpDesk_Download/.
Getting started
To set up your ROG BALTEUS Qi Wireless Charging
RGB Gaming Mouse Pad:
Connect the USB connector (PAD) to an available USB port on
your device.
Device features
To set up your USB 2.0 passthrough port:
1.
Connect the USB passthrough connector to an
available USB port on your device.
2.
Connect your USB device to the USB 2.0 passthrough
port on your mouse pad.
1.
USB 2.0 passthrough port
2.
Micro USB DC-in port
3.
Qi wireless charging status indicator
4.
Lighting mode button
5.
Qi wireless charging zone
6.
USB passthrough connector
7.
USB connector (PAD)
Using the Qi wireless charging function
1.
Connect the bundled Qi wireless charging cable to the
micro USB DC-in port and an adapter.
NOTE:
We recommend using an adapter
with a minimum of 5V2A power rating for
optimal performance.
2.
Plug the adapter into a 100V~240V power source.
3.
Place your device on the Qi wireless charging zone.
Ensure that the Qi wireless charging zone is aligned
with your device’s Qi charging zone.
LED Status
Description
Blue (slowly blinking)
Fully charged
Blue (blinking)
Charging
Blue (rapidly blinking)
Low charging efficiency
Red (blinking)
Charging failure
Off
Standby
Qi wireless charging status indication
S
Customizing with ROG Armoury
For more lighting effects, and lighting zone configurations, download and install the ROG Armoury from
https://www.asus.com/ROG-Republic-Of-Gamers/ROG-Balteus-Qi/HelpDesk_Download/.
Getting started
To set up your ROG BALTEUS Qi Wireless Charging
RGB Gaming Mouse Pad:
Connect the USB connector (PAD) to an available USB port on
your device.
Device features
To set up your USB 2.0 passthrough port:
1.
Connect the USB passthrough connector to an
available USB port on your device.
2.
Connect your USB device to the USB 2.0 passthrough
port on your mouse pad.
1.
USB 2.0 passthrough port
2.
Micro USB DC-in port
3.
Qi wireless charging status indicator
4.
Lighting mode button
5.
Qi wireless charging zone
6.
USB passthrough connector
7.
USB connector (PAD)
Using the Qi wireless charging function
1.
Connect the bundled Qi wireless charging cable to the
micro USB DC-in port and an adapter.
NOTE:
We recommend using an adapter
with a minimum of 5V2A power rating for
optimal performance.
2.
Plug the adapter into a 100V~240V power source.
3.
Place your device on the Qi wireless charging zone.
Ensure that the Qi wireless charging zone is aligned
with your device’s Qi charging zone.
LED Status
Description
Blue (slowly blinking)
Fully charged
Blue (blinking)
Charging
Blue (rapidly blinking)
Low charging efficiency
Red (blinking)
Charging failure
Off
Standby
Qi wireless charging status indication
RO
Customizing with ROG Armoury
For more lighting effects, and lighting zone configurations, download and install the ROG Armoury from
https://www.asus.com/ROG-Republic-Of-Gamers/ROG-Balteus-Qi/HelpDesk_Download/.
Getting started
To set up your ROG BALTEUS Qi Wireless Charging
RGB Gaming Mouse Pad:
Connect the USB connector (PAD) to an available USB port on
your device.
Device features
To set up your USB 2.0 passthrough port:
1.
Connect the USB passthrough connector to an
available USB port on your device.
2.
Connect your USB device to the USB 2.0 passthrough
port on your mouse pad.
1.
USB 2.0 passthrough port
2.
Micro USB DC-in port
3.
Qi wireless charging status indicator
4.
Lighting mode button
5.
Qi wireless charging zone
6.
USB passthrough connector
7.
USB connector (PAD)
Using the Qi wireless charging function
1.
Connect the bundled Qi wireless charging cable to the
micro USB DC-in port and an adapter.
NOTE:
We recommend using an adapter
with a minimum of 5V2A power rating for
optimal performance.
2.
Plug the adapter into a 100V~240V power source.
3.
Place your device on the Qi wireless charging zone.
Ensure that the Qi wireless charging zone is aligned
with your device’s Qi charging zone.
LED Status
Description
Blue (slowly blinking)
Fully charged
Blue (blinking)
Charging
Blue (rapidly blinking)
Low charging efficiency
Red (blinking)
Charging failure
Off
Standby
Qi wireless charging status indication
UA
Customizing with ROG Armoury
For more lighting effects, and lighting zone configurations, download and install the ROG Armoury from
https://www.asus.com/ROG-Republic-Of-Gamers/ROG-Balteus-Qi/HelpDesk_Download/.
Getting started
To set up your ROG BALTEUS Qi Wireless Charging
RGB Gaming Mouse Pad:
Connect the USB connector (PAD) to an available USB port on
your device.
Device features
To set up your USB 2.0 passthrough port:
1.
Connect the USB passthrough connector to an
available USB port on your device.
2.
Connect your USB device to the USB 2.0 passthrough
port on your mouse pad.
1.
USB 2.0 passthrough port
2.
Micro USB DC-in port
3.
Qi wireless charging status indicator
4.
Lighting mode button
5.
Qi wireless charging zone
6.
USB passthrough connector
7.
USB connector (PAD)
Using the Qi wireless charging function
1.
Connect the bundled Qi wireless charging cable to the
micro USB DC-in port and an adapter.
NOTE:
We recommend using an adapter
with a minimum of 5V2A power rating for
optimal performance.
2.
Plug the adapter into a 100V~240V power source.
3.
Place your device on the Qi wireless charging zone.
Ensure that the Qi wireless charging zone is aligned
with your device’s Qi charging zone.
LED Status
Description
Blue (slowly blinking)
Fully charged
Blue (blinking)
Charging
Blue (rapidly blinking)
Low charging efficiency
Red (blinking)
Charging failure
Off
Standby
Qi wireless charging status indication
SK
Customizing with ROG Armoury
For more lighting effects, and lighting zone configurations, download and install the ROG Armoury from
https://www.asus.com/ROG-Republic-Of-Gamers/ROG-Balteus-Qi/HelpDesk_Download/.
Getting started
To set up your ROG BALTEUS Qi Wireless Charging
RGB Gaming Mouse Pad:
Connect the USB connector (PAD) to an available USB port on
your device.
Device features
To set up your USB 2.0 passthrough port:
1.
Connect the USB passthrough connector to an
available USB port on your device.
2.
Connect your USB device to the USB 2.0 passthrough
port on your mouse pad.
1.
USB 2.0 passthrough port
2.
Micro USB DC-in port
3.
Qi wireless charging status indicator
4.
Lighting mode button
5.
Qi wireless charging zone
6.
USB passthrough connector
7.
USB connector (PAD)
Using the Qi wireless charging function
1.
Connect the bundled Qi wireless charging cable to the
micro USB DC-in port and an adapter.
NOTE:
We recommend using an adapter
with a minimum of 5V2A power rating for
optimal performance.
2.
Plug the adapter into a 100V~240V power source.
3.
Place your device on the Qi wireless charging zone.
Ensure that the Qi wireless charging zone is aligned
with your device’s Qi charging zone.
LED Status
Description
Blue (slowly blinking)
Fully charged
Blue (blinking)
Charging
Blue (rapidly blinking)
Low charging efficiency
Red (blinking)
Charging failure
Off
Standby
Qi wireless charging status indication
NW
Customizing with ROG Armoury
For more lighting effects, and lighting zone configurations, download and install the ROG Armoury from
https://www.asus.com/ROG-Republic-Of-Gamers/ROG-Balteus-Qi/HelpDesk_Download/.
Getting started
To set up your ROG BALTEUS Qi Wireless Charging
RGB Gaming Mouse Pad:
Connect the USB connector (PAD) to an available USB port on
your device.
Device features
To set up your USB 2.0 passthrough port:
1.
Connect the USB passthrough connector to an
available USB port on your device.
2.
Connect your USB device to the USB 2.0 passthrough
port on your mouse pad.
1.
USB 2.0 passthrough port
2.
Micro USB DC-in port
3.
Qi wireless charging status indicator
4.
Lighting mode button
5.
Qi wireless charging zone
6.
USB passthrough connector
7.
USB connector (PAD)
Using the Qi wireless charging function
1.
Connect the bundled Qi wireless charging cable to the
micro USB DC-in port and an adapter.
NOTE:
We recommend using an adapter
with a minimum of 5V2A power rating for
optimal performance.
2.
Plug the adapter into a 100V~240V power source.
3.
Place your device on the Qi wireless charging zone.
Ensure that the Qi wireless charging zone is aligned
with your device’s Qi charging zone.
LED Status
Description
Blue (slowly blinking)
Fully charged
Blue (blinking)
Charging
Blue (rapidly blinking)
Low charging efficiency
Red (blinking)
Charging failure
Off
Standby
Qi wireless charging status indication
FI
Customizing with ROG Armoury
For more lighting effects, and lighting zone configurations, download and install the ROG Armoury from
https://www.asus.com/ROG-Republic-Of-Gamers/ROG-Balteus-Qi/HelpDesk_Download/.
Getting started
To set up your ROG BALTEUS Qi Wireless Charging
RGB Gaming Mouse Pad:
Connect the USB connector (PAD) to an available USB port on
your device.
Device features
To set up your USB 2.0 passthrough port:
1.
Connect the USB passthrough connector to an
available USB port on your device.
2.
Connect your USB device to the USB 2.0 passthrough
port on your mouse pad.
1.
USB 2.0 passthrough port
2.
Micro USB DC-in port
3.
Qi wireless charging status indicator
4.
Lighting mode button
5.
Qi wireless charging zone
6.
USB passthrough connector
7.
USB connector (PAD)
Using the Qi wireless charging function
1.
Connect the bundled Qi wireless charging cable to the
micro USB DC-in port and an adapter.
NOTE:
We recommend using an adapter
with a minimum of 5V2A power rating for
optimal performance.
2.
Plug the adapter into a 100V~240V power source.
3.
Place your device on the Qi wireless charging zone.
Ensure that the Qi wireless charging zone is aligned
with your device’s Qi charging zone.
LED Status
Description
Blue (slowly blinking)
Fully charged
Blue (blinking)
Charging
Blue (rapidly blinking)
Low charging efficiency
Red (blinking)
Charging failure
Off
Standby
Qi wireless charging status indication
BP
Customizing with ROG Armoury
For more lighting effects, and lighting zone configurations, download and install the ROG Armoury from
https://www.asus.com/ROG-Republic-Of-Gamers/ROG-Balteus-Qi/HelpDesk_Download/.
Getting started
To set up your ROG BALTEUS Qi Wireless Charging
RGB Gaming Mouse Pad:
Connect the USB connector (PAD) to an available USB port on
your device.
Device features
To set up your USB 2.0 passthrough port:
1.
Connect the USB passthrough connector to an
available USB port on your device.
2.
Connect your USB device to the USB 2.0 passthrough
port on your mouse pad.
1.
USB 2.0 passthrough port
2.
Micro USB DC-in port
3.
Qi wireless charging status indicator
4.
Lighting mode button
5.
Qi wireless charging zone
6.
USB passthrough connector
7.
USB connector (PAD)
Using the Qi wireless charging function
1.
Connect the bundled Qi wireless charging cable to the
micro USB DC-in port and an adapter.
NOTE:
We recommend using an adapter
with a minimum of 5V2A power rating for
optimal performance.
2.
Plug the adapter into a 100V~240V power source.
3.
Place your device on the Qi wireless charging zone.
Ensure that the Qi wireless charging zone is aligned
with your device’s Qi charging zone.
LED Status
Description
Blue (slowly blinking)
Fully charged
Blue (blinking)
Charging
Blue (rapidly blinking)
Low charging efficiency
Red (blinking)
Charging failure
Off
Standby
Qi wireless charging status indication
CZ
Customizing with ROG Armoury
For more lighting effects, and lighting zone configurations, download and install the ROG Armoury from
https://www.asus.com/ROG-Republic-Of-Gamers/ROG-Balteus-Qi/HelpDesk_Download/.
Getting started
To set up your ROG BALTEUS Qi Wireless Charging
RGB Gaming Mouse Pad:
Connect the USB connector (PAD) to an available USB port on
your device.
Device features
To set up your USB 2.0 passthrough port:
1.
Connect the USB passthrough connector to an
available USB port on your device.
2.
Connect your USB device to the USB 2.0 passthrough
port on your mouse pad.
1.
USB 2.0 passthrough port
2.
Micro USB DC-in port
3.
Qi wireless charging status indicator
4.
Lighting mode button
5.
Qi wireless charging zone
6.
USB passthrough connector
7.
USB connector (PAD)
Using the Qi wireless charging function
1.
Connect the bundled Qi wireless charging cable to the
micro USB DC-in port and an adapter.
NOTE:
We recommend using an adapter
with a minimum of 5V2A power rating for
optimal performance.
2.
Plug the adapter into a 100V~240V power source.
3.
Place your device on the Qi wireless charging zone.
Ensure that the Qi wireless charging zone is aligned
with your device’s Qi charging zone.
LED Status
Description
Blue (slowly blinking)
Fully charged
Blue (blinking)
Charging
Blue (rapidly blinking)
Low charging efficiency
Red (blinking)
Charging failure
Off
Standby
Qi wireless charging status indication


