background image

DRW-0804P

DVD

±

R/RW Drive

Dual Format

User Guide

Summary of Contents for DRW-0804P

Page 1: ...DRW 0804P DVD R RW Drive Dual Format User Guide ...

Page 2: ...ESS FOR A PARTICULAR PURPOSE IN NO EVENT SHALL ASUS ITS DIRECTORS OFFICERS EMPLOYEES OR AGENTS BE LIABLE FOR ANY INDIRECT SPECIAL INCIDENTAL OR CONSEQUENTIAL DAMAGES INCLUDING DAMAGES FOR LOSS OF PROFITS LOSS OF BUSINESS LOSS OF USE OR DATA INTERRUPTION OF BUSINESS AND THE LIKE EVEN IF ASUS HAS BEEN ADVISED OF THE POSSIBILITY OF SUCH DAMAGES ARISING FROM ANY DEFECT OR ERROR IN THIS MANUAL OR PRODU...

Page 3: ... Features 10 Front panel 11 Rear panel 12 Installation 13 System requirements 13 Setting the jumper terminals 14 Installing the device 15 Connecting the drive cables 17 Drive basics 18 Placing a disc into the drive 18 Ejecting a disc from the drive 19 Using the emergency eject pinhole 20 Using compact discs 21 Cleaning a disc 21 Handling a disc 21 Technical information 22 Environmental specificati...

Page 4: ...ent does cause harmful interference to radio or television reception which can be determined by turning the equipment off and on the user is encouraged to try to correct the interference by one or more of the following measures Reorient or relocate the receiving antenna Increase the separation between the equipment and receiver Connect the equipment to an outlet on a circuit different from that to...

Page 5: ...emont CA 94538 USA Fax 1 510 608 4555 E mail tmd1 asus com Web site usa asus com Technical Support Telephone General 1 502 995 0883 Notebook 1 510 739 3777 Support fax 1 502 933 8713 Support e mail tsd asus com ASUS COMPUTER GmbH Germany and Austria Address Harkort Str 25 D 40880 Ratingen Germany Telephone 49 2102 95990 Fax 49 2102 959911 Online contact www asuscom de sales Technical Support Telep...

Page 6: ...mble or repair the drive Opening the drive may result to exposure to laser radiation Do not use or place this device near magnetic fields televisions or radios to avoid electronic interference that affects drive performance Do not place this device under direct sunlight or in humid or damp places Do not place this device in an unstable position or on vibrating surfaces ...

Page 7: ...to dilute the solvent to easily wipe it from the device Try not to interrupt the supply of power while the device is in reading or writing mode Do not place damaged or warped discs inside the device A warped disc may break while in use and damage the device Do not place discs into the device immediately if they came from a cold environment specially during cold seasons Wait until the discs have re...

Page 8: ... in good condition If any of the items is damaged or missing contact your retailer immediately ASUS DRW 0804P internal DVD R RW IDE interface IDE cable Mounting screw set Audio cable Emergency eject pin and instruction slip User guide Multi language quick installation guide Bundled software CD The above items are available in retail boxes only ...

Page 9: ...hanced IDE ATAPI Data Buffer Size 2 MB Random Access Time DVD ROM 140 ms CD ROM 130 ms Application discs DVD Single Dual layer discs DVD R DVD RW DVD R DVD RW CD ROM Mode 1 CD ROM XA Mode 2 form 1 form 2 Photo CD single and multiple session CD DA CD Extra CD Text CD R CD RW DVD RAM Recording Format DVD R DAO Incremental Multi Border Recording DVD RW Restricted Overwriting DVD R Incremental Recordi...

Page 10: ... and efficiency in terms of multimedia data storage and sharing The drive complies with the Enhanced IDE Attachment Packet Interface ATAPI specification and comes equipped with the latest innovative technologies in DVD recording Check out other features of the drive FlextraLink FlextraSpeed Superior stability with DDSS II Optical pickup head Liquid Crystal Tilt LCT technology Compatible with a wid...

Page 11: ...disc Refer to page 20 for details Front panel 2 1 3 4 2 READ WRITE indicator This LED is lit Green when data is being read or written on the disc 3 Disc loading tray This tray holds the disc Open the loading tray by pressing the Eject Button Place a CD or DVD on the tray with the label side up Press the Eject Button or push the front part of the tray to load the disc 4 Eject button Press this butt...

Page 12: ...ode for the drive Refer to page 14 for the jumper settings Pin Name Switch Status Description 1 MA ON Master mode 2 SL ON Slave mode 3 CS ON Cable select mode 4 5 Reserved 3 Air vent This air vent allows air intake to maintain ideal drive temperature Make sure the air vent is not blocked by cables or other objects inside the system 4 Host IDE interface This connector is for a 40 pin IDE cable to c...

Page 13: ...Duron 850 MHz or higher PC Windows 98SE ME 2000 NT XP operating system At least 64MB RAM 128MB recommended An empty 5 25 inch external drive bay HDD empty storage capacity of 100MB or more Average seek time 20ms or less Transmission rate 2 MB s or more Avoid using a hard disk that thermally calibrates during operation Do not insert damaged or warped disc in the drive to avoid potential body injury...

Page 14: ...ur drive as either Primary or Secondary Slave Cable Select Mode Cover the two pins labeled CS see illustration if your computer supports a Cable Select CSEL signal You need an exclusive interface cable for this mode Refer to your computer manual for details RESERVED RESERVED PIN 1 RESERVED PIN 1 PIN 1 S L C S Jumper terminals Setting the jumper terminals Set the jumpers to configure the device to ...

Page 15: ... panel The holes on the sides of the drive should align with the holes on the drive bay 1 Remove the cover of an empty 5 25 inch external drive bay Installing the device Follow these steps to install the drive into the computer chassis Refer to your computer manual for specific instructions on opening the chassis and installing drives ...

Page 16: ...me with the drive package Use two screws on each side of the drive Depending on the space on your chassis you may need to connect the drive cables before securing the drive into the chassis For cable connections proceed to the following section Connecting the Drive Cables ...

Page 17: ...dio feature connect an audio interface cable to the 4 pin analog audio connector on the rear of the drive Connect the other end of the audio cable to the connector on the sound card or on the 4 pin CD connector on the motherboard Power Cable IDE Cable 4 pin Audio Cable Replace the computer cover according to your computer manual All the cable plugs are slotted so that they fit in only one orientat...

Page 18: ... RW drive Drive basics Placing a disc into the drive 1 Press the eject button on the front of the drive to eject the tray 2 When the drive tray ejects out of the drive place the disc on the tray with the label printed side up ...

Page 19: ... the eject button on the front of the drive to eject the tray 2 Carefully remove the disc from the tray 3 Press the drive eject button or lightly push the center of the drive tray to load the tray back into the drive 12 cm Disc 8 cm Disc If you are using a 12 cm disc place it on the outer circular border of the tray If you are using an 8 cm disc place it on the inner circular border ...

Page 20: ...tray out and remove the disc Follow these steps to eject the drive tray using the emergency pinhole 1 Insert the Emergency Eject Pin that came with the drive package into the Emergency Eject Pinhole You may also use a paper clip or any pointed rod small enough to fit into the emergency eject pinhole Use the manual method only when the eject button does not work Turn off your computer before manual...

Page 21: ...this section when using compact discs These instructions will help you avoid damaging the discs and your drive Cleaning a disc Spray the disc with compressed air for about five seconds to get rid of the dust on a disc Handling a disc Hold a disc by the edges Do not touch the disc surface ...

Page 22: ...wave 3 shock each side Packaged 60 cm high no damage 1 corner 3 edges 6 surfaces Acoustic Sound Power Less than 52 dB A Reliability MTBF 60 000 power on hours ODC Read 20 of power on time ODC Write 2 of power on time Mean Time To Repair MTTR 30 minutes ODC Operating Duty Cycle Electrical and Audio Specifications Power Source Voltage 5V DC 12V DC Tolerance 5 10 Ripple 100m Vpp 200m Vpp IO Terminal ...

Page 23: ...mpts you to enter your country location select a country location within the region code of the DVD Refer to the map and table below You are only allowed to change your country location up to five times This limitation makes the drive adaptable for use in many regions while maintaining compliance with RPC II regulations Region Code Area 1 U S U S Territories Canada 2 Europe Middle East Japan Egypt...

Page 24: ...24 ASUS DRW 0804P DVD R RW drive ...

Page 25: ... DRW 0804P ...

Page 26: ...2 DRW 0804P 2004 DRW 0804P V1 T1533 2004 2 ...

Page 27: ... asus com 1 502 995 0883 1 502 933 8713 tsd asus com http www asus com ASUS COMPUTER GmbH Harkort Str 25 D 40880 Ratingen Germany 49 2102 9599 0 49 2102 9599 11 http www asuscom de sales Email sales asuscom de 49 2102 9599 0 49 2102 9599 10 49 2102 9599 11 http www asuscom de support http www asuscom de ASUSTek Middle East North Africa P O Box 64133 Dubai U A E 9714 2831774 9714 2831775 www asusar...

Page 28: ...4 DRW 0804P 2 3 4 4 5 5 5 5 6 6 7 8 8 9 9 10 11 12 12 13 14 16 17 17 18 19 20 20 20 21 21 21 22 DVD 22 DRW 0804P ...

Page 29: ...5 DRW 0804P 10 http taiwan asus com tw support eService querydist_tw aspx 02 25062558 0800089558 12XX345678 Manufactured June 2003 http taiwan asus com tw ...

Page 30: ...6 DRW 0804P DRW 0804P ...

Page 31: ...7 DRW 0804P ...

Page 32: ... R RW DVD R RW DVD ATAPI DVD FlextraSpeedTM FlextraLinkTM DDSSII LCT Liquid Crystal Tilt Technology DVD R DVD RW DVD R DVD RW CD R CD RW DVD ROM CD ROM DAO TAO SAO Packet Write Windows 98SE ME 2000 NT XP DRW 0804P DRW 0804P IDE ...

Page 33: ...0 ms CD ROM 130 ms DVD DVD R DVD RW DVD R DVD RW CD ROM Mode1 CD ROM XA Mode2 form 1 form 2 Photo CD CD DA CD Extra DVD RAM CD Text CD R CD RW DVD R Incremental Recording DVD RW Random Recording DVD R DAO Incremental Recording Multi Border Recording DVD RW Restricted Overwriting CD R RW DAO TAO SAO Packet Write Windows 98 SE ME NT 2000 XP x x 148 x 42 3 x 198 mm 1100 2 42 ...

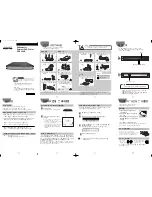
Page 34: ...10 DRW 0804P 1 2 3 CD DVD 4 1 2 4 3 ...

Page 35: ...11 DRW 0804P 5 Pin 1 L 2 3 G 4 R 6 Master MA Slave SL Cable Select CS Master Pin 1 MA ON master 2 SL ON slave 3 CS ON cable select 4 5 7 5 6 9 7 8 8 IDE 40 IDE Primary IDE Secondary IDE 9 ...

Page 36: ...12 DRW 0804P IBM Pentium III 700MHz Celeron 700MHz AMD Duron 850MHz Windows 98SE ME 2000 NT XP 64MB 128MB 5 25 100MB 20ms 2 MB 1 Buffer Underrun Thermal Calibration 2 ...

Page 37: ...RW 0804P Master MA Master IDE Secondary Master Slave SL Slave IDE Primary Slave Secondary Slave Cable Select Cable Select CSEL signal CS UltraDMA 66 100 IDE Cable Select C S M S L A C S M S L A C S M S L A ...

Page 38: ...14 DRW 0804P 2 1 5 25 ...

Page 39: ...15 DRW 0804P 3 ...

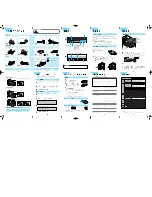
Page 40: ...16 DRW 0804P 1 2 MA SL CS IDE Primary IDE Secondary IDE 3 IDE ...

Page 41: ...17 DRW 0804P 1 2 ...

Page 42: ...18 DRW 0804P 3 1 2 3 12cm 8cm 12 5 8 3 ...

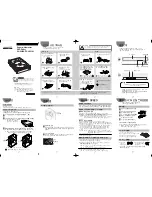
Page 43: ...19 DRW 0804P 2 1 ...

Page 44: ...20 DRW 0804P ...

Page 45: ...ock each side 60 1 3 6 52 dB A MTBF 60 000 Power On Hours Mean Time Between Failure ODC 20 of Power On Time ODC 2 of Power On Time 30 MTTR Mean Time To Repair ODC Operating Duty Cycle 5V DC 12V DC 5 10 Ripple 100m Vpp 200m Vpp I O 4 pin 5V 12V ATAPI 40 pin 4 pin 2 S N ratio 70 db line out 0 75 0 1V rms typical ...

Page 46: ...22 DRW 0804P DVD DVD DVD DVD DVD 3 3 ALL DVD 1 2 3 4 5 6 ...

Reviews: