background image

E-Manual

E11960

First Edition

November 2016

Summary of Contents for 8260D2

Page 1: ...E Manual E11960 First Edition November 2016 ...

Page 2: ...OUT NOTICE AND SHOULD NOT BE CONSTRUED AS A COMMITMENT BY ASUS ASUS ASSUMES NO RESPONSIBILITY OR LIABILITY FOR ANY ERRORS OR INACCURACIES THAT MAY APPEAR IN THIS MANUAL INCLUDING THE PRODUCTS AND SOFTWARE DESCRIBED IN IT Copyright 2016 ASUSTeK COMPUTER INC All Rights Reserved LIMITATION OF LIABILITY Circumstances may arise where because of a default on ASUS part or other liability you are entitled...

Page 3: ...Tablet 14 Front View 14 Top View 15 Bottom Side 16 Left Side 17 Right Side 18 ASUS Pen on selected models 21 Inserting the battery 21 Replacing the tip 22 ASUS Keyboard Dock optional 23 Top View 23 Chapter 2 Using your ASUSTablet and ASUS Keyboard Dock Getting started 26 ASUS Tablet 26 ASUS Keyboard Dock 29 Using your ASUS Tablet with the ASUS Keyboard Dock 30 Gestures for the touch screen panel a...

Page 4: ...ows apps 50 Customizing Windows apps 50 Task view 53 Snap feature 54 Snap hotspots 54 Action Center 56 Other keyboard shortcuts 57 Connecting to wireless networks 59 Wi Fi 59 Bluetooth 60 Airplane mode 61 Turning your ASUS Tablet off 62 Putting your ASUS Tablet to sleep 63 Chapter 4 Power On Self Test POST The Power On Self Test POST 66 Using POST to access BIOS and Troubleshoot 66 BIOS 66 Accessi...

Page 5: ...RF Exposure warning 92 FCC Radio Frequency RF Exposure Caution Statement 93 RF Exposure Information SAR 93 RF Exposure information SAR CE 94 CE Mark Warning 94 IC Radiation Exposure Statement for Canada 95 Déclaration d Industrie Canada relative à l exposition aux ondes radio 96 Radiation Exposure Statement 97 Déclaration d exposition aux radiations 97 Caution 97 Avertissement 98 Wireless Operatio...

Page 6: ...l Environmental Regulation Compliance and Declaration 107 ASUS Recycling Takeback Services 108 Prevention of Hearing Loss 108 Notices for removable batteries 109 Avis concernant les batteries remplaçables 109 Rechargeable Battery Recycling Service in North America 109 Regional notice for India 109 Regional notice for California 109 Regional notice for Singapore 110 Japan Technical Conformity Mark ...

Page 7: ...w to use the different parts of your ASUS Tablet and ASUS Keyboard Dock Chapter 3 Working with Windows 10 This chapter provides an overview of using Windows 10 in your ASUS Tablet and ASUS Keyboard Dock Chapter 4 Power On Self Test POST This chapter shows you how to use POST to change the settings of your ASUS Tablet Tips and FAQs This section presents some recommended tips hardware FAQs and softw...

Page 8: ...esented as follows IMPORTANT This message contains vital information that must be followed to complete a task NOTE This message contains additional information and tips that can help complete tasks WARNING This message contains important information that must be followed to keep you safe while performing tasks and prevent damage to your ASUS Tablet and ASUS Keyboard Dock s data and components Icon...

Page 9: ...m heat exposure Do not use damaged power cords accessories and other peripherals with your ASUS Tablet and ASUS Keyboard Dock While powered on ensure that you do not carry or cover your ASUS Tablet and ASUS Keyboard Dock with any materials that can reduce air circulation Do not place your ASUS Tablet and ASUS Keyboard Dock on uneven or unstable work surfaces You can send your ASUS Tablet and ASUS ...

Page 10: ... your ASUS Tablet and ASUS Keyboard Dock using a dry cloth Do not use strong solvents such as thinners benzene or other chemicals on or near your ASUS Tablet and ASUS Keyboard Dock Do not place objects on top of your ASUS Tablet and ASUS Keyboard Dock Do not expose your ASUS Tablet and ASUS Keyboard Dock to strong magnetic or electrical fields Do not use or expose your ASUS Tablet and ASUS Keyboar...

Page 11: ...ecycling The symbol of the crossed out wheeled bin indicates that the product electrical electronic equipment and mercury containing button cell battery should not be placed in municipal waste Check local regulations for disposal of electronic products Do not throw the battery in municipal waste The symbol of the crossed out wheeled bin indicates that the battery should not be placed in municipal ...

Page 12: ...12 ASUS Tablet and ASUS Keyboard Dock E Manual ...

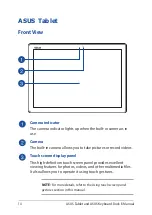
Page 13: ...ASUS Tablet and ASUS Keyboard Dock E Manual 13 Chapter 1 Hardware Setup ...

Page 14: ...a The built in camera allows you to take pictures or record videos Touch screen display panel This high definition touch screen panel provides excellent viewing features for photos videos and other multimedia files It also allows you to operate it using touch gestures NOTE For more details refer to the Using touch screen panel gestures section in this manual ...

Page 15: ...ponsive press and hold the power button for at least four 4 seconds until your ASUS Tablet shuts down Fingerprint sensor This built in fingerprint sensor captures your fingerprint and uses it as biometric authentication for logging on to your ASUS Tablet NOTE For more details refer to the Setting up your Fingerprint account section in this manual Array microphones The array microphones feature ech...

Page 16: ...Manual Bottom Side Dock port Connect your ASUS Keyboard Dock to this port to support keyboard and touchpad functions Hinge holes Align and insert the latch hooks into these holes to securely attach your ASUS Tablet to your ASUS Keyboard Dock ...

Page 17: ... software controlled MicroSD card slot This built in memory card reader slot supports microSD and microSDHC card formats Volume button This button turns the volume up or down on your ASUS Tablet Headphone Headset Microphone jack This port allows you to connect amplified speakers or headphones You can also use this port to connect your headset or an external microphone ...

Page 18: ...r the HDMI High Definition Multimedia Interface connector and is HDCP compliant for HD DVD Blu ray and other protected content playback USB Type C DisplayPort combo port The USB Universal Serial Bus Type C port provides a transfer rate of up to 5 Gbit s and is backward compatible to USB 2 0 Use a USB Type C adapter to connect your ASUS Tablet to an external display NOTE Transfer rate of this port ...

Page 19: ...er may become warm to hot while in use Do not cover the adapter and keep it away from your body while it is connected to a power source IMPORTANT Use only the bundled power adapter to charge the battery pack and supply power to your Tablet Two color battery charge indicator The two color LED provides a visual indication of the battery s charge status Refer to the following table for details ...

Page 20: ...to a power source charging its battery and the battery power is less than 95 Blinking Orange The ASUS Tablet is running on battery mode and the battery power is less than 10 Lights off The ASUS Tablet is running on battery mode and the battery power is between 10 to 100 Audio speakers The built in audio speakers allow you to hear audio straight from your Tablet Audio features are software controll...

Page 21: ...can use this button to enable the right click function Eraser button You can use this button to enable the eraser function 1 Remove the top half of the stylus 2 Remove the sticker and insert the battery noting the correct polarity 3 Return the top half of the stylus into place Inserting the battery ...

Page 22: ...22 ASUS Tablet and ASUS Keyboard Dock E Manual Replacing the tip 1 Use your fingernails to grab the tip and pull it out 2 Insert a replacement tip into the stylus ...

Page 23: ...ASUS Tablet and ASUS Keyboard Dock E Manual 23 ASUS Keyboard Dock optional NOTE The keyboard s layout may vary per model region or country The ASUS Keyboard Dock may be sold separately Top View ...

Page 24: ...iffers by model or region Latch hooks The latch hooks allow you to securely attach the ASUS Tablet on the ASUS Keyboard Dock Dock connector Securely attach the tablet into the ASUS Keyboard Dock by aligning the dock port on top of this connector Touchpad The touchpad allows the use of multi gestures to navigate onscreen providing an intuitive user experience It also simulates the functions of a re...

Page 25: ...ASUS Tablet and ASUS Keyboard Dock E Manual 25 Chapter 2 Using your ASUS Tablet and ASUS Keyboard Dock ...

Page 26: ... 2 37A 45W Rating output voltage 19V Getting started ASUS Tablet Charging your ASUS Tablet A Plug the AC power adapter into a 100V 240V power source B Connect the DC power connector into your ASUS Tablet s power DC input port NOTE The power adapter may vary in appearance depending on models and your region Use only the bundled power adapter for charging ...

Page 27: ...ut currents based on the available SKU Ensure that your ASUS Tablet is connected to the power adapter before turning it on for the first time We strongly recommend that you use a grounded wall socket while using your ASUS Tablet and ASUS Keyboard Dock on power adapter mode The socket outlet must be easily accessible and near your ASUS Tablet and ASUS Keyboard Dock To disconnect your ASUS Tablet fr...

Page 28: ...ical burn if removed or disassembled Follow the warning labels for your personal safety Risk of explosion if battery is replaced by an incorrect type Do not dispose of in fire Never attempt to short circuit your ASUS Tablet s battery Never attempt to disassemble and reassemble the battery for non removable battery only Discontinue usage if leakage is found The battery and its components must be re...

Page 29: ...US Keyboard Dock A Dock your ASUS Tablet into your ASUS Keyboard Dock B Plug the AC power adapter into a 100V 240V power source C Connect the DC power connector into your ASUS Tablet s power DC input port NOTE For details refer to the Charging your ASUS Tablet section in this manual ...

Page 30: ...to use both your ASUS Tablet and ASUS Keyboard Dock as a Notebook PC 1 Ensure your ASUS Tablet is charged 2 Dock the ASUS Tablet into the ASUS Keyboard Dock as shown in the illustration below Magnetic attachment WARNING Keep the magnetic attachment away from external storage drives and cards with magnetic strips to prevent demagnetization ...

Page 31: ...rams and access the settings of your ASUS Tablet Refer to the following illustrations when using hand gestures on your touch screen panel and touchpad NOTE The following screenshots are for reference only The touch screen panel s appearance may vary depending on model Using touch screen panel gestures The gestures allow you to launch programs and access the settings of your ASUS Tablet The functio...

Page 32: ...in Zoom out Spread apart your two fingers on the touch screen panel Bring together your two fingers on the touch screen panel Tap Double tap Press and hold Tap an app to select it Double tap an app to launch it Press and hold to open the right click menu ...

Page 33: ...Dock E Manual 33 Finger slide Drag Slide your finger to scroll up and down and slide your finger to pan the screen left or right Drag to create a selection box around multiple items Drag and drop an item to move it to a new location ...

Page 34: ... Dock E Manual Using the touchpad Moving the pointer You can tap anywhere on the touchpad to activate its pointer then slide your finger on the touchpad to move the pointer onscreen Slide horizontally Slide vertically Slide diagonally ...

Page 35: ...finger gestures Tap Double tap Tap an app to select it Double tap an app to launch it Drag and drop Double tap an item then slide the same finger without lifting it off the touchpad To drop the item to its new location lift your finger from the touchpad ...

Page 36: ...uble click an app to launch it Click this button to open the right click menu NOTE The areas inside the dotted line represent the locations of the left mouse button and the right mouse button on the touchpad Two finger gestures Tap Tap two fingers on the touchpad to simulate the right click function ...

Page 37: ... Zoom out Zoom in Bring together your two fingers on the touchpad Spread apart your two fingers on the touchpad Two finger scroll up down Two finger scroll left right Slide two fingers to scroll up or down Slide two fingers to scroll left or right ...

Page 38: ...g and drop Select an item then press and hold the left button Using your other finger slide on the touchpad to drag the item lift your finger off the button to drop the item Three finger gestures Tap Tap three fingers on the touchpad to invoke Cortana ...

Page 39: ...E Manual 39 Swipe left Swipe right If you opened multiple apps swipe three fingers left or right to switch between these apps Swipe up Swipe down Swipe up to see an overview of all the apps currently opened Swipe down to show the desktop ...

Page 40: ...anual Four finger gestures Tap Tap four fingers on the touchpad to invoke Action Center Customizing your touchpad 1 Launch All settings from the Action Center 2 Select Devices then select Mouse touchpad 3 Adjust the settings to your preference ...

Page 41: ...e you can use the other sign in options You must set up a PIN before you can enroll in Windows Hello 4 Click Tap Get started in the prompt screen and enter your PIN for verification 5 Follow the onscreen instructions to set up your Fingerprint account NOTE Press and lift the same finger repeatedly making small adjustments to the position of your finger each time until the scan is complete 6 Click ...

Page 42: ...mode Turns Airplane mode on or off NOTE When enabled the Airplane mode disables all wireless connectivity Decreases brightness for the backlit keyboard Increases brightness for the backlit keyboard Decreases display brightness Increases display brightness Turns the display panel on or off Toggles the display mode NOTE Ensure that the second display is connected to your primary display device ...

Page 43: ...l Windows keys on your ASUS Keyboard Dock used as below Launches the Start menu Displays the drop down menu Enables or disables the touchpad Turns the speaker on or off Turns the speaker volume down Turns the speaker volume up Launches the ASUS Touchpad Handwriting On selected models ...

Page 44: ...44 ASUS Tablet and ASUS Keyboard Dock E Manual ...

Page 45: ...ASUS Tablet and ASUS Keyboard Dock E Manual 45 Chapter 3 Working with Windows 10 ...

Page 46: ... appears 2 From the setup screen pick your region and a language to use on your ASUS Tablet 3 Carefully read the License Terms Select I accept 4 Follow the onscreen instructions to configure the following basic items Personalize Get online Settings Your account 5 After configuring the basic items Windows 10 proceeds to install your apps and preferred settings Ensure that your ASUS Tablet is kept p...

Page 47: ...ed programs or Windows apps Adjust ASUS Tablet settings Get help with the Windows operating system Turn off your ASUS Tablet Log off from Windows or switch to a different user account Change account settings lock or sign out from your account Launch the Start menu Shut down restart or put your ASUSTablet to sleep Launch All apps LaunchTaskview Launch an app from the taskbar Launch an app from the ...

Page 48: ... key on your keyboard Opening programs from the Start menu One of the most common uses of the Start menu is opening programs installed on your ASUS Tablet Tap the program to launch it Position your mouse pointer over the program then click to launch it Use the arrow keys to browse through the programs Press to launch it NOTE Select All apps at the bottom of the left pane to display a full list of ...

Page 49: ...Dock E Manual 49 Windows apps These are apps pinned on the right pane of the Start menu and displayed in tiled format for easy access NOTE Some Windows apps require signing in to your Microsoft account before they are fully launched ...

Page 50: ...unch it Position your mouse pointer over the app then click to launch it Use the arrow keys to browse through the apps Press to launch an app Customizing Windows apps You can move resize unpin or pin apps to the taskbar from the Start menu using the following steps Moving apps Press and hold the app then drag and drop it to a new location Position your mouse pointer over the app then drag and drop...

Page 51: ...ick Unpin from Start Use the arrow keys to navigate to the app Press then select Unpin from Start Resizing apps Press and hold the app then tap and select an app tile size Position your mouse pointer over the app and right click it then click Resize and select an app tile size Use the arrow keys to navigate to the app Press then select Resize and select an app tile size ...

Page 52: ...over the app you want to add to the Start menu and right click it then click Pin to Start From All apps press on the app that you want to add to the Start menu then select Pin to Start Pinning apps to the taskbar Press and hold the app then tap Pin to taskbar Position your mouse pointer over the app and right click it then click Pin to taskbar Use the arrow keys to navigate to the app Press then s...

Page 53: ...ed apps and programs using the task view feature you can also use task view to switch between desktops Launching task view Tap the icon on the taskbar or swipe form the left edge of the screen Position your mouse pointer over the icon on the taskbar and click it Press on your keyboard ...

Page 54: ... and ASUS Keyboard Dock E Manual Snap feature The Snap feature displays apps side by side allowing you to work or switch between apps Snap hotspots You can drag and drop apps to these hotspots to snap them into place ...

Page 55: ...title bar of your app and drop the app to the edge of the screen to snap 3 Launch another app and repeat the above steps to snap another app 1 Launch the app you wish to snap 2 Press and hold the key then use the arrow keys to snap the app 3 Launch another app and repeat the above steps to snap another app ...

Page 56: ...and presents a single place where you can interact with them It also has a really useful Quick Actions section at the bottom Launching Action Center Click the icon on the taskbar or swipe from the right edge of the screen Position your mouse pointer over the icon on the taskbar and click it Press on your keyboard ...

Page 57: ...o use the following shortcuts to help you launch applications and navigate Windows 10 Launches Start menu Launches Action Center Launches the desktop Launches the File Explorer Opens the Share panel Launches Settings Launches Connect panel Activates the Lock screen Minimizes all currently active windows ...

Page 58: ... E Manual Launches Search Launches Project panel Opens the Run window Opens Ease of Access Center Opens the context menu of the Start button Launches the magnifier icon and zooms in your screen Zooms out your screen Opens Narrator Settings ...

Page 59: ...nsure that Airplane mode is turned off before enabling the Wi Fi connection of your ASUS Tablet Connecting Wi Fi Connect your ASUS Tablet to a Wi Fi network by using the following steps or 1 Select the icon from the taskbar 2 Select the icon to enable Wi Fi 3 Select an access point from the list of available Wi Fi connections 4 Select Connect to start the network connection NOTE You may be prompte...

Page 60: ... with the device NOTE For some Bluetooth enabled devices you may be prompted to key in the passcode of your ASUS Tablet Bluetooth Use Bluetooth to facilitate wireless data transfers with other Bluetooth enabled devices IMPORTANT Airplane mode disables this feature Ensure that Airplane mode is turned off before enabling the Bluetooth connection of your ASUS Tablet Pairing with other Bluetooth enabl...

Page 61: ...ode off or 1 Launch Action Center from the taskbar 2 Select the icon to disable Airplane mode Press Turning Airplane mode on or 1 Launch Action Center from the taskbar 2 Select the icon to enable Airplane mode Press NOTE Contact your airline provider to learn about related in flight services that can be used and restrictions that must be followed when using your ASUS Tablet in flight ...

Page 62: ...ing procedures Launch the Start menu then select Shut down to do a normal shutdown From the log in screen select Shut down Press to launch Shut down Windows Select Shut down from the drop down list then select OK If your ASUS Tablet is unresponsive press and hold the power button for at least four 4 seconds until your ASUS Tablet turns off ...

Page 63: ...ablet to Sleep mode Launch the Start menu then select Sleep to put your ASUS Tablet to sleep From the log in screen select Sleep Press to launch Shut down Windows Select Sleep from the drop down list then select OK NOTE You can also put your ASUS Tablet to Sleep mode by pressing the power button once ...

Page 64: ...64 ASUS Tablet and ASUS Keyboard Dock E Manual ...

Page 65: ...ASUS Tablet and ASUS Keyboard Dock E Manual 65 Chapter 4 Power On Self Test POST ...

Page 66: ...following information for more details BIOS The BIOS Basic Input and Output System stores system hardware settings that are needed for system startup in the ASUS Tablet The default BIOS settings apply to most conditions of your ASUS Tablet Do not change the default BIOS settings except in the following circumstances An error message appears onscreen during system bootup and requests you to run the...

Page 67: ...artup When you enter the Advanced startup screen select Troubleshoot Advanced options UEFI Firmware Settings Restart If you have an external keyboard connected you may also restart your ASUS Tablet then press during POST Restart your ASUS Tablet then press both the power button and the volume down button during POST NOTE Do not press and hold the power button for more than four 4 seconds or you ma...

Page 68: ...ion are for reference only The actual screens may differ by model and territory EZ Mode This menu appears when you enter the BIOS setup program and provides you an overview of the basic system information To access the Advanced Mode for the advanced BIOS settings select Advanced Mode F7 or press ...

Page 69: ...E Manual 69 Boot This menu allows you to set your boot option priorities You may refer to the following procedures when setting your boot priority 1 On the Boot screen select Boot Option 1 2 Press and select a device as the Boot Option 1 ...

Page 70: ... Tablet It also allows you to control the access to your ASUS Tablet s hard disk drive input output I O interface and USB interface NOTE If you install a User Password you will be prompted to input this before entering the operating system If you install an Administrator Password you will be prompted to input this before entering BIOS ...

Page 71: ...a password then press 3 Re type to confirm the password then select OK To clear the password 1 On the Security screen select Administrator Password or User Password 2 Type in the current password then press 3 Leave other fields blank then select OK to continue 4 Select OK to clear the old password NOTE A keyboard is required to type in the password ...

Page 72: ...72 ASUS Tablet and ASUS Keyboard Dock E Manual Save Exit To keep your configuration settings select Save Changes and Exit before exiting the BIOS ...

Page 73: ...download the latest BIOS file for your model from the ASUS website 2 Save a copy of the downloaded BIOS file to a flash disk drive 3 Connect your flash disk drive to your ASUS Tablet 4 Restart your ASUS Tablet then access the BIOS settings 5 From the BIOS menu select Advanced ASUS EZ Flash 3 Utility then press ...

Page 74: ...anual 6 Locate your downloaded BIOS file in the flash disk drive then press Follow the onscreen instructions to complete the update 7 After the BIOS update process select Save Exit Restore Defaults to restore the system to its default settings ...

Page 75: ...rk settings user names and passwords to avoid data loss Ensure that your ASUS Tablet is plugged in to a power source before resetting your system Windows 10 allows you to do any of the following recovery options Keep my files This option allows you refresh your ASUS Tablet without affecting personal files photos music videos documents Using this option you can restore your ASUS Tablet to its defau...

Page 76: ...on allows you to go back to an earlier build Use this option if this build is not working for you Advanced startup Using this option allows you to perform other advanced recovery options on your ASUS Tablet such as Using a USB drive network connection or Windows recovery DVD to startup your ASUS Tablet Using Troubleshoot to enable any of these advanced recovery options System Restore System Image ...

Page 77: ...ASUS Tablet and ASUS Keyboard Dock E Manual 77 2 Under the Update and security option select Recovery then select the recovery option you would like to perform ...

Page 78: ...78 ASUS Tablet and ASUS Keyboard Dock E Manual ...

Page 79: ...ASUS Tablet and ASUS Keyboard Dock E Manual 79 Tips and FAQs ...

Page 80: ...ing force shutdown to turn off your ASUS Tablet and ASUS Keyboard Dock Always backup your data and make it a point to create a backup data in an external storage drive Refrain from using the ASUS Tablet and ASUS Keyboard Dock at extremely high temperatures If you are not going to use your ASUS Tablet and ASUS Keyboard Dock for a long period of time at least a month we recommend that you take out t...

Page 81: ... your display panel may be affected by the angle and current position of your ASUS Tablet and ASUS Keyboard Dock The brightness and color tone of your ASUS Tablet may also vary per model You may use the function keys or the display settings in your operating system to adjust the appearance of your display panel 3 How can I maximize my ASUS Tablet s battery life You can try doing any of the followi...

Page 82: ...act your local ASUS service center for assistance 5 Why is my touchpad not working Press to enable your touchpad 6 When I play audio and video files why can t I hear any sound from my ASUS Tablet s speakers You can try doing any of the following suggestions Press to turn up the speaker volume Check if your speakers were set to mute Check if a headphone jack is connected to your ASUS Tablet and rem...

Page 83: ...hat nothing accidentally touches or presses on your touchpad while you type on the keyboard You can also disable your touchpad by pressing 9 Instead of showing letters pressing the U I and O keys on my keyboard displays numbers How can I change this Press the key or on selected models on your ASUS Keyboard Dock to turn off this feature and use the said keys for inputting letters ...

Page 84: ...xists contact your local ASUS service center for assistance 2 What should I do when my screen displays this message Remove disks or other media Press any key to restart You can try doing any of the following suggestions Remove all connected USB devices then restart your ASUS Tablet and ASUS Keyboard Dock Remove any optical discs that are left inside the optical drive then restart If the problem st...

Page 85: ...hen restart your system If the problem still exists contact your local ASUS service center for assistance 5 Why can t my ASUS Tablet wake up from sleep or hibernate mode You need to press the power button to resume your last working state Your system might have completely used up its battery power Connect the power adapter to your ASUS Tablet and ASUS Keyboard Dock and connect to a power outlet th...

Page 86: ...86 ASUS Tablet and ASUS Keyboard Dock E Manual ...

Page 87: ...ASUS Tablet and ASUS Keyboard Dock E Manual 87 Appendices ...

Page 88: ... network termination point In the event of problems you should contact your equipment supplier in the first instance Overview On 4th August 1998 the European Council Decision regarding the CTR 21 has been published in the Official Journal of the EC The CTR 21 applies to all non voice terminal equipment with DTMF dialling which is intended to be connected to the analogue PSTN Public Switched Teleph...

Page 89: ... manufacturer shall also associate a statement to make it clear where network compatibility is dependent on physical and software switch settings It will also advise the user to contact the vendor if it is desired to use the equipment on another network Up to now the Notified Body of CETECOM issued several pan European approvals using CTR 21 The results are Europe s first modems which do not requi...

Page 90: ... Applicable Denmark1 Yes Yes Finland Yes No France Yes No Germany Yes No Greece Yes No Hungary No Not Applicable Iceland Yes No Ireland Yes No Italy Still Pending Still Pending Israel No No Lichtenstein Yes No Luxemburg Yes No The Netherlands1 Yes Yes Norway Yes No Poland No Not Applicable Portugal No Not Applicable Spain No Not Applicable Sweden Yes No Switzerland Yes No United Kingdom Yes No ...

Page 91: ...nce received including interference that may cause undesired operation This equipment has been tested and found to comply with the limits for a class B digital device pursuant to Part 15 of the Federal Communications Commission FCC rules These limits are designed to provide reasonable protection against harmful interference in a residential installation This equipment generates uses and can radiat...

Page 92: ...roved by the party responsible for compliance could void your authority to operate the equipment Reprinted from the Code of Federal Regulations 47 part 15 193 1993 Washington DC Office of the Federal Register National Archives and Records Administration U S Government Printing Office This device operates within a 5 15 5 25 GHz frequency range and is restricted for indoor use only Outdoor operation...

Page 93: ... s requirements for exposure to radio waves This device is designed and manufactured not to exceed the emission limits for exposure to radio frequency RF energy set by the Federal Communications Commission of the U S Government The exposure standard employs a unit of measurement known as the Specific Absorption Rate or SAR The SAR limit set by the FCC is 1 6 W kg Tests for SAR are conducted using ...

Page 94: ... tissue It meets the requirements of the International Commission on Non Ionizing Radiation Protection ICNIRP For next to body operation this device has been tested and meets the ICNRP exposure guidelines and the European Standard EN 50566 and EN 62209 2 SAR is measured with the device directly contacted to the body while transmitting at the highest certified output power level in all frequency ba...

Page 95: ...nce and This device must accept any interference including interference that may cause undesired operation of the device To prevent radio interference to the licensed service i e co channel Mobile Satellite systems this device is intended to be operated indoors and away from windows to provide maximum shielding Equipment or its transmit antenna that is installed outdoors is subject to licensing Th...

Page 96: ... toute interférence y compris les interférences qui pourraient causer un fonctionnement non souhaité de l appareil Pour éviter les interférences radio avec le service sous licence c est à dire le partage de canal avec les systèmes de téléphonie satellite cet appareil est destiné à être utilisé en intérieur et loin des fenêtres pour fournir un blindage maximal Tout appareil ou son antenne d émissio...

Page 97: ...t être augmentée si l appareil peut être conservé aussi loin que possible du corps de l utilisateur ou que le dispositif est réglé sur la puissance de sortie la plus faible si une telle fonction est disponible Caution i the device for operation in the band 5150 5250 MHz is only for indoor use to reduce the potential for harmful interference to co channel mobile satellite systems ii the maximum ant...

Page 98: ...imal d antenne permis pour les dispositifs utilisant les bandes 5250 5350 MHz et 5470 5725 MHz doit se conformer à la limite de p i r e iii le gain maximal d antenne permis pour les dispositifs utilisant la bande 5725 5825 MHz doit se conformer à la limite de p i r e spécifiée pour l exploitation point à point et non point à point selon le cas iv De plus les utilisateurs devraient aussi être avisé...

Page 99: ...lities for outdoor use on private property or on the private property of public persons use is subject to a preliminary authorization procedure by the Ministry of Defense with maximum authorized power of 100mW in the 2446 5 2483 5 MHz band Use outdoors on public property is not permitted In the departments listed below for the entire 2 4 GHz band Maximum authorized power indoors is 100mW Maximum a...

Page 100: ...re 41 Loir et Cher 45 Loiret 50 Manche 55 Meuse 58 Nièvre 59 Nord 60 Oise 61 Orne 63 Puy du Dôme 64 Pyrénées Atlantique 66 Pyrénées Orientales 67 Bas Rhin 68 Haut Rhin 70 Haute Saône 71 Saône et Loire 75 Paris 82 Tarn et Garonne 84 Vaucluse 88 Vosges 89 Yonne 90 Territoire de Belfort 94 Val de Marne This requirement is likely to change over time allowing you to use your wireless LAN card in more a...

Page 101: ...may be a remote risk of electric shock from lightning DO NOT use the ASUS Tablet in the vicinity of a gas leak Required for UL 1642 covering primary nonrechargeable and secondary rechargeable lithium batteries for use as power sources in products These batteries contain metallic lithium or a lithium alloy or a lithium ion and may consist of a single electrochemical cell or two or more cells connec...

Page 102: ...arth at the building entrance REACH Complying with the REACH Registration Evaluation Authorization and Restriction of Chemicals regulatory framework we publish the chemical substances in our products at ASUS REACH website at http csr asus com english REACH htm Macrovision Corporation Product Notice This product incorporates copyright protection technology that is protected by method claims of cert...

Page 103: ...tteri tilbage til leverandøren Danish VARNING Explosionsfara vid felaktigt batteribyte Använd samma batterityp eller en ekvivalent typ som rekommenderas av apparattillverkaren Kassera använt batteri enligt fabrikantens instruktion Swedish VAROITUS Paristo voi räjähtää jos se on virheellisesti asennettu Vaihda paristo ainoastaan laitevalmistajan sousittelemaan tyyppiin Hävitä käytetty paristo valmi...

Page 104: ...DRH Regulations The Center for Devices and Radiological Health CDRH of the U S Food and Drug Administration implemented regulations for laser products on August 2 1976 These regulations apply to laser products manufactured from August 1 1976 Compliance is mandatory for products marketed in the United States WARNING Use of controls or adjustments or performance of procedures other than those specif...

Page 105: ...ASUS Tablet and ASUS Keyboard Dock E Manual 105 CTR 21 Approval for ASUS Tablet and ASUS Keyboard Dock with built in modem Danish Dutch English Finnish French ...

Page 106: ...106 ASUS Tablet and ASUS Keyboard Dock E Manual German Greek Italian Portuguese Spanish Swedish ...

Page 107: ...gov powermanagement for detail information on power management and its benefits to the environment In addition please visit http www energystar gov for detail information on the ENERGY STAR joint program NOTE Energy Star is NOT supported on FreeDOS and Linux based operating systems Global Environmental Regulation Compliance and Declaration ASUS follows the green design concept to design and manufa...

Page 108: ...onents as well as the packaging materials Please go to http csr asus com english Takeback htm for detailed recycling information in different regions Prevention of Hearing Loss To prevent possible hearing damage do not listen at high volume levels for long periods While user turns up the volume past this point 27mV the system will show a pop up with the following information High volume can cause ...

Page 109: ...ous materials and 0 01 by weight in homogenous materials for cadmium except for the exemptions listed in Schedule II of the Rule Notices for removable batteries Risk of explosion if battery is replaced by an incorrect type The battery and its component must be recycled or disposed of properly Avis concernant les batteries remplaçables La batterie de l ordinateur portable peut présenter un risque d...

Page 110: ...gapore This ASUS product complies with IMDA Standards Complies with IMDA Standards DB103778 Japan Technical Conformity Mark ASUS Tablet 003 150094 D150070003 National Telecommunications Commission of the Philippines This ASUS product complies with NTC Standards No ESD XXX ...

Page 111: ... TR Simplified EU Declaration of Conformity ASUSTek Computer Inc hereby declares that this device is in compliance with the essential requirements and other relevant provisions of Directive 1999 5 EC Full text of EU declaration of conformity is available at https www asus com support This device may be operated in the countries listed below ...

Page 112: ...112 ASUS Tablet and ASUS Keyboard Dock E Manual ...

Reviews: