background image

ALM58LI402

Original instructions

Summary of Contents for ALM58LI402

Page 1: ...ALM58LI402 Original instructions ...

Page 2: ...2 2 Important It is essential that you read the instructions in this manual before assembling operating and maintaining the product Subject to technical modifications ...

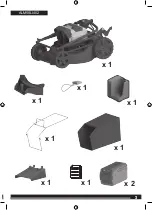
Page 3: ...3 3 x 1 x 1 x 1 x 1 x 1 x 2 x 1 x 1 x 1 ALM58LI402 ...

Page 4: ...4 4 BATTERY SAFETY KEY REAR DISCHARGE DOOR SIDE DISCHARGE DOOR SIDE DISCHARGE PLUG HEIGHT ADJUSTMENT LEVER ...

Page 5: ...5 5 START BUTTON ON OFF TRIGGER UPPER HANDLE KNOB HANDLE ADJUSTMENT PIN GRASS CATCHER MULCH PLUG BAR BLADE ...

Page 6: ...6 6 26 30 27 INSTALLING THE SIDE DISCHARGE PLUG REMOVING THE SIDE DISCHARGE PLUG REPLACING THE BLADE ...

Page 7: ...7 7 10 14 START 15 17 OPERATING THE PRODUCT UNFOLDING THE HANDLES INSTALLING THE MULCH PLUG REMOVING THE MULCH PLUG ...

Page 8: ...8 8 24 13 32 12 ADJUSTING THE CUTTING HEIGHT INSTALLING AND REMOVING THE BATTERY PACKS STORING THE PRODUCT INSTALLING AND REMOVING THE SAFETY KEY ...

Page 9: ...9 9 28 22 19 ADJUSTING THE HANDLE HEIGHT REMOVING THE GRASS CATCHER INSTALLING THE GRASS CATCHER ...

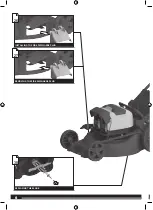
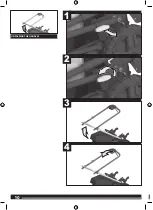
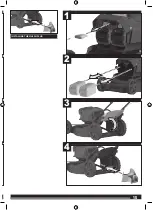
Page 10: ...10 10 1 2 3 4 UNFOLDING THE HANDLES ...

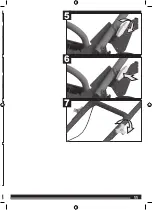
Page 11: ...11 11 7 6 5 ...

Page 12: ...12 12 click 1 2 2 1 INSTALLING AND REMOVING THE BATTERY PACKS NOTE The mower can run on either 1 battery pack or 2 battery packs for extended runtime ...

Page 13: ...13 13 1 2 1 INSTALLING AND REMOVING THE SAFETY KEY NOTE The mower does not turn on unless the safety key is installed The arrow on the safety key points to which battery pack the mower draws power from ...

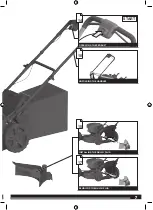
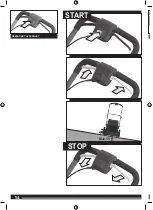
Page 14: ...14 14 Max 15 START STOP OPERATING THE PRODUCT INS ...

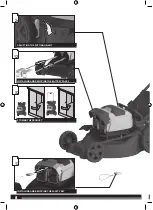
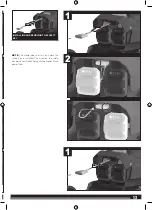
Page 15: ...15 15 3 4 1 2 INSTALLING THE MULCH PLUG ...

Page 16: ...16 16 5 RE ...

Page 17: ...17 17 1 2 3 4 REMOVING THE MULCH PLUG ...

Page 18: ...18 18 5 INS To a catch top h Inser then ...

Page 19: ...GRASS CATCHER To assemble the grass catcher insert the grass catcher frame into the bag making sure that the top handle stays outside of the bag Insert the grass catcher bag through the frame and then clip the bag over the frame ...

Page 20: ...20 20 6 5 4 ...

Page 21: ...21 21 8 7 ...

Page 22: ...22 22 3 1 2 4 REMOVING THE GRASS CATCHER AD ...

Page 23: ...23 23 3 1 2 ADJUSTING THE CUTTING HEIGHT ...

Page 24: ...24 24 5 4 INS NOT the ...

Page 25: ...25 25 3 4 1 2 INSTALLING THE SIDE DISCHARGE PLUG NOTE For best side discharge performance install the mulch plug when using the side discharge plug ...

Page 26: ...26 26 2 1 4 3 REMOVING THE SIDE DISCHARGE PLUG AD ...

Page 27: ...27 27 3 1 2 ADJUSTING THE HANDLE HEIGHT ...

Page 28: ...28 28 5 4 RE ...

Page 29: ...29 29 3 1 2 4 REPLACING THE BLADE ...

Page 30: ...8 6 Blade bolt tightening torque 35 40 Nm ST NOTE Always properly dispose of a used blade NOTE For the replacment blade part number see the specifications table NOTE Tighten the blade bolt to a torque of 35 40 Nm ...

Page 31: ...31 31 g 3 4 1 2 STORING THE PRODUCT ...

Page 32: ...32 32 8 7 5 6 ...

Page 33: ...33 33 12 10 11 9 ...

Page 34: ...tible chargers ABC58S ABC58FX REPLACEMENT PART Blade ALM1 682092 Mulch plug 531711003 Side discharge plug 529853002 Grass catcher 307007004 SOFTWARE AND HARDWARE VERSION Hardware Version VER S05 Software Version V01 INTENDED USE The cordless lawnmower is intended for outdoor use only TECHNICAL DATA CORDLESS LAWNMOWER ALM58B ALM58LI402 Rated voltage 58V d c Width of cut 46 cm Height of cut 18 75 mm...

Page 35: ...emove the safety key whenever you are not operating the product Remove the battery pack before making any adjustments cleaning or removing material from the product Ensure that the safety key is removed before inserting the battery pack A battery pack must be recharged only with the charger specified by the manufacturer Using a charger with an incompatible battery pack may create a risk of fire Us...

Page 36: ... to stop powering the product If the battery pack is too warm allow it to cool down before resuming operation If the product still does not work recharge the battery pack NOTE The battery pack LED indicator does not work if the battery protection feature has caused the battery pack to stop powering the product Release the on off lever or remove the battery pack from the product and the battery pac...

Page 37: ...n safe working condition Be careful during adjustment of the product to prevent entrapment of the fingers between moving blades and fixed parts of the product When servicing the blades be aware that even though the power source is turned off the blades can still be moved The blade on the product is sharp Use extreme caution and wear heavy duty gloves when fitting replacing cleaning or checking bol...

Page 38: ...n imminently hazardous situation which if not avoided will result in death or serious injury WARNING Indicates a potentially hazardous situation which if not avoided could result in death or serious injury CAUTION Indicates a potentially hazardous situation which if not avoided may result in minor or moderate injury CAUTION Without safety alert symbol Indicates a situation that may result in prope...

Page 39: ...39 39 ...

Page 40: ...verley VIC 3149 Australia Techtronic Industries N Z Limited Unit C 70 Business Parade South Highbrook Auckland 2013 New Zealand www aegpowertools com au www aegpowertools co nz AEG is a registered trade mark used under license from AB Electrolux publ 961087286 03 ...

Reviews: