background image

1400 D

Dunstabzugshaube
Afzuigkap
Hotte aspirante
Cooker Hood

Montage- und Gebrauchsanweisung
Installatie- en gebruksaanwijzing
Manuel de montage et d’utilisation
Operating and Installation Instructions

Summary of Contents for 1200 D

Page 1: ...1400 D Dunstabzugshaube Afzuigkap Hotte aspirante Cooker Hood Montage und Gebrauchsanweisung Installatie en gebruksaanwijzing Manuel de montage et d utilisation Operating and Installation Instructions ...

Page 2: ...55 Printed on recycled paper AEG putting words into action ...

Page 3: ...rsion Filter version Hood operation 60 Maintenance and care 61 Metal grease filter Carbon filter Changing the light bulb Cleaning Special accessories Technical assistance service Guarantee conditions Service Technic Details 67 Installation 68 Electrical connection Wall unit mounting Wall mounting ...

Page 4: ...liance In the case of oil gas and coal fired cookers it is essential to avoid open flames Also when frying keep the deep frying pan on the cooker top cooker under careful control The hot oil in the frying pan might ignite due to overheating The risk of self ignition increases when the oil being used is dirty It is extremely important to note that overheating can cause a fire Never carry out any fl...

Page 5: ...h appliances connected to a chimney if the room and or flat air environment combination is ventilated from outside using a suitable ventilation hole approxi mately 500 600 cm2 large to avoid the possibility of a depression being created during operation of the hood If you have any doubts contact the relevant controlling authority or building inspector s office Since the rule for rooms with fuel bu...

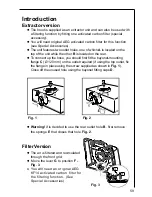
Page 6: ...To connect up the hose you should first fit the bayonet mounting flange C Ø 120 mm on the outlet required if using the top outlet fix the flange in place using the screw supplied as shown in Fig 1 Close off the unused hole using the bayonet fitting caps D Fig 1 l Warning If is decided to use the rear outlet hole B first remove the sponge E that closes that hole Fig 2 Filter Version l The air is fi...

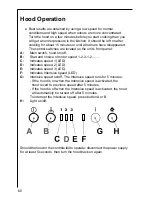
Page 7: ...art and choice of motor speed 1 2 3 1 2 C Indicates speed 1 LED D Indicates speed 2 LED E Indicates speed 3 LED F Indicates Intensive speed LED G Intensive speed on off The Intensive speed runs for 5 minutes If the hood is on when the Intensive speed is activated the hood revert to previous speed after 5 minutes If the hood is off when the Intensive speed is activated the hood will automaticly be ...

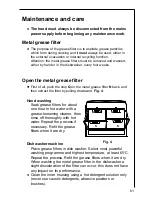
Page 8: ...k and then extract the filter by pulling downward Fig 4 Dishwasher machine Place grease filters in dish washer Select most powerful washing programme and highest temperature at least 65 C Repeat the process Refit the grease filters when it are dry When washing the metal grease filter in the dishwasher a slight discoloration of the filter can occur this does not have any impact on its performance C...

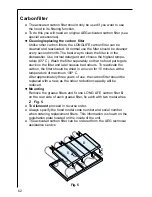
Page 9: ...ts gets stuck on the filter and later causes bad odours To reactivate the carbon the filter should be dried in an oven for 10 minutes with a temperature of maximum 100º C After approximately three years of use the carbon filter should be replaced with a new as the odour reduction capacity will be reduced l Mounting Remove the grease filters and fit one LONG LIFE carbon filter S on the rear side of...

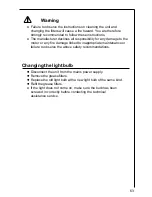
Page 10: ...o the motor or any fire damage linked to inappropriate maintenance or failure to observe the above safety recommendations Changing the light bulb l Disconnect the unit from the mains power supply l Remove the grease filters l Replace the old light bulb with a new light bulb of the same kind l Refit the grease filters If the light does not come on make sure the bulb has been screwed in correctly be...

Page 11: ...to do so will cause grease deposits to build up that could constitute a fire hazard Special accessories Carbon filter KF 14 E Nr 942 120 604 Technical assistance service You are welcome to telephone our technical assistance service see list of technical assistance centres whenever you need information or in the unlikely event of a fault When calling please be ready to specify 1 The model code numb...

Page 12: ...sed agent AEG reserves the right to stipulate the place of the repair i e the customer s home place of installation or AEG workshop 4 The guarantee or free replacement includes both labour and materials 5 Repairs carried out under guarantee do not extend the guarantee period for the appliance Parts removed during guarantee repairs become the property of AEG 6 The purchaser s statutory rights are n...

Page 13: ... of your new home They will then ensure that the local Service Organisation is aware of your move and able to look after you and your appliances France Senlis 33 0 44 62 29 29 Germany Nürnberg 49 0 911 323 2600 Italy Pordenone 39 0 1678 47053 Sweden Stockholm 46 0 8 738 7910 UK Slough 44 0 1753 219899 ...

Page 14: ...67 Technic Details Dimensions Height x Width x Depht in cm 16 3 x 59 9 x 53 5 Maximum absorbed power 200 W Motor absorption 120 W Lighting 2 x 7 W Length of the cable 115 cm ...

Page 15: ...necessary to provide a fixed connection the hood must only be installed by an electrician authorised by the local electricity board When installing an omnipolar disconnector with a distance of at least 3 mm between contacts must be provided The manufacture declines all responsibility for malfunctions resulting from failure to comply with the above instructions Electrical connection 220 240 V by me...

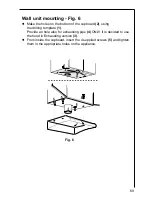
Page 16: ... cupboard 2 using the drilling template 1 Provide an hole also for exhausting pipe 4 ONLY if is decided to use the hood in Exhausting version 3 l From inside the cupboard insert the 4 supplied screws 5 and tighten them in the appropriate holes on the appliance Fig 6 ...

Page 17: ...er points Insert the three Ø 8mm expansion plugs into the wall 4 Insert 2 5x45 screws 5 but do not tighten them completely hang the hood 6 Adjust the unit so that it is positioned at a right angle to the wall by turning the two screws on lower side 7 Tighten the 2 upper screws 8 From inside the hood insert the third 5x45 screw into the lower hole 9 and tighten 10 2 3 4 4 4 5 5 3 1 6 6 9 8 1cm 5 10...

Page 18: ...71 ...

Page 19: ...AEG Hausgeräte GmbH Postfach 1036 D 90327 Nürnberg http www aeg hausgeraete de Copyright by AEG LI1OSE Ed 07 02 ...

Reviews: