background image

Altos easyStore Quick Installation Guide


1.1 Packing content: 

One Altos easyStore with pre-installed Hard Disk Drives 
One Power cord  

One Software Installation CD  

One DiskSafe Express Recovery CD 

One RJ-45 Networking cable 


1.2 Default Setting 

Name Default 

Setting 

User name 

admin 

Password storage 
IP Address 

192.168.0.101 

Subnet Mask 

255.255.255.0 

DHCP Client 

Yes 

1.3 Hardware Installation  

In order to connect Altos easyStore, perform the following steps: 

1.  Carefully remove the Altos easyStore unit the package. 

2.  Connect an Ethernet cable from your computer directly to the back of the Altos easyStore in Figure 

1-2. 

3.  Connect your host computer and Altos easyStore by RJ45 Networking cable in Figure 1-2. 

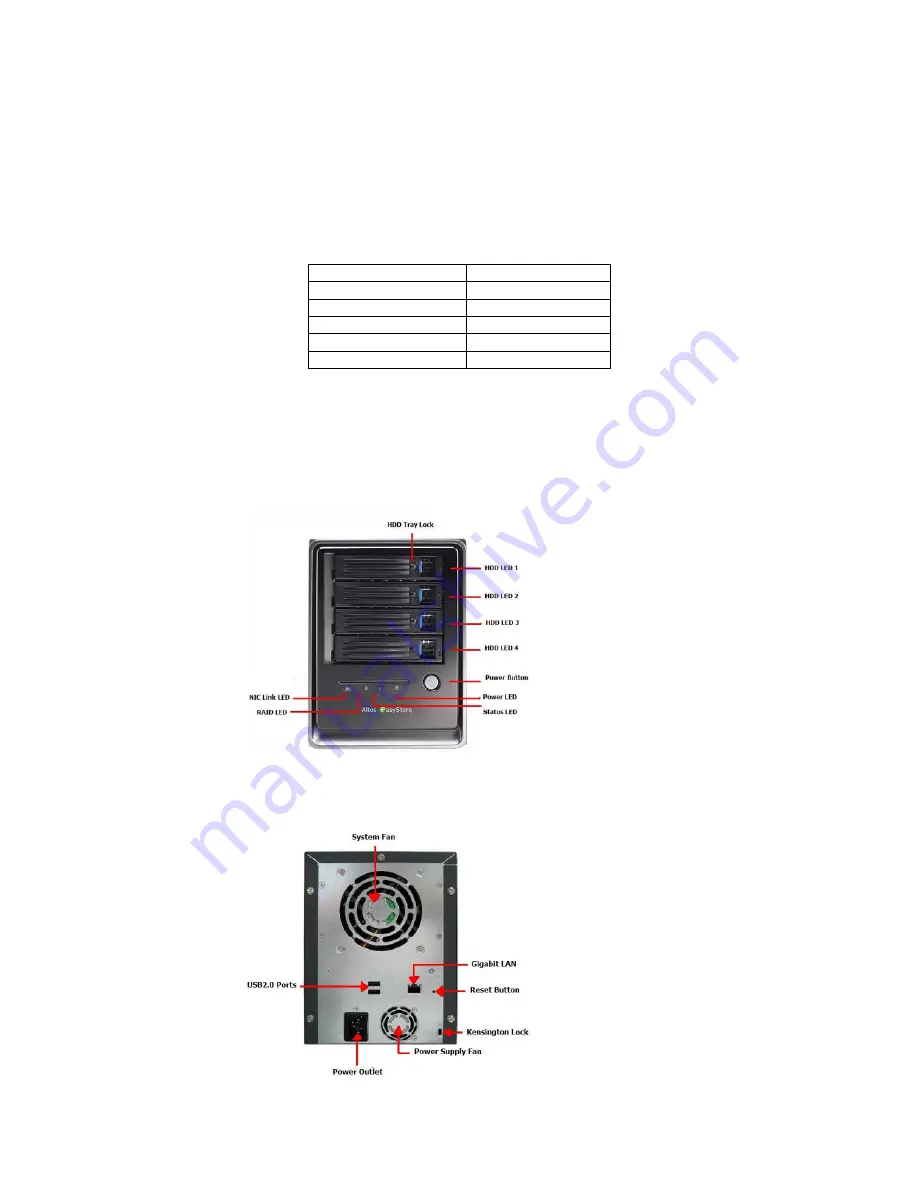
4.  Power on the Altos easyStore in Figure 1-1. 


Figure 1-1:   Front Panel 


Figure 1-2: Rear Panel 


Altos easyStore Quick Installation Guide                       

Summary of Contents for Altos EasyStore

Page 1: ... 101 Subnet Mask 255 255 255 0 DHCP Client Yes 1 3 Hardware Installation In order to connect Altos easyStore perform the following steps 1 Carefully remove the Altos easyStore unit the package 2 Connect an Ethernet cable from your computer directly to the back of the Altos easyStore in Figure 1 2 3 Connect your host computer and Altos easyStore by RJ45 Networking cable in Figure 1 2 4 Power on the...

Page 2: ...ddress is 192 168 0 101 with a subnet mask of 255 255 255 0 3 Open your web browser and type http 192 168 0 101 in the address bar and press ENTER 4 When you access Altos easyStore first time system will display below interface for system configuration However if your Altos easyStore comes with pre installed and configured HDDs you can skip these steps Figure 1 4 System Initialization Note If you ...

Page 3: ... System will start initialization When system initialization is complete please turn off browser manually and wait for one minute Figure 1 7 System firmware upload Figure 1 8 System firmware upload complete 7 Open your web browser and type http 192 168 0 101 in the address bar and press ENTER You will be taken to the Welcome Page click NEXT Figure 1 9 System Welcome Page Altos easyStore Quick Inst...

Page 4: ...are License Agreement Page 9 The Host Name page appears Click Next to accept the default name NetworkStorage or enter a desired name for Altos easyStore The Host name can be up to 15 characters long and can include letters numbers and hyphens Figure 1 11 System Host Name Page Altos easyStore Quick Installation Guide ...

Page 5: ...click Next Figure 1 12 Setup Date Time Page 11 Setup Network Setting Choose Get an IP address automatically If you have DHCP server or use the default IP 192 168 0 101 When you are done with the setting click Next Figure 1 13 Network Settings Page Altos easyStore Quick Installation Guide ...

Page 6: ... 5 is enabled When you are done with the setting click Next Figure 1 14 Setup Disk Configuration 13 The storage will be divided into 2 portions shared folders default is 200MB and backups select the desired volume for each one When you are done click Finish Figure 1 15 Disk Space Distribution Altos easyStore Quick Installation Guide ...

Page 7: ...ter system configuration is complete close browser manually and wait for several minutes 16 Open your web browser and type http 192 168 0 101 in the address bar and press ENTER Default setting of username and password is admin and storage Figure 1 17 Logging into Altos easyStore Storage System 17 System initialization complete Altos easyStore Quick Installation Guide ...

Reviews: