

A
B
C
D
1
2a 2b
3
4
1
3
2
Wired Bus
Wired Bus
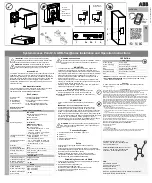
Alternative
Power input
Alternative
Power input
Wired
free@home
Bus
2
4 V
D
C
RJ
45
24
V
D
C
RJ
4
5
SAP-S-3-US
2CKA00
0073B963
3 / 24
.07
.2018
EN
FR
System Access Point 2.0, ABB-free@home Installation and Operation Instructions
En
g
lish
IMPORTANT
: Carefully read all instructions and safety
information about this device before operation. Please leave
this document with the homeowner for future reference.
WARNING
: Installation must be performed by a licensed
electrician or electrical professional. Improper installation can
cause property damage, personal injury, or loss of life.
Intended Use
The System Access Point 2.0 (SysAP) is the central controller hub of the
free@home network. It is used to identify and configure free@home
devices during installation. Once the devices are added to the network,
the SysAP is able to automatically execute user-defined programs and
facilitates manual interaction via the free@home app available on
smartphones, tablets, and PCs. Only one SysAP may be active on a
network at any time.
Additional Information
For more information on system integration or the range of functions,
please scan the QR code or refer to the system manual at
http://new.abb.com/products/2CKA006200A0156/
Box Contents
System Access
Point 2.0
Mounting Base
2 Wall Screws
2 Wall Anchors
1 free@home Wired Bus Connection
Terminal (Red/Black)
1 Power Supply Connection Terminal
(Yellow/White)
1 Plug Power Supply with Adapter
1 Strain-Relief Bracket with 2 Screws
Optional Accessories:
External Antenna
SAP-S-3-US Technical Data
SAP-S-3-US
External Wall Plug Power Supply
(enclosed, SELV)
24 VDC / 300 mA
NEC Class 2 (LPS)
Operating Voltage
* Alternative
DIN Rail Power Supply
24 VDC / 300 mA (SELV)
NEC Class 2 (LPS)
■
Connection terminal: 0.8 - 1.0 mm
(AWG 18 - AWG 20)
■
Line type: J-Y(St)Y, 2 x 2 x 0.8 mm
■
Wire stripping: 6 - 7 mm
free@home Wired Bus
Voltage
24 VDC via separate power supply
(sold separately)
free@home Wired Bus
Connection
■
Bus connection terminal:
0.8 - 1.0 mm (AWG 18 - AWG 20)
■
Line type: J-Y(St)Y, 2 x 2 x 0.8 mm
■
Wire stripping: 6 - 7 mm
Ethernet
RJ45
Protection Rating
IP20
Operating Temperature 23° F to 113° F (-5° C to 45° C)
Storage Temperature
-40° F to 158° F (-40° C to 70° C)
USB-Port
2.0 (High Speed)
Total USB current: 500 mA
Wireless (WL)
Transmission protocol
free@home wireless
Transmission frequency 2.400 - 2.483 GHz
Maximum transmission
power WL (wireless)
< 20 dBm
WLAN
WLAN standard
IEEE 802.11 a/b/g/n/ac
WLAN frequency range
2.400 - 2.483 GHz
5.100 - 5.725 GHz
Maximum transmission
power, WLAN
< 20 dBm
WARNING: SHOCK HAZARD
Disconnect the main power supply prior to installation. Failure to
turn off the power can cause electrical shock or equipment
damage.
MOUNTING
■
The transmitter and receiver communicate via RF signals. The
transmission range depends on the structural conditions. Walls,
ceilings, and electrical equipment can affect wireless communication,
especially steel reinforcements or other large metal objects. Electrical
devices that send high-frequency signals (such as computers,
wireless routers, audio systems, and video systems) should be at
least 3-feet from this device.
■
If the System Access Point 2.0 is installed within a closed metallic
housing (i.e. breaker box), the external antenna should be connected
for WL operation and fed outside the box.
■
Stationary surface-mounting in interior, dry rooms only. Observe all
state and local regulations for installation.
Ways to Mount the SysAP:
Option A - Wall:
Screw the mounting base directly onto the
wall. Set the SysAP on the top and push it downwards.
Option B - Flat Surface:
Place the SysAP on a flat surface (i.e.
on a table).
CONNECTION
■
Cat5 or Cat6 wires are connected directly via the Ethernet
port.
IMPORTANT: Use only shielded Cat5 or 6 wires
.
■
For installations with a plug-in connection, the socket outlet
must be mounted close to the SysAP and be easy to access.
■
Use the enclosed power supply with the correct adapter to power the
SysAP. To connect the adapter to the power supply, simply slide it
down the rails on the power supply until it locks in place (See diagram
C & D). All other devices on the network (free@home wired bus) must
be powered by a separate NEC Class 2 (LPS) power supply.
■
Alternative: 24 V power cord, supplied by the DIN Rail Power Supply
(See mounting diagram) instead of enclosed power supply.
WARNING
: Do not attempt to power the device using both the
DC power jack and the alternative DC power connection. Use
only a single connection.
Connection Diagram
1
Use the adapter for the enclosed DC power jack
2a USB-Port
2b USB-Port
3 Ethernet Connection (RJ45)
4 External Antenna
Setup
■
All the devices of the system must be correctly wired and
powered ON.
■
Connect to the SysAP with a smartphone, tablet, or PC via WLAN.
■
For additional connection options see the technical reference manual.
(Scan QR code in this instruction manual).
■
Detailed information about setup, network connection and
configuration is available in the technical reference manual at
http://new.abb.com/products/2CKA006200A0156/
Establishing Connection via WLAN
1. Connect to the System Access Point 2.0 with WLAN (For password
see backside of the device)
2. Open the web-based configuration tool
A) Automatic within free@home app
B) Via UPnP (network settings - double click on device)
C) Via browser (enter IP address: 192.168.2.1)
3. Settings page will appear
OPERATION
1 - LED Light
Green - Briefly
Power is ON
Green - Flashing
Device is booting
White
Device is ready for operation
Blue
Access Point mode, (WLAN)
2 x Red Flashing
Failed to join Network
White/red flashing
No connection to myABB
OFF
No power
2 -
RESET
by using a pin - press down and hold for 40 seconds or longer
3 -
ACTIVATED/DEACTIVATED
Access Point mode (WLAN on/off);
LED ON/OFF: active/inactive
Cleaning:
To clean, wipe with a clean damp cloth. DO NOT use any chemical
cleaning solutions.
FCC/IC Information
This device complies with part 15 of the FCC Rules and Industry Canada license-exempt RSS
standard(s). Operation is subject to the following two conditions: (1) this device
may not cause interference, and (2) this device must accept any interference, including
interference that may cause unwanted operation. Modifications not expressly approved by the
manufacturer could void the user’s authority to operate this equipment.
Note: This equipment has been tested and found to comply with the limits for a Class B digital
device, pursuant to part 15 of the FCC Rules. These limits are designed to provide reasonable
protection against harmful interference in a residential installation. This equipment generates,
uses and can radiate radio frequency energy and, if not installed and used according to the
instructions, may cause harmful interference to radio communications. However, there is no
guarantee that interference will not occur in an installation. If this equipment does cause
harmful interference to radio or television reception, which can be tested by turning the
equipment off and on, the user is encouraged to try to correct the interference by doing one or
more of the following:
■
Reposition or move the receiving antenna.
■
Increase the distance between the equipment and the receiver.
■
Connect the equipment to an outlet on a different circuit (not the circuit used by the
receiver).
■
Consult the dealer or an experienced radio/TV technician for help.
This radio transmitter IC:23736-SAPS3US has been approved by ISED Canada to operate
with the antenna types listed below with the maximum permissible gain indicated. Antenna
types not included in this list, having a gain greater than the maximum gain indicated for that
type, are strictly prohibited for use with this device.
The device operation in the band 5150–5250 MHz is only for indoor use to reduce the
potential for harmful interference to co-channel mobile satellite systems.
This device contains WLAN Module IC 23736-SPB209A.
External Antenna (optional):
■
ABB SAP-1-WL
■
gain: 1.5dBi
■
connector: reverse SMA
A minimum separation distance ≥ 20 cm is required between the antenna and radiating
structures of the device and nearby persons to qualify for mobile exposure limits.
Customer Service:
800-816-7809
7:00 am – 5:30 pm, CST, Monday-Friday
[email protected]
Technical Support:
888-385-1221, Option 1
7:00 am – 5:00 pm, CST, Monday-Friday
[email protected]
ABB
Electrification Products
860 Ridge Lake Boulevard
Memphis, TN 38120
abb.com/freeathome
NEC
®
is a registered trademark of the National Fire Protection
Association, Quincy, Massachusetts.
LIS TE D E 498995
IC


