background image

VER:1.0 


  05.04.2017

ABB-Welcome

Pos: 2 /DinA4  - Anl eitun gen  Online /Inh alt/KNX/Doo rEntry /832 20-AP- xxx/Tit elblat t -  832 20-AP-xxx  - ABB @ 1 9\m od_ 132 3249 806 476 _15. docx  @ 11 108 4 @   @ 1
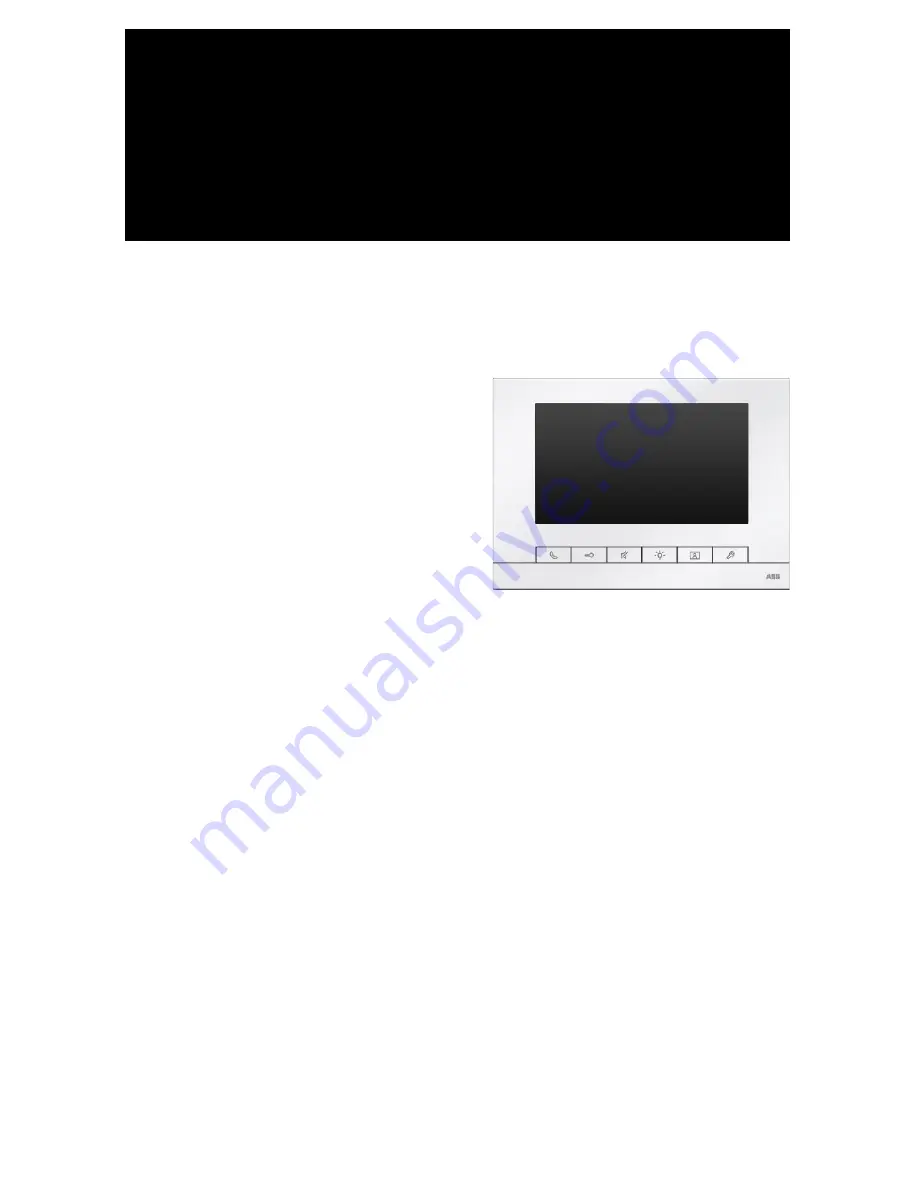
83220 AP-6..-5..

7" video hands-free indoor

station, pushbutton

=== E nde der Liste für Tex tma rke C over == =

Summary of Contents for 83220 AP-5 series

Page 1: ...DinA4 Anl eitun gen Online Inh alt KNX Doo rEntry 832 20 AP xxx Tit elblat t 832 20 AP xxx ABB 1 9 m od_ 132 3249 806 476 _15 docx 11 108 4 1 83220 AP 6 5 7 video hands free indoor station pushbutton E nde der Liste für Tex tma rke C over ...

Page 2: ...g up the voice and video connections 14 4 2 6 Opening the door 15 4 2 7 Muting 16 4 2 8 Activating the custom function 17 4 2 9 Event and picture memory history 19 4 2 10 Information 23 4 2 11 Inserting an SD card 24 4 2 12 Settings 25 4 2 12 1 Overview 25 4 2 12 2 Intercom 28 4 2 12 3 Switch actuator 31 4 2 12 4 Program button 33 4 2 12 5 Leave home management 34 4 2 12 6 Voice message 36 4 2 12 ...

Page 3: ... Terminal resistor 54 4 4 2 Connection 55 5 Technical data 56 6 Mounting Installation 57 6 1 Requirements for the electrician 57 6 2 General installation instructions 58 6 3 Mounting 59 E nde der Liste für Tex tma rke TOC ...

Page 4: ...se r Ge bra uch 83 220 AP xxx 500 2 0 mo d_1 324 561 168 699 _15 docx 11 272 8 1 This device is an integral part of the ABB Welcome door communication system and operates exclusively with components from this system The device must only be installed in dry indoor rooms Pos 10 B usch J aeg er Neus truk tur M odul Strukt ur O nline Doku me ntatio n Übe rsch rifte n Fü r alle Doku men te 1 E bene U Z...

Page 5: ...ectric devices and their components via an authorized recycling facilities or disposal companies ABB products meet the legal requirements in particular the laws governing electronic and electrical devices and the REACH ordinance EU Directive 2002 96 EG WEEE and 2002 95 EG RoHS EU REACH ordinance and law for the implementation of the ordinance EG No 1907 2006 ...

Page 6: ...eb 18 mo d_1 302 768 8209 65_ 15 docx 10 3540 2 1 4 1 Standard operations Pos 20 Di nA4 A nleitu ngen Onlin e Ueb ersc hrift en 3 Bedie nele men te 20 mod _13 232 6022 055 9_1 5 do cx 1 116 47 3 1 4 1 1 Control elements Pos 21 Di nA4 A nleitu ngen Onlin e In halt KNX Do orEnt ry 83 220 AP xxx Be dienel eme nte 8 322 0 AP xxx 18 mo d_1 3032 128 536 05_ 15 d ocx 103 673 1 Fig 1 Control elements SD C...

Page 7: ...press this button to mute the ringtone for this indoor station 4B In standby mode hold this button to mute the ringtone for all indoor stations in the apartment 4C Press this button to reject incoming call 4D During a conversation press this button to mute the microphone If the LED lights up this indicates a mute status 5 Program button 5A Release the lock connected with outdoor station COM NC NO ...

Page 8: ...t outdoor station master or slave station on this panel and the current software information 4 History New informations events or picture memory are available when this icon flashes This also indicates a missed call or a new voice message Click on this icon to display the events and picture memory 5 Mute function Icons crossed out handset and crossed out bell indicate the mute status of the microp...

Page 9: ...lance Click on this button to start to survey the default outdoor station 12 Intercom Click on this button to enter the intercom call menu 13 Guard unit Click on this button to call guard unit 14 Switch actuator Click on this button to enter the switch actuator menu Pos 29 B usch J aeg er Neus truk tur M odul Strukt ur O nline Doku me ntatio n Steu er mod ule Onlin e Dok ume ntati on Für alle Dok ...

Page 10: ...illance Click on this button to start to survey the default outdoor station Only the video connection appears first Press button to activate the voice connection No Function 1 Designation of camera 2 Set volume with the plus minus buttons 3 If several outdoor stations or external cameras are connected Select a camera with the forward back buttons 4 Click on the button to set the display Saturation...

Page 11: ...m Click on this button to enter intercom call menu and then the following functions are available Set the intercom call lists in the system setting intercom setting menu first No Functions 1 The name of an intercom 2 The address of an intercom 3 The type of an intercom external or internal means an external intercom from a different apartment means an internal intercom from the same apartment 4 Cl...

Page 12: ...P xxx Tue r o effne n 832 20 AP x xx 20 m od_ 132 326 795 847 9_15 docx 1 121 09 1 Fig 5 Calling guard unit Click on the guard unit button to call a guard unit and then the following functions are available No Functions 1 Designation of a guard unit 2 Set volume with the plus minus buttons Call guard unit 2 1 ...

Page 13: ...itch actuator Click on switch actuator button to enter the switch actuator menu and then the following functions are available Set actuator lists in the system setting switch actuator menu first No Functions 1 The name of an actuator 2 The address of an actuator 3 Click on this button to activate the selected actuator 4 Click on this button to go back to the Start screen Switch actuator 4 1 2 3 ...

Page 14: ...s the communication button No Functions 1 Designation of the camera 2 Set the volume with the plus minus buttons 3 If several outdoor stations or external cameras are connected select the camera with the forward back buttons 4 Click on the buttons to set the display Saturation of the display plus and minus Contrast of the display plus and minus Pos 29 B usch J aeg er Neus truk tur M odul Strukt ur...

Page 15: ...o effne n 832 20 AP x xx 20 m od_ 132 326 795 847 9_15 docx 1 121 09 1 Fig 8 Opening the door Press the key button to activate the door opener and then the following functions become available No Functions 1 The open door icon is displayed after you press the door opener or activate the function automatic door opener 1 ...

Page 16: ...s No Functions 1 No call is pending If you press the mute function while no call is pending the bell sound of the panel will be deactivated for a certain period If calls come in during this time only the video image is displayed Missed calls are displayed in the events and pictures memory 2 A call is pending If you press the button mute function during a call the microphone of the panel will be de...

Page 17: ... Welcome 17 4 2 8 Activating the custom function Pos 31 Di nA4 A nleitu ngen Onlin e In halt KNX Do orEnt ry 83 220 AP xxx Tue r o effne n 832 20 AP x xx 20 m od_ 132 326 795 847 9_15 docx 1 121 09 1 1 2 3 ...

Page 18: ...l list switch actuator list can be assigned for the program button No Functions 1 If the function release second lock is assigned to the program button the open door icon will be displayed when you press the program button 2 If the function control switch actuator is assigned to the program button the actuator icon will be displayed when you press the program button 3 If the function make an inter...

Page 19: ... panel records all events Press the history button and then the last 100 events will be displayed prior events are overwritten No Functions 1 If you have activated the function auto snapshots activated in the system settings the flashing icon in the status bar signals a newly taken snapshot The symbol stops flashing when you call up the events and pictures memory 2 Voice message Press the flash bu...

Page 20: ...ABB Welcome 20 1 2 2 3 4 ...

Page 21: ...ure memory history During a call you can take a snapshot at any time by pressing the history button even when the automatic snapshots function is not activated The event and picture memory history menu has the following functions 8 5 6 7 ...

Page 22: ... you would like to archive can be copied onto a SD card SD SDHC 3 Three photos are made each time a visitor rings the bell This ensures that an acceptable photo has been taken All recorded photos are accessed via the details window 4 Only if a call is on an intercom call list it can be added to the blacklist which is used to prevent unwanted calls from other apartment s 5 Display the details windo...

Page 23: ...rmation Pos 31 Di nA4 A nleitu ngen Onlin e In halt KNX Do orEnt ry 83 220 AP xxx Tue r o effne n 832 20 AP x xx 20 m od_ 132 326 795 847 9_15 docx 1 121 09 1 Fig 13 Information Items above will be shown on the information menu ...

Page 24: ...e 24 4 2 11 Inserting an SD card Pos 31 Di nA4 A nleitu ngen Onlin e In halt KNX Do orEnt ry 83 220 AP xxx Tue r o effne n 832 20 AP x xx 20 m od_ 132 326 795 847 9_15 docx 1 121 09 1 Fig 14 Inserting an SD card ...

Page 25: ...tuator list in the menu 3 Program button Set functions for the program button 4 Leave home management Call forward setting Set the target e g other indoor stations or guard units who you wish to forward calls to when you are away Message leaving If you are not at home you can record and leave a message before leaving home to notify possible visitors and vice versa 5 Voice message Create voice mess...

Page 26: ... the outdoor stations the doorbell and others Set the volume for the ringtone 9 Auto unlock Set the automatic unlock time range 10 Display settings Different display settings 11 Date and time Different time settings 12 Language Set the local language 13 Set up Other settings e g automatic snapshots 14 Firmware update 15 Reset the factory default ...

Page 27: ...the hidden functions click on the scroll buttons 2 2 Touch one of the setting areas 3 Touch the button set 3 The device turns to the selected settings area The individual functions are described in the upcoming chapters Device returns to start page when back button is pressed 4 Select this button to go back to start page 4 1 2 3 ...

Page 28: ...o make an external intercom each apartment must have a master indoor station means an internal intercom from the same apartment 4 Add Add a new intercom list Up to 32 intercom lists can be added 5 Delete Click on this button to delete an existing intercom entry Finally confirm the dialogue box displayed 6 Back Click on this button to return to the system settings menu 7 Adjust Click on this button...

Page 29: ...ABB Welcome 29 Pressing Add or Adjust Fig 18 Intercom The intercom has the following functions 5 4 1 3 2 1 ...

Page 30: ...om different apartments internal intercom means a call from the same apartment 3 Edit the address via the numeric keyboard from 001 to 250 If the call is an internal intercom there is no need to set the target address 4 Click on the ok button to activate the settings 5 Click on the back button to return to the intercom settings menu without saving the settings ...

Page 31: ...s 1 Name of an actuator 2 Address of an actuator 3 Add Click on this button to add new actuator entry 4 Delete Click on this button to delete an existing actuator Confirm the dialog box displayed 5 Back Click on this button to return to system settings 6 Adjust Click on this button to edit the name and address 3 4 1 2 5 6 ...

Page 32: ...nctions No Functions 1 Click on this edit box to rename the relay actuator 2 Edit the address via the numeric keypad from 001 to 199 3 Click on the OK button to activate the settings 4 Click on the Back button so you can return to the relay actuation settings menu without saving the settings 4 3 1 2 ...

Page 33: ... lock call to the guard unit intercom call enabling the switch actuator second lock means a lock which is connected with an outdoor station NC NO COM Only the existing intercom call list and switch actuator list can be assigned for the program button 2 Click on this button to activate the settings 3 Click on this button to return to the system settings menu without saving the settings 3 2 1 ...

Page 34: ...an only be set in master indoor station No Functions 1 Call forward Tick the checkbox to activate or deactivate the call forward command Choose the target type through the drop down menu Tick address numeric keyboard to edit the address if a call type comes from an indoor station If the call forward function is activated the auto unlock function will be disabled 2 Message leaving Tick the checkbox...

Page 35: ...l be a warning that prompts users to set the absence message first in the voice message menu 3 OK Click on this button to activate the settings 4 Back Click on this button to return to the system settings menu without saving the settings 5 Call forward time can be set from 1 to 30s ...

Page 36: ...or visitors when the message leaving function is activated 2 Date Time The date and time when voice messages are created 3 Record a new message Click on this button to create a new voice message 4 Save for absence message Set a selected voice message as the away message 5 Delete message Click on this button to delete an existing voice message Finally confirm the dialog box displayed 6 Back Click o...

Page 37: ...B Welcome 37 7 Listen Touch the button to play the voice message Choose record a new message to create a new voice message Fig 24 Voice message Choosing Listen to play a voice message Fig 25 Voice message ...

Page 38: ...wing functions The function can only be set in master indoor station No Functions 1 Tick the checkbox to activate or deactivate the password function 2 Set a 3 8 digit password 3 OK Click on this button to activate the settings 4 Back Click on this button to return to the system settings menu Available only with the keypad 4 3 2 1 ...

Page 39: ...No Order of list 2 Indoor station address Set the address of the target indoor station from 001 to 250 3 Add Click on this button to add a new blacklist A total of 32 blacklists can be added 4 Delete Click on this button to delete an existing blacklist Finally confirm the dialog box displayed 5 Back Click on this button to return to the system settings menu 4 5 1 2 3 ...

Page 40: ...r other doors by clicking on one of the buttons in the list field 3 Bell sound for apartments Select a bell sound for apartments by clicking on one of the buttons in the list field 4 Bell sound for others Select a bell sound for others by clicking on one of the buttons in the list field e g a call from a guard unit intercom call or call from other apartments 5 Bell sound volume Set the volume of t...

Page 41: ...utes the active range is highlighted with a frame 7 Repeated Tone The ringtone can be set fixed or cycled Touch Feedback Tick the checkbox to activate or deactivate the feedback tone which sounds when the display or the button is touched 8 OK Click on this button to activate the settings 9 Back Click on this button to return to the system settings menu ...

Page 42: ...ctions leave home management and auto snapshot are disabled 2 On Activate or deactivate the time range when the automatic door opener is activated 3 Start Time Set the start time with the plus minus button when you activate the timer Before adjusting the hours or minutes the active range is highlighted with a frame 4 End Time Set the end time with the plus minus button when you activate the timer ...

Page 43: ...If you choose weekday the function will be activated at this period of time only on weekdays from Monday to Friday 6 OK Click onh this button to activate the settings 7 Back Click on this button to return to the system settings menu without saving the settings Pos 32 B usch J aeg er Neus truk tur M odul Strukt ur O nline Doku me ntatio n Steu er mod ule Onlin e Dok ume ntati on Für alle Dok ume nt...

Page 44: ... digital clock If an SD card with suitable pictures is located in the device you can select a screensaver through the drop down menu If several photos are stored in the SD card they are displayed as a slideshow Slideshow electronic photo Each photo appears for 20 seconds Photo requirements The photo must be stored in the SD card in the directory DCIM digital camera images on the first level The ma...

Page 45: ...t saving the settings 7 Calibration If the buttons and the associated graphics of the display are no longer superimposed the monitor must be calibrated Click on the calibration button and then click on the 5 displayed position crosses Finally confirm the dialog box displayed The display has been calibrated 8 Screen saver off after Select the active period for the screen saver via the drop down men...

Page 46: ...t the format of the displayed date via the drop down menu 3 OK Click on this button to activate the settings 4 Back Click on this button to return to the start page without saving the settings 5 Summer time Activate or deactivate during summertime by clicking on the checkbox automatic switchover 6 Date Set the date via with plus minus buttons Before adjusting the day month or year the active area ...

Page 47: ...ABB Welcome 47 7 Time Set the time with the plus minus buttons Before adjusting the hours minutes or seconds the active area is highlighted with a frame ...

Page 48: ...camera interface is associated with indoor station click on this button to activate Visual doorbell function When pressing the doorbell the image from the camera connected to camera interface will display on the Indoor station 5 When the camera is set as visual doorbell this icon will display to show the status Only one camera can be set visual doorbell 1 SYSTEM SETTING CAMERALIST Enable the Camre...

Page 49: ...ng functions No Functions 1 Language list field Available languages are listed 2 Scroll To display the hidden languages tick the scroll boxes 3 OK Click on this button to activate the settings 4 Back Click on this button to return to the start page without saving the settings 4 3 1 2 ...

Page 50: ...e checkbox to activate or deactivate the door status check If activating this function the outdoor station with a sensor installed will send alarm signal to indoor station when the door is open over 120s 3 Key illumination Tick the checkbox to activate or deactivate the key illumination If activating the function the key will be illuminated during operation Otherwise the key illumination will be o...

Page 51: ...ABB Welcome 51 Click on this button to activate the settings 6 Back Click on this button to return to the start page without saving the settings ...

Page 52: ...from your electrical installer and copy it into an SD card 2 Insert the SD card into the card slot on your indoor station 3 Select firmware update 4 Execute the firmware updated by selecting updating 5 Confirm the pop up dialog box with yes Pos 67 Di nA4 A nleitu ngen Onlin e Ueb ersc hrift en 2 Reini gung 1 9 m od_ 131 0733 980 533 _15 docx 10 785 3 2 1 ...

Page 53: ... Never use such objects for entries on the touch screen monitor Use your finger or a plastic stylus The screen surface can be damaged by cleaning fluids or abrasive agents Clean the surfaces using a soft cloth and commercially available glass cleaner Never use abrasive cleaning agents Pos 69 B usch J aeg er Neus truk tur M odul Strukt ur O nline Doku me ntatio n Steu er mod ule Onlin e Dok ume nta...

Page 54: ... A nleitu ngen Onlin e In halt KNX Do orEnt ry Bedie nun g M aste r Slave Sc halte r setz en 832 20 AP xxx 1 9 m od_1 310 723 320 966 _15 docx 10 783 3 No Functions 1 Station Select switch to set the address of default outdoor station 2 X10 X1 Select switches to set the address 0 99 of the indoor station Setting hundreds see Chapter 4 2 12 15 setup 3 Master slave function Only one indoor station i...

Page 55: ...2 Connection for the system controller When using several indoor stations connection for the internal bus Pos 75 B usch J aeg er Neus truk tur M odul Strukt ur O nline Doku me ntatio n Steu er mod ule Onlin e Dok ume ntati on Für alle Dok ume nte S eiten umb ruch 9 m od_ 126 8898 668 093 _0 docx 521 49 1 ...

Page 56: ...15 docx 1 037 05 1 Designation Value Display resolution 800 x 480 Display size 7 Operating temperature 10 C 55 C Storage temperature 40 C 70 C Protection IP 30 Single wire clamps 2 x 0 28 mm 2 x 0 75 mm Fine wire clamps 2 x 0 28 mm 2 x 0 75 mm Bus voltage 20 30 V Size 155 mm x 218 mm x 29 mm Pos 78 B usch J aeg er Neus truk tur M odul Strukt ur O nline Doku me ntatio n Steu er mod ule Onlin e Dok ...

Page 57: ...upply system to be performed only by specialist staff Pos 81 B usch J aeg er Neus truk tur M odul Strukt ur O nline Doku me ntatio n Siche rheit Fü r alle D oku ment e War nhinweis e Siche rheit Fachk enn tnisse 18 mo d_1 302 774 384 017_ 15 docx 10 356 4 2 1 6 1 Requirements for the electrician Warning Electric voltage Install the device only if you have the necessary electrical engineering knowl...

Page 58: ...system controller directly next to the bell transformer and other power supplies to avoid interference Do not install the wires of the system bus together with 100 240 V wires Do not use common cables for the connecting wires of the door openers and wires of the system bus Avoid bridges between different cable types Use only two wires for the system bus in a four core or multi core cable When loop...

Page 59: ... DinA4 Anleit ung en O nline I nhal t KNX DoorE ntry 832 20 AP xxx Mo nta ge Mo dule Mon tag e Mon tage dos e 83 220 AP xxx 19 mod _132 325 040 684 8_1 5 doc x 1 110 98 1 Dismantling Open the housing of the panel by pulling the clamp at the bottom of the device Mounted on the wall or flush mounted box Affix the bottom of the device directly on a level wall surface or on a flush mounted socket acco...

Page 60: ...tion on the rotary switches Set the master slave function and the terminal resistor on the switches at the rear of the top part of the housing See Chapter 4 4 1 Terminal Resistor Latch the device Latch the upper part of the device onto its bottom part Place the upper side of the device on the lock in lugs and then press the bottom side onto the bottom part of the device until it is caught by the c...

Page 61: ... of the device on the lock in lugs and then press the bottom side onto the bottom part of the device until the it is caught by the clamp The installation of the indoor station is now complete Pos 94 B usch J aeg er Neus truk tur M odul Strukt ur O nline Doku me ntatio n Steu er mod ule Onlin e Dok ume ntati on Für alle Dok ume nte S eiten umb ruch 9 m od_ 126 8898 668 093 _0 docx 521 49 1 ...

Page 62: ... rke Ba ckcove r We reserve the right to at any time make technical changes or changes in the content of this document without prior notice The detailed specifications agreed to at the time of ordering applies to all orders ABB accepts no responsibility for possible errors or incompleteness in this document We reserve all rights to this document and the topics and illustrations contained therein T...

Reviews: